伽马模式选择怎么选
上期给大家说过,千万级大号的美食色彩明度都控制在二十五到七十五之间,要达到这个明度区间范围就要用到 pp 值,到底哪个 pp 值能达到二十五到七十五之间的亮度范围呢? 大家好,我是小黑,千万级美食号的索尼 pp 值到底选择哪一个?记得点赞关注下个下来。首先影响 pp 值最大的就是伽马,从索尼官方 pp 值可以看到,各种伽马设置我们直出的时候要把明度压缩到更小的区间范围,也就是 hgl 和 s logo 会把明洞压缩到更小的区域,这样就会保留了更多的细节,那么 slogo 会更加的灰。对于普通人来说,调色更加复杂,但效果会更好。 h g l 会有色彩,更方便后期调色。那么 h g l 就是 p p 十,那么直接用 p p 十直出就能达到想要的色彩吗?当然不是,我们还需要后期调色,那么 p p 十该如何后期调色呢?我们下期再分析。

粉丝3.9万获赞22.2万
相关视频
 01:08查看AI文稿AI文稿
别揉了,你再揉就要瞎了。这个游戏效果画面太刺激了,我已经练太久了,眼睛好疼啊。一看就知道你的显示器刚 码值没有调好。伽马射线我知道,但是伽马值是啥?大多数人在玩游戏的时候觉得显示器亮度和 颜色刺眼,其实都是因为大马值没有设置好。大马值指的是图像处理上,输入值和显示器输出时,亮度和色彩表现之间的关系。当你调整显示器 伽马池的时候,整体画面的亮度和色彩表现也会随之发生变化。你可以打开控制面板,选择颜色管理,选择高级,然后选择校准显示器,点击下一步就可以调节后面的伽马池。左边有一个状态条,拉到 最高最亮,拉下来就是最暗,你可以根据自己的喜好和眼睛的舒适程度进行调节就可以啦。哇,宝宝你好厉害啊,算了,你连显示器干码值都不会调,还说要成为电竞大神,分手吧!
 00:55查看AI文稿AI文稿
很多人都不知道索尼的七零九百分之八百是干嘛的,打开说明是以乐格拍摄时用于验证干嘛曲线的,那是不是在开拍前设置成七零九八百呢?在菜单里面的工具箱找到显示选项,然后 后打开该码显示辅助,打开辅助类型,打开就可以看到这四种类型的转换,其实你只需要选自动就可以了。也就是说你拍摄的时候如果选择 logo 拍摄,打开这个辅助既可以让你用七零九彩色的画面来监看。拍完了素材呢?又是 slog, 灰色的 索尼 s 三和 f x 三都有 p v 十一,这里用 c 零二可以模拟 c d t 黑色等级减十,伽马 c 一二,黑伽马范围中等级减七,七点改为手动 点改成百分百色彩模式 style 色彩相位减一,色彩浓度红加二,绿加一,蓝减一,品红加一,然后细节等级减七。这个设置来源于这位大神,向大神致敬,我是晴天,拜拜。
9401晴天调色 00:32查看AI文稿AI文稿
我的相机 pp 一直设置,这是我用索尼七 m 三在于仔细拍摄的视频素材,想要视频清晰,画面通透,就跟着我这样操作。首先打开相机图片配置文件,打开 pp 吧,黑色等级负二,加码选择 slot 三黑加码 范围选择快等级加二,洗掉模式自动色彩模式 s gm 三三饱和度三色彩浓度二减三,七减二, c 加二, n 减二, y 减二,跟着操作,瞧不出就把电脑砸了吧。
9693艾睿 07:08
07:08 03:26查看AI文稿AI文稿
如果你平时经常使用索尼的微单相机,像 a 七 m 四啊或者 a 七七录制短视频 vlog, 那么这个视频一定要看完。我会教你使用索尼的 p p 值这个功能, 学会过后,你的视频拍摄就会更加高级。点击菜单按钮,找到图片配置文件,从上往下我们可以切换 p p 一到 p p 十完成拍摄,其中 p p 零其实就是关闭了 p p 值这个选项,它跟我们肉眼看到的效果是一样的。 pp 一,画面色彩直出是正常的,颜色对比度也比较强烈,比较适用于直出拍摄,无需后期,但是画面的细节会比较少,后期调色价值不大。 p p 二,画面色彩比较浓郁,亮布、暗处的细节有所提升,但同样它的画面对比度也比较高,后期调色空间比较小。 p p 三,直观画面饱和度是比 p p 一、 e p p 二要低的,高光、暗部的细节都有所提升,色彩也是属于正常的,后期不需要色彩还原。 p p 四,植树画面色彩比较鲜艳,明暗对比跟 p p 三类似,但是不适合拍摄大光比的场景。 p p 五, 画面直出的对比度比较低,画面开始变灰,细节量大幅度提升,效果的话是模拟电影质感,但色彩依然是保留正常的,我们可以后期适当微调后就直接导出视频。 pp 六相比 pp 五画面的话, pp 六的高光细节会更多, 适合大多数场景拍摄,后期微调对比度,直接输出视频即可。那到此为止,前面的 p p 零到 p p 六都是不需要后期调色的,你直接直就拍出来,它的色彩就是正常的,但往后的 p p 七八九十就是需要后期还原色彩才能够使用了。 p p 七使用 用了 slog two 曲线,画面对比度很低,画面开始发灰了,后期必须要电脑还原色彩,然后调色才能够正常展示。并且开启 pp 七后,感光度的最低值会被限制,对光线要求比较高,不建议新手直接使用这个选项。 pp 八你会看到画面非常的灰, 后期需要还原色彩,调色过后才能够使用。这一个选项比较适合倒光笔或者要保留更多细节的场景使用。 pp 九同样是使用了 slog 曲线,画面对比 pp 七和八要更灰,那意味着画面的动态范围会更大, 前期录制的话最好提高一点,七到两档曝光拍摄感光度也有一定的起跳值,色彩还原必须要后期才能够完成。 p 十是默认使用 h l g 曲线的,画面的动态范围呢,是位于 s l 曲线和 pp 关闭之间的,后期直接套用 log 还原色彩即可,建议新手可以使用部分相机。有的 pp 十一是不需要后期还原色彩的,动态范围也比较大,画面对比度比较低,可以简单调色后指出,比较适合拍摄人像视频。 其实如果你仔细的去研究每一个 p p 值的选项区别,你会发现他们的区别是在于选择的干码值,干码曲线不一样, 那这个钢板曲线大概可以分为四类,我给大家做一个表格。第一类是不需要后期调色的,比较适合新手使用,比如说像 movie still 曲线。第二类是模拟电影感的画面,可以直接调色导出视频,比如说心里 one 到心里四曲线。第三类是灰篇曲线,后期必须要还原色彩, 适合拍摄大光笔环境,比如说 slog two, slog 三曲线。第四类录制的是 hdr 视频,一般就是 pp 十,它能够记录更多的明暗细节,后期套上蜡就可以还原色彩。
6417宋大大摄影 00:25查看AI文稿AI文稿
效果图表现了不佳是因为在场景中使用了错误的加码设置。给大家分享一款可以一键修改场景加码的插件,显示加码控制场景的显示亮度,输入加码控制外部文理图的输入加码值,如果使用了错误的加码值,会导致文理图变量输出加码 控制图像渲染完成后保存了下码,一般设置为二点二。可以看到我们的效果图就非常 nice 了。
545靠画效果图年薪百万 00:23查看AI文稿AI文稿
各位同学大家好,今天我们来讲解伽马设置,首先我们打开我们的材质编辑器,发现我们的材质球是一个暗色的,然后我们在自定义首选项中找到伽马, 然后起用干麻椒这样点勾,确定这样的话就变成一个灰色的材质球了。好,点赞加关注,三滴不迷路。
130单纯的小白纸 02:28查看AI文稿AI文稿
保存后的效果图要比炫出来的量很多,那这是怎么回事呢?左边这个是保存后的效果,那右侧是刚刚渲染好的一个结果,出现这种情况,一般情况下都是蛤蟆的问题,那么这个蛤蟆应该怎么设置?那么接下来大家看一下啊, 在渲染窗口当中啊,找到窗口菜单在这里呢,有一个显示颜色空间,那一般默认的话就是显示 srgb 空间,也就是说我们炫耀好之后呢,就这样的一个亮度, 但这样的话,保存之后他也是比较亮的啊。那么怎样保存成?我们刚刚啊就是关闭 srgb 啊,这种空间选择无的时候,这种效果呢?方法有两种啊,一种就是通过文件的自定义菜单里的, 然后我们在熟选箱里边把噶码啊,把这噶码这里把它勾掉就可以了啊,勾掉之后保存的那个结果就是我们现在看到的这个效果,那像这个啊,他已经勾选了,勾选之后,如果我们再去保存的话,就是我们刚刚看到的这种效果, 所以这就是勾和不勾的一个区别啊,如果勾了的话,那这个图保存后默认的噶码值就是二点二就比较亮,那如果勾掉之后,就相当于是关闭了噶码矫正,那么他保存之后呢,就是这种对比度稍微强一点的效果, 所以这是一种方法。那还有一种啊,比如说我们保持勾选伽马的这个结果确定,然后在保存的时候啊,就保存这个图像的时候来举例啊啊,还是保存到这里,可是我们选择这个依据,我先免称单杆,然后点击保存 啊,如果这样去保存的话,那道理很简单啊,那保存之后肯定就是这种效果啊,就是比较亮的这种效果。那在这里大家看啊,这里有一个自动推荐 啊,保存的时候如果自动推荐的话,就是自动推荐的嘎嘛。矫正,那如果我们想保存成刚刚渲染好的那种啊,稍微偏暗一点的效果的话,那就不选下面的覆盖,然后这个啊可以改成多少呢?保持默认一点零也行啊,或者说一点五,一点二都可以啊,如果是保持一点零的结果啊,这个时候保存 确定,那么在这个文件夹当中出现的这个啊啊文件那就是这样的一个效果啊,所以这个道理很简单啊,当我们去保存图像的时候啊,如果是默认开启嘎玛的话,那么保存的结果就是比较亮的一个结果,如果是关闭这种嘎玛的话,那么结果就是偏爱一点。
788壹品室内设计培训 01:12查看AI文稿AI文稿
使用索尼的 hm 四录视频,一定给我把 pp 值打开了,但是呢,新手不会用 pp, 一到 pp 十要怎么选择? 那么这个视频讲到的 pp 值里面的干码曲线才是关键,设置对了干码曲线,你的视频才能够更加高级。首先要知道 pp 值就是我们相机里面的这一个图像配置文件,每一个选项相机出场的时候都设置好了对应的色彩参数。里面的干码这个曲线大概可以分为四类, 第一类适合新手指出使用,比如说像 movie still, 后期不需要还原,所拍即所得。然后第二类的话是比较常用的,从 cd one 到 cd 四、 itu 七零九 这几个选项,拍摄的画面噪点比较少,后期方便并且不容易出现画面的色彩断层,你直接轻微调色就可以直接导出使用,我们一般把它称之为电影色彩模式。第三类适合用来拍摄大 大光笔的环境,比如说像 x ro two, x ro 三,动态范围比较大,并且注意了这一个选项对后期的调色要求比较大。第四类的话也可以直出或者半直出, 比如说像我们的 h l g h l g 一二三曲线,他拍的画面明亮,细节会更多,后期只需要简单的套用辣就可以还原色彩。
3094A7M4摄影教学 01:12查看AI文稿AI文稿
索尼复杂的 pp 设置经常让很多新手摸不着头脑,什么伽马、西点黑等级弄得跟天书一样,今天刷哥就把这个 pp 设置给你翻译成人话,看看他都说了些什么。这次我们先来说一说非常重要的伽马, 根据百度百科,伽马就是。当然了,这些你可以先不用理解,也可以放到后面的去理解。你只要记住,伽马影响的就是对比度和宽容度, 发生度越高,对比度就越低。通常情况下,我们为了获得更好的后期空间,会选择一个较高的发生度,这也就是为什么趁机越贵,拍摄出来的素材越灰。 当然了,这个和 sdr 显示标准有关,这里就先不展开说了。关于这个宽容度,也就是动态范围,我会放在后面的视频给大家讲解,也算是给自己挖了一个坑。下面这张图是不同扎马的动态范围表现,这里要说一下这个 slog 三和 slog 二,虽然宽容 风度很高,但是我并不推荐新手去使用它。索尼爸爸或多或少都对微单性能进行一定限制,在你选择 slog 二或者 slog 三拍摄时,那个暗部皂点都会变得尤其严重, 对于灯光和曝光的要求也就相对苛刻。所以新手朋友我还是劝你们乖乖使用 c 呢或者 hlg 进行拍摄。下一集我们再来讲讲色彩模式。
4059影视民工宅小刷&青岛影视器材租赁 01:47查看AI文稿AI文稿
今天我来给大家教一下怎么去设置索尼 s log 三。首先你打开这个颜色跟色调,然后点击 p p 九,然后点开会发现这里有个 s log 三,点击这个蛤蟆显示辅助 哦。点击打开,点击 slog 三啊。索尼的 p p 十一是那个 s c 尼烫。这个模式就拍一些日常类的, 不用怎么调色比较方便。手机还有一个很简单的一个功能呢,就是你点这个屏幕,他会有个定点跟踪,然后拍摄慢动作的话 点击 s q 设置这里记录针是二十五针, 然后把帧速率点两百帧也可以长的话会打开这个这个模式。这个模式的话他可以在后期的时候方便剪辑。如果在多台机拍摄的时候,我们可以文件设置, 可以标题设置 c, 如果是下一个积月可以设置成 d。 还有呢,我们可以还可以打开那个斑马吗? 还有呢,我们可以设置一个自定义按键,这个自定义按键就很方便,我平常会把 c 三键设置成录制键,点开这个纵横标记可以可以设置二点三五比一,还有其他画幅, 怕这个有时候没有拍到。 mac 没有开机的情况下,我们可以点击这个录制时强调显示。
251留下系列 01:00查看AI文稿AI文稿
只需要一个设置,让你在拍 slog 三等灰片视野能实时监看还原后的色彩。好的,我们来到闷六菜单,来到第七个选项,然后我们选择第七个显示选项,然后来到伽玛显示辅助 开好,我们来看一下开启这个后和前面灰片时候的一个色彩的一个对比,那很明显这个呢就是把它还原为七零九后的一个颜色的显示。再回到菜单, 然后我们可以看到下面他可以设置钢板显示辅助类型,在这里你可以选择自动,或者说我们拍的是 s log 三,那我们可以选择 s log 三转为七零九。在下面呢,你还可以设置剩余拍摄显示,比如说 仅在拍摄的时候显示,或者说是一直显示,然后我们来到自动检测,这个你可以选择每两秒,每五秒,每十秒检测一次,我们把它设置为每五秒检测一次, 他意思就是每隔五秒会自动的检测显示为你还原后的一个七零九的一个色彩,那这个的话我觉得是在拍摄的时候进行转场的时候可能会比较适用。
1005机盲海带 15:02查看AI文稿AI文稿
there is a lot of talk and quite a few videos out there comparing the different picture profiles of the sony cameras, but it's all a bit too subjective and opinion oriented for my taste, so today we're gonna take a look at the scopes and see what's really going on today, we're gonna look at three things the first is the noise level and dynamic range of the popular picture profiles for sony for video using the a seven three, i'm gonna say picture profiles for that first part we're gonna focus on the gamma selection second, i'll give you my pick for the most well rounded picture profile and third i'll dispel a couple minutes about picture profiles in general along the way, so let's stop monkeying around and get right into the samples, so for each one of these, we're gonna have the gamma that was used here, which in this case is movie or like i said you could set picture profile to off as well as the iso and the f stop and then we just have some increasing power of lights and then over here we're gonna have the scopes now, we're using the luma waveform right now, which will show us a few different things each one of the lights is obviously going to show a step here and then this example would be what happens when something is clip, so we can see there's four different lights that are all above, one hundred or above two fifty five and they're just showing us flat clip lines and over here we can see that they're just bright white lights and they're pretty much indistinguishable and then as it comes down to the bottom here this bar is gonna be our black level that's basically the rest of the black and the scene and the higher that goes the higher, the black level will be and also the noise may encroach upon it or overtake it also this will count as a stop itself but if say this bottom stop here as you can see the stop on the left you can't you can't make it out it's buried within the black level and this stop is pretty much being eliminated by the black level as well this is what you would look forward to decide if this gamma is going to give you enough information to work with for what you're trying to do as well as the noise values so the next one we have here is sinny two now, sinny two is one that i personally like but something that i should let you know is that all of these first ones were done at iso eight hundred and that's the reason primarily why both movie and ciney two have some clipping ciney two has less clipping there's only two of the stops that are pushed all the way up over a hundred but the reason why we used iso eight hundred is because s log and s log two s log three they require a minimum of iso eight hundred so in order to evaluate these things evenly we're gonna do iso eight hundred first, but then we will utilize the lower isos that we can for the picture profiles that allow it, but let's start off with just the iso eight hundred ones so city we have a better a better shape here less contrast it's not being pushed to the extreme and you know we get decent lower stops decent upper stops, but again we could set a better exposure because we're not required to do iso eight hundred now let's go to cinny four just to compare similar idea the top two stops are being clipped and we get kind of a similar roll off but there's two differences here cindy four has more contrast which again we can see because the middle area is being pressed apart further and the black level is lower as well, if we jump back to ciney two we can see the black level is higher but there's a disadvantage here which is that on ciney four our lower stops are having difficulty you know erupting through that black level and if we look at the image itself we can see this the lower areas here in the shadows there's fewer of them that are pronounced compared to the ciney two which we can clearly make out some more of the shadow areas better so those are the trade offs there between sinny two and sinny four both are okay i think that sinny two gives you more to work with and it's much easier to just push down those levels afterwards and you'll actually end up with a cleaner result but we'll get into that when we have the better iso settings all right let's jump ahead to this one which is s log two now we can see with s log two that we're nowhere near clipping anymore using the exact same exposure settings of iso eight hundred and f two point eight we're only reaching eighty ire and it's rolling off rather nicely and let's just compare that real quick to s log three over here s log three is giving us more shadow information we're getting higher bars the higher the bar that you're seeing here is basically going to suggest that there's more information there so as you can see these stops here are reaching higher then if we go back to s log two they're lower so we're going to get more shadow information out of s log three, but the highlight bars aren't reaching quite as high as s log two is so we'll get more highlight information out of s log two, but there's some trade offs here if we just kind of look at the noise in the scene here, and then we jump over to s log three we can see this clearly a lot more noise in the scene and when we zoom out the black level like we said is different and this is going to have an impact where yeah we can see more shadow tones, but and fewer in slog too, but the image is dirtier now the common recommendation for shooting slog would be to shoot it more exposed and then bring it down afterwards if you want or to clean up your shadows because if we bring our shadows and our black levels down that's going to hide a lot of that noise, but it's still not going to fix it perfectly so now let's jump over to this one which is still ice log three and it's still isoway hundred, but it's f one point four so it's two stops brighter and that allows us to get our highlights to come almost all the way up to one hundred and this is sort of i would say i don't want to call it a myth, but something that's commonly done is the idea that you can just over expose your s log and then you just push it down and it's fine it depends on what you're shooting let's push your shadows down here and are blacks down so now our noise levels are a little bit better, but now we're getting to the point where we're actually losing almost a full stop of the shadows now the advantage of vesselog is that you're probably going to gain that stop up on the higher end and if we clean it up a little bit more and push it even further you know we can get a pretty nice looking image but we've almost completely lost that last stop now and this is this is just what happens generally if you want to get rid of the noise from an s log image you're gonna have to probably crush your blacks out, which is fine again if you're shooting a nice bright, outdoor scene or something with a lot of light but it doesn't work the greatest in a dark scene because it can kind of get muddy and crushed and hard to really make the details so okay moving right along let's jump over to hlg now this is hlg three and this is probably my favorite gamma for the sonies and i'll explain why so first off you'll notice right away that we get all the way up to the one hundred two fifty five while keeping the iso eight, hundred f two point eight setting and then also we can come all the way down here with a nice smooth shape and our bottom stops are doing pretty well to keep above the black level and hlg also has the advantage unlike s log where we can have a lower iso just like we come with the sinnie gamus and so let's jump into the lower iso situation now and talk about reducing some of the noise so this is iso eight hundred f two point eight if we jump over here this is hlg three again, but iso two hundred at f one point four so it's the same exposure but we've shifted those stops onto the f stop instead of on the iso and this is usually good for blackened areas but something interesting about the hlg profile is that it doesn't have as big of an impact on hlg as it does on other gammas the two hundred one obviously this is iso two hundred so this should have lower noise and i'll just give this a bit of a play for you so look at the noise over here and now let's do that same thing, but on the ice o eight hundred one you might find i'm gonna switch back and forth now that it's not that big of a difference and this is one thing that's great about hlg is that even if you have to kind of get there with iso despite what i was just saying about s log is it doesn't punish you as much as other games do by getting there with iso now a quick thing let's just compare to the other hlgs, hlg, three iso two hundred f one point four let's notice the shape over here now let's jump over to this one which is hlg too you'll notice that there's very little difference at all all ics of the very top stop is just being pushed down a little bit so let's jump back see it's a little bit higher, a little bit lower and then the other difference would be the black levels and the noise let's take a look at hlg three look at the bottom where the black level is and then hlg two so it just comes up a little bit so i would just say that hlg two is just slightly inferior it has slightly worse blacks and noise and slightly worse whites so there's not really any reason to use that one in my opinion, i would just stick with h l g three based on what i'm seeing here on the waveform, let's go to h l g one now that's just even worse if we compare that even to the second one this is two this is one the black levels go up even higher and we're clipping two and a half to three stops on the upper end here and then lastly hlg straight no number it's very very very similar to hlg three let's jump back to hlg three and then just hlg so the shape is fundamentally the exact same on the two of them and we're getting very similar values, but the black level is higher on the straight hlg one now this could indicate to you that maybe you would be able to push that down a little bit and get a better noise of reduction, but there is one thing to consider which is if we look at how much our lower stops are coming up out of the black level and we compare that hlg three we are getting a little bit more separation on our lower stops than we are on hlg, so even if we did have more room to bring that down we're also gonna be bringing down our lower stops as well, i don't think that one or the other here is gonna really make it a break it i think that hlg three maybe is slightly slightly more versatile, but they're very very close but i wouldn't use hlg one or two i don't really see much reason for that now let's jump over here i've got some better exposed cinny ones this is cinny four i was able to use iso two hundred the lowest you can go on cinny four is iso two hundred and with cinny two you can go down to iso one hundred and then like i said hill g's like one twenty five or one sixty so if we look at this one it's definitely not clipping like it was earlier where was our previous cinny four was this one right yeah, so see we have this pushed all the way up, so we have an advantage of not having that happen, but we still have the issue where there's definitely more contrast and a lot of our lower tones are you know being faded into oblivion let's compare that to a better exposed cinny two same idea is what we saw earlier where there's more more shadows we can see them here versus the cinny four i actually kind of like the way that the highlights are being handled here with cinny two over the cinny four and the lowered contrast again i feel like it's going to give you more to work with afterwards in cinny forward you could argue that cindy for would be more deliverable right out of the camera, but it's not that hard to add a little bit of contrast and change your black and white levels so i think that sinee two is gonna give you more to work with and you can have a full stop lower iso which will probably make a difference so if we were to just drop down the blacks a little bit on sinee two and the shadows a little bit and then compare that to sinee four we still have more more shadows we still have more different stops in the darker area now you are going to get better dynamic range on the s log profiles if we compare this cinny two which is pushed down to this s log three which is pushed down we can see that we're getting better dynamic range out of the s log three, but the s log is harder to work with and there is still something to be said about the fact that the s log might band and cause blotching artifacts sooner than the cinny wood just because of the eight bit limitations of the smaller sony mereless cameras where with cinny, i don't think that you're really gonna find that happening as easily and again you don't even have to push it as hard too great it because it's less extreme than s log to begin with throwing this all together though i think i would still go with the hlg, which as you can see here i didn't push this one down at all so let's just do a quick comparison between the hlg three the cinny two push down on the s log three push down so this is hlg three this is slog three and this is cinny two now we can definitely see that we're getting better at animic range out of the hlg three and slog three but the hlg three compared which by the way i did nothing to it compared to the s log three you know we're getting most of what's already been done to the s log three with the hlg three right out of the camera and we can achieve lower iso, so we don't have to push down as far and if we look closer into our darker areas here let's zoom in here and compare this to the s log log three we can definitely see that we're retaining more with the hlg three than we are with the s log three and again with that whole eight bit banding blotchy artifacts thing the hlg will be less susceptible than the s log to that because we don't have to push it as far and so to answer my second point where i said i would tell you what i think is the most well rounded picture profile gamma i would use hlg three and as a runner up i would go with cinny two for hlz iii i would use the bt twenty twenty color and not the wreck seven or nine the bt twenty twenty just has a better rendition and allows for more versatility and more applications in the future and it's pretty easy to conform down to wreck seven or nine in post okay now point three i said i would talk about a couple miss one of the first ones that i see a lot is that it depends which picture profile you actually put your settings in so some people say like if you're gonna use you know sinny two make sure you put it on picture profile six because it that stuff doesn't matter now it is possible that on your camera there are different settings for the different picture profiles that are deeper in like in some of the details and advanced stuff where if you just change the gamma that it's gonna look different than just changing the gamma on another picture profile, but if you make the settings the same exactly the same on any picture profile it will look the same as any other picture profile with the exact same settings now, i also went through and looked at all the different color modes and try to make some evaluations on that to pass on to you, but i'm not going to bother with this because color is so subjective and i'm not going to tell you what might look better to you or not do whatever you like the best there's a lot of different color options in there i can say which ones i think are you know the most versatile like i told you the bt twenty twenty i think on hlg three is the right way to go and for the cinny ones i actually think that cinema color might be it's a little bit flat and might give you a little bit more to work with some people like pro color and that kind of thing, but i think if you want a better starting point a more open starting point i think cinema would be the way to go, but if you want some specific look to come right out of the camera that's gonna be up to you and this is the perfect point to talk about my final myth, which is that adjusting the knee to have a point of eighty percent and a higher slope will really improve your image and my answer to that is not really there are definitely some looks out there that people try and sell or you know give you downloads for lots and that kind of thing where there are specific settings that would probably work best with that let, but i think just so sort of a general statement you're more likely to worsen the image than improve it by adjusting those things these aren't magical options that are gonna increase your dynamic range or wide in your color space and i think in many cases they're advised by people that i don't think fully understand the downsides for example crowding a lot of information into that adiri area if you have lighter skin like me can make for really murky highlights and blotchy skin tones so my advice is to leave everything on auto or zero or whatever neutral setting there is and stick to the more important things like white balance and nailing exposure because those actually will have real serious advantages on your final image and your dynamic range but if you truly want to get good at choosing profiles and grating your footage you're just gonna have to practice and base it off of what looks good to you there's no quick fix and i think starting with the neutral hlg three with bt twenty twenty color or cinny two with cinema color is a good safe versatile launch point but if you drew different conclusions from these tests based on your own needs then that's okay too there aren't any miracle settings out there that you can just put into your camera and not have to think anymore it's always gonna require a thought full attention to detail but hey, that's what makes it your video and not someone else's, but that's gonna be it for me i hope you found this video helpful or at least entertained。
71木木兵 01:05查看AI文稿AI文稿
图像采样这一块,我们把这个类型呢调成这种块的形式,打开这个东西,打开专家模式啊,最小注册率呢,你把它调的越大呢,这个噪点呢就越少。图像采样器这块呢,默认是一二十四零点零一这块呢简单的说一下,就是最大细分 这个值,越大越清楚,越小越模糊。那由于我们一开始做的时候,我们不可能一下子就 渲染很干净,对吧?不可能一下子就渲染的高清的啊,肯定是不合适的。所以说我们在做的时候呢,我们先测试,他就是说做一个小图啊,哎,看他门参数要给低一点,我就给到一四, 然后这块颜色映射啊,我们点击打开,颜色映射呢,我们在这块呢啊,我们需要勾选这两, 这样啊,防止他出现一些这个呃奇怪的一些问题,比如说啊,有噪点啊,有一些声色压边啊等等模式呢,我们选择第一种颜色映射和伽马小白同学把这张图呢给他保存一下。
1211云学贝(3dmax插件与教程)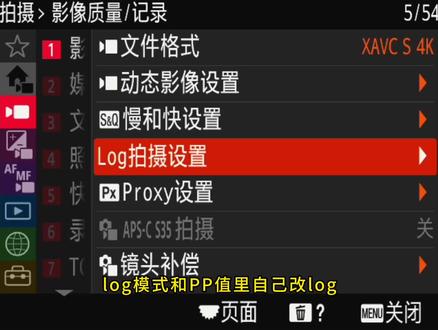 01:03查看AI文稿AI文稿
log 模式和 p p 值里自己改 log 有什么区别呢? a 七 m 四这代机型还保留着 p p 八九是 s log 三 f 叉三 z v 一这代就取消了。 你可能有个误区啊,以为只要把 pp 里的钢码改成 slog 三就行了,但色彩空间是由两个参数决定的,除了钢码你还得改色彩模式 s gamemads three 或带 cinder 的,这样才标准,否则后期用还原 at 是有问题的。这也是我主张你不懂的话别乱改 pp 参数的原因之一, 你以为改对了,实际是错的。那和 log 模式有什么区别呢?最大的区别是只有 log 模式下能使用机内 log 功能,配合 slog 三的风格, lot 可以指出调色或者直播的时候直接套 log 调色输出,同时能选择 e i 模式。这是原来电影机下方的曝光 指数,但对日常拍摄来说,一没 n d 滤镜,二没控光条件。我不建议新手用这个灵活 iso 更实用。小黄车的视频拍摄课程适合新手学习,拍自媒体有问题我都会帮你解答的。
1821虚空光影


