axs购票APP如何设置中文

粉丝20.2万获赞282.2万
相关视频
 02:04查看AI文稿AI文稿
来首尔想去除了首尔之外的其他城市玩?韩国 ktx 列车乘坐攻略来啦!今天跟文鹤一起沉浸式体验首尔到釜山 ktx 往返买票乘车车内设施使用手把手教学! 第一步,买票搜索 kora i l 火车,直接找到 ktx 中文官方小程序,选择好你想要去的城市,出行日期、人数 就可以直接点击进入购票界面。请注意,购买的起始站点除了首尔站之外,还有清凉里站、龙山站,买票和出行之前要确认好哦!选择好车次之后,右下角可以选择座位,注意座位分正向和逆向,记得选择自己觉得舒适的位置和方向,选择好之后点击确定。第一次购买需要填写个人信息,填写好之后支付就可以完成购买啦。第二步, 前往车站本次以首尔站到釜山站为例,到达起点站内设有奥利维亚和各种吃喝店铺。进入站内,根据地标往前走,找到列车信息,显示屏有杭州英日四国语言切换,所以不用担心看不懂。 第三步,上车站台信息将会在开车前十五分钟显示在大屏上。开车时间,列车车号,终点站你的乘车站台站台进门后往左还是往右 时间,车号,终点站站台确认站台数字,不用检票也不用安检,直接前往列车站台,找到自己的车厢,上车就可以。上车后看座位号看不懂韩文没关系,写了 window 的 那个就是靠窗位置,只要你准确找到了自己的位置,一般是不会有工作人员来检票的, 接下来你就可以安心乘坐了。第四步,怎么使用车内设施?如果你的设备没电了,车内是配有充电插口的,充电口有 type c 和 u 盘接口,没有转换器也可以使用。 小桌板在前方座椅靠背上抽出就可以打开,座位调整方式比较特别,按住这个按钮,屁股往前挪就可以躺下啦。如果要去卫生间,到车厢镜头向右拧开把手,找到厕所马桶,冲水按钮不在这,而是用脚踩 水池的冲水按钮不在这,也不是感应,也是用脚踩,扭开门锁后,一只手拧门把手,一只手往里拉门才可以打开。 如果你购买的是特等座,还可以使用自助取水机。接下来就请注意下车时间,希望你能顺利抵达目的地,拥有一次愉快的出游体验。齐根卡吉我那一米哒,爱你呦!
8907闻鹤Wonha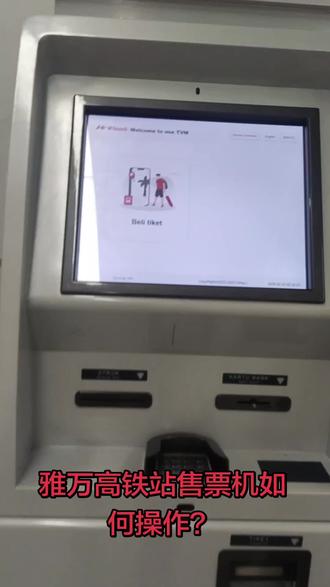 01:37查看AI文稿AI文稿
嗯,今天我们来看一下啊,这是印尼雅加达哈利姆高铁站的这个自助售票的,看怎么使用。 这是哈利姆发车站,这个是终点站,我要去的终点站。这是德格鲁尔,日期已经自动定了,确认一张票, 这是这个应该是商务座选择这个确认, 这个可以输,你自己有印尼手机号,输印尼号没有的话输朋友的。 这个是输油箱的, 油箱是确认 这身份证护照,选择护照。
 02:51查看AI文稿AI文稿
welcome to you one two three four 学四肢波又温柔 three two three one two three four one two three four welcome to you dj drop the beat i love you but just like you 啦啦啦啦啦 tfboys 没事都干不出你的超级 dj drop the beat the beat birthday to you 不然俺们家刚刚播会儿七万十二万。
169梁神爱单车 11:25查看AI文稿AI文稿
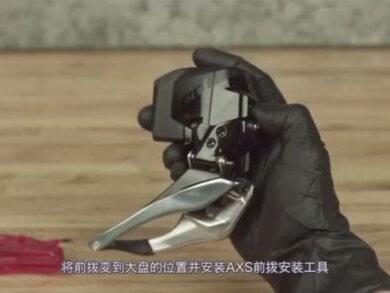
this video will guide you through the installation procedure for the sram eagle access transmission system for a full list of tools and supplies review the user manual at sram com service or find it linked in the video description below sram eagle access transmission installation is unlike any system before in which we prepare each component off the bike using details of your bike loosely hang the components in place then tighten the components in a specific sequence the installation is easier than ever but totally new so please complete the installation and setup in the order shown before we prepare any components consult access web at www sram com or use the sram axis app to determine the following preparations chain link size, set up key position and set up cog to install the eagle transmission cassette and dub cranks review the video linked in the upper right corner or consult the user manual at sram com service for more information position the clamp or right bridge in the right handlebar position install the pod controller with a pointed tip aligned with the open slot in the clamp loosen the clamp bolt if necessary loosely install the pod controller on the handlebar adjust the position to rider preference tighten the bolts install a charged sram battery into the derailleur press and hold the axis button on the rear derailleur until the green led blink slowly then release press and hold the axis button on the controller until the green led blinks quickly then release press and release the axis button on the derailleur to end the pairing session or wait 30 seconds for the session to time out the pairing process does not need to be repeated when batteries are removed or applied placed countdown on a new full length t type chain to the number of chain links determined by the calculator or app or use the t type chain sizing tool included with the chain printed manual using approved chain breaker tool to break the chain at the inner link use a small flathead screwdriver to remove the setup key from the derailleur adjust the setup key to the position call out for your bicycle install the setup key into the derailleur so the notch is aligned with the corresponding letter a or b failure to position the setup key correctly will result in an inaccurate chain gap pore shifting performance and may even damage your derailleur and or bicycle frame press the top button on the controller to shift the derailleur into the fully outboard position alternatively press and release the axis button on the derailleur to move the derailleur outboard one position at a time until it's fully outboard press the bottom button on the controller to shift the unmounted derailleur into the setup cog position 21 tooth or 24 tooth as determined in axis web or the axis app shift five times from full outboard position for the 21 tooth cog or shift six times for the 24 tooth cog alternatively press the axis button on the derailleur twice quickly to move the derailleur inboard one position at a time until it's in the setup cog position the universal derail your hanger must be removed from the frame before derail your installation turn the udh bolt clockwise to remove it from the hanger threats the udh bolt is left hand threaded to loosen the bolt turn clockwise remove the frame specific udh washer along with the udh bolt rotate the udh hanger backward to unseat the hanger from the pocket remove the udh from the frame for split pivot frames pay attention to not lose any washers between seat and chainstays remove the mount bolt and bushing frame insert from the derailleur clean the frame to remove any grease or debris install the bushing frame insert from the outside with the black side facing outwards into the hangerless interface for split pivot frames reinstall any washers between the seat and chain stays before proceed reading make sure the cage assembly is fully tightened under the derailleur body apply grease to the mount bolt threads and shaft hang the transmission derailleur with the full mount sliding over the hangerless interface and bushing frame insert install and tighten the mount bolt clockwise to snug loosen the mount bolt counterclockwise one full turn rotate the derailleur cage forward until the lock icon on the cage clears the setup key button press the button to lock the cage in the extended position the transmission is spring loaded and will return to the cage open position rapidly keep fingers clear of pinch points apply grease to the through axle threads before axle installation install the through axle and wheel a according to the manufacturer's instructions and tighten the snug loosen the through axle bolt counterclockwise one full turn stop verify the chain has been cut to the proper size the transmission derailleur is shifted into the setup cock and the derailleur setup key is in the position as determined in axis web or axis app and set up in the prepare the component section e bikes must be powered off before proceeding place the properly sized eagle t type chain on the setup cock 21 tooth or 24 tooth and route through the derailleur pulleys with the flat edge of the chain facing away from the cassat make sure to route the chain below the tab in the cage pull each end of the chain together and install the power lock press the power lock connector links together the arrow on the outer plate must point in the direction of chain travel before locking the power lock into place once locked the power lock cannot be reused if removed rotate the derailleur cage forward to release it from the fully extended position lock the cage mode button at the derailleur cage where the two key lines made the derailleur is spring loaded and will return rapidly keep fingers clear of pinch points check that the two halves of the power lock are properly aligned use chain link pliers to lock the power lock alternatively rotate the crank until the power lock is above the chain stay and confirm the two halves are still connected apply the rear brake and firmly push the crank arm down to lock the power lock you should hear and feel the power lock click into place check the power lock by hand to make sure it moves freely the power lock is designed for one time use only the power lock can only be removed with the chain link pliers and must not be reused install a new power lock each time the chain is installed reusing a power lock may result in a broken chain that could result in a crash before proceeding verify the completion of all steps in the prepare and hang the component sections that the chain is properly engaged on the setup cog and chain ring the cage is locked in the setup position and that the bicycle suspension is uncompressed at zero percent sag unless otherwise instructed pull back on the lower cage of the transmission derailleur to remove slack from the chain continue to pull back while you rotate the crank forwards two rotations and firm the chain stays on the setup cog for bicycles using the 24tooth setup cog or gear 6 make sure the chain is fully seated on the extinct cassette cog profile with two full crank rotations adjust the chain is needed tighten the mount bolt while continuing to pull back on the lower cage of the derailleur then release if there's still slack in the chain after tightening the mount bolt loosen the bolt and repeat the previous steps verified the nurled ring mark is aligned with the mark on the full mount of the derailleur if it's not aligned loosen the mount bolt rotate the nurled ring so that it is touching the nurled ring stop and repeat the previous steps tighten the rear axle to torque according to the frame or axle manufacturer's instructions release the cage from setup mode by rotating the cage forward and carefully letting it return to to the unlocked position this completes the system installation there are no adjustment screws in this system you must repeat the installation procedure if you change any of the following on your bicycle chain ring size geometry adjustment to chain stay length or position of a lower idler pulley failure to repeat the installation when changing chain ring size geometry or position of a lower idler pulley may result in poor shifting performance and may even damage your derailleur and or bicycle frame rotate the crank slowly and press the bottom button on the axis pod controller to shift the derailleur all the way in board continue to rotate the cranks and press the top button of the axis pod controller to shift the derailleur all the way outboard the pulleys may appear to be unalined they are intentionally offset to improve chain travel and direction to the top chain ring optimize derailleur, shift performance and eliminate unwanted rasping sounds by fine tuning the derailleur position with micro adjust, micro adjust affects position across all of the cocks there is no independent adjustment for each cock press and hold the controller access button while pressing a controller button the bottom button will adjust the derailleur ..2 millimeters inboard and improve shifting to an inboard cock the top button will adjust the derailleur point, two millimeters outboard and improve shifting to an outboard cog if you've customized shift buttons in the axis app micro adjustments will follow those settings the derailleur may not appear to move watch for the led to blink to confirm the derailleur executed the command use the suram axis app as an alt alternative method to perform micro adjust when the bicycle setup does not include or allow access to the shifter buttons if you haven't already download the sram access app available for free in the app stores use the app to create your account add your components and customize your sram access experience this concludes the installation procedure for the sram eagle access transmission system。
164新云鹏 01:49查看AI文稿AI文稿
原来动漫里的场景是真实存在的,从东京出发两小时就能得到这样这样这样和这样的景色,吃到这样这样和这样的美食。这里就是伊豆宫崎骏电影浪漫取景地。 but, 几日小白的你如何买票?其实超简单,这篇就手把手教你怎样不开口说一句话。买到伊豆五子号的车票。首先是找到这个写有新干线特级滋养的机器,日本大型的 g r 站都会有,不一定是东京站,磁带、新宿等大型车站都可以买到五子号车票。先选择语言中文公, 恭喜你已经按下离东京最近的浪漫按钮。选择购买车票以后点特快,这个时候就会出现乘车方向,一豆方向是阿塔米西莫达。选择从托 q 出发之后就是选择下车的车站了,这里我把一豆几个人汽车站的中文标出来,记得截图保存。本次我的目的地 is ko 给一豆高原。接下来是选择出发的日期和时, 接着就是选择乘车人数,因为五子号是全席指定需要对号入座的绿色圈圈表示还有座位可选座。哎,这里注意了,如果你想看海景,一定要选择 a 座。 如果你想指定车厢,就从座位表选择带有洗手间的车厢,一目了然,随便选择一个车厢哦,果然海景 view 就是 很有人气。 点确认请选择乘车券的区间,因为我目前位于磁带站,所以会有个从磁带出发的区间选择,选择从磁带出发,价格也不会变。其实 j r 三手线内任何一站出发价格都是一样的,是不是很贴心呢?支付方式可选择信用卡、西瓜卡和现金,这次我选择信用卡支付,还可以要收据。 最后,恭喜你克服重重困难,拿到治愈之旅的入场券。如果你不喜欢用机器,也可以在绿色窗口找人工买票。太平洋最温柔的海岸线、白冰神社转木奇的水仙花、晨起海岸露天温泉以及冬天的大势山都在等着你。详细游玩攻略,记得主页上车,我们下一条视频见!
285虎牙慧慧在东京 00:48查看AI文稿AI文稿
高贵的 axs 后波可以搭配 gx 飞轮吗?我的答案是完全可以,他这个兼容度是完全没问题的,重量可能会相差一百克左右,但是呢,我完全不建议这么搭配,我这么玩呢也是卑鄙无奈。理由有二,首先这么玩的话,要么是想体验一下电子变速, 要么就是想玩个钱花在刀刃上,但是这两者的共同点就是预算不足,其实变速系统对于山地车来说的话,升级的优先度极其靠后,花五千多块钱升级一套无限套件,大家的提升啊,远不及换一对碳轮来的提升高。 我跟你们说,可别瞧不起国碳,好的,国碳现在完全没有问题。有时间的话呢,我会单开一个视频来进行一个国碳的一个推荐啊。 ok, 那就这样,拜拜。
1495AZ与阿张的单车生活 02:56查看AI文稿AI文稿
嗨嗨,这是我第一次去首尔旅游的 vlog。 去首尔之前一定要提前先申报你的路径信息,落地之后去海关一路上都有中文指标,不需要担心找不着,但是这个海关真的要等很久。然后在机场就坐直达列车直达首尔站,车程大概四十分左右,地铁购票是可以用中, 现在好像用微信也可以支付了。想来地铁爬楼梯这件事情是真的累。让我住的这个地方呢,就在地铁口,很方便,他是自助 check in 的, 这种韩文也没有关系,给你们看一下工作地理位置上来说,他就在地铁口,一出来而且可以走路到明洞是挺好的,大小适中,就是我感觉厕所有点味道,然后隔音不大,行 我就出门补充电能量。开逛喽今天的话主要就是逛明洞的区域。第一家 music 属于基础款比较多,有点像优衣库的感觉。第二站,乐天,乐天免税的话就是你进乐天后的十到十一楼都是的, 不过我对比了一下,其实线上免税店的价格更优惠哦。那我们就选择在明洞吃这家辣炒章鱼,这个章鱼你可以自己拌饭吃, 知道吃完可以拌面吃,但我最喜欢的还是他包这个芝士品,因为甜甜辣辣的特别的香。然后就是去逛欧力威亚,因为产品很多,像我这种这人其实提前是选好想要买什么,看到导购员就会指着图片说 where 会节省很多时间。那还有一家店也蛮好逛的,它像帽子、饰品,包包 款式都很多,价格也还行。楼上还有些衣服啊文串这些东西都蛮有设计感的。我也是没有想到我竟然会跑到韩国去买泡泡玛特的猩猩人,因为国内是真的售空了。然后第一晚的行程就结束喽。 嗨嗨!第二天一早的话,我们选择在明洞的一家粥店喝粥,倒还不错,我点的是牛肉粥,然后就去买了一杯草莓奶昔。他这个自助是没办法用阿里配的前 还可以用现金购买,还特地从国内带了一个奶茶包,这样可以装进去。开启今天第一站,先去光华门,有很多换韩服的小姐姐们, 然后光华门门口是有一个表演的,然后可以排队拍照,这碗里头就是仅浮空,门票是二十,不过我就在门口到此一游,转战隔壁的民俗馆。主要是被这个什么一九八八铜管拍摄地给吸引了,正好可以拍拍照。本身也是一九八八的剧迷, 人不多,场地也不是很大,所以其实半小时到一个小时也能结束。下一站我们步行去附近的北村,韩屋村的话主要是想要感受一下韩国的这种建筑风格,因为这里本来就是一个居民区,所以他是有安静使者,我们一定要小声再小声,不要打扰到他们。 我们去附近一家面包咖啡馆,还蛮出名,叫欧尼尔,那边点了一些面包和咖啡喝。当当阿波最近学会的一个 ins 韩语拍摄。下一站我们到下午光线好的时候就去了明洞的漫画街,可以拍照。这条街其实不是很长,逛逛也很快的,一直晚上走,你还可以看到首尔塔, 然后就继续逛街。晚上我们选择的是明洞这家香港饭店,这家我推荐,因为它这个炸酱面真的很好吃。然后就是坐 b 一 小粉巴士去首尔塔楼,不看首尔的夜景,因为那天晚上太冷,我们也没有上那个塔上回去继续去奥利维亚买买买了。
508🍒一只囍囍 02:42425cz摇一摇
 03:46查看AI文稿AI文稿
不会说英语,坐火车逛老挝之万荣攻略来了, 从朗博拉邦一个小时就到了万荣这里我再说一下购票的事啊,老挝境内是要用 l c r t k 的, 这个 app 购买 注册是要落地到老挝境内,用老挝电话卡注册,然后购票就 ok 了,界面都是中文,所以没有问题。我们下了火车就坐的这个小巴到了万荣镇上,他是四万吉普一个人, 驻马司机都会主动出示微信让你加他,这样的话你回程的时候就可以联系他,让他去接你就 ok 了。我们是十五号晚上八点到了万荣,这个现在还是泼水节呢,巨热闹。 首先我还是讲一下住宿,住宿的话我们这次是踩雷了,然后在阿古达定了一间评分九点一的,结果一进去这房间太吓人了,脏的要命,而且还有蚂蚁。 后两天我换到了靠河边的这个酒店,它的价格是三百八十元,对标国内五星酒店,所以来玩的朋友一定要注意,你定酒店就沿着河边定河边的这些酒店就可以了,千万不要定到镇上,也不要定到就是很远的地方,因为你实在是玩啊吃啊,什么都不方便。 再说一下游玩攻略,我们是在镇上一个旅行社,叫老挝印象中国人开的店,逛了一日游项目包括竹筏漂流,轮胎,溶洞, 丛林飞跃,还有蟹湖包,中午一顿饭价格的话是一百八十元。我之前还在网上攻略,因为他这边的蟹湖分为什么一号二号三号四号,很多,这次玩了以后才知道,其实如果你不会游泳的话,你也不用去想那么多,蟹湖一日游就 ok 了, 尤其是在那个去溶洞轮胎漂流的时候。其实那个景点的蟹湖是水是最清的,但是他当地小孩他根本就不排队, 丛林飞跃玩是一个小时也不是很害怕,跟清迈的丛林飞跃比起来差一些。然后我这次报的是二号西湖,第二天我又包车去了三号西湖。总体来说,如果你对水上或户外项目没有那么感兴趣的话,在万荣你住两天,三天就撑死了, 也不用去包车,专门去三号蟹湖。宝子们看我的视频也发现吗,这天老是雾蒙蒙的,现在是烧山季,我是因为泼水节来的,然后如果你们是不敢泼水节的话,想干青山绿水的话,那就五月份以后来吧。 再说一下,吃饭吧。万荣的消费要比朗布拉邦高。嗯,他们这边排行第一的 happy mango, 我觉得味道也就那么回事。还有一个大概要避雷,就是我现在要发的视频上的这个店,他们是欠钱的。嗯,当时我们给他钱,他没找我们钱,后来过去跟他要,他又说我们没给他,然后我们说要报警,他才还给我们的,欠了我们二十万。 白万荣的老外基本上都是白天去玩水,晚上去泡班, 在万荣玩的还是非常欢乐的,所有的国家的人都非常非常友善。我的这趟旅行也是非常随意的,去的时候也没有定什么时候回来去哪里,然后在万荣的时候就看到了。嗯,从万象,然后就可以直接坐公共汽车就能入境泰国。所以我在 万荣的时候就在网上订好的从泰国的满开去曼谷的网红列车,红丝绒列车。 四月十九号我们吃完早餐,中午十一点二十二的火车,我们就前往万象了。好了,宝子们,下一期见,拜拜,出发喽,我去万象喽。
38李coco


