特斯拉抬头显示hud安装走线

粉丝33获赞48
相关视频
 00:22查看AI文稿AI文稿
州吐槽特斯拉没有仪表盘和 hud 吗?今天就给你一个超棒的解决办法!空气码表直接看我装完的效果啊!速度、转向灯、档位、灯光,甚至开关门等常用显示都有啊!与大屏上显示同步,完全无颜值啊!塞在出风口里毫无违和感! 安装特别简单,只要走线到后排空调出风口下面,轻松撬开这个盖板,接口一插就 ok 了,十分钟搞定需要的左下角啊!
561汽车用品 04:20查看AI文稿AI文稿
今天教一下大家如何安装这个新款的空气码表,我们先把这个膜撕掉, 然后这个是电源线,这电源线呢是插在后面的,这个后面是做了防水呃处理的,这个芯片都是做了这个防水防雾处理的, 这个是直接对插的啊,这不用分正反面的,这个电源线边上还做了一圈的这个密封条,这个防净水防净物的作用。这个电源线插好了以后,啊啊有贴的这个机器的条形码的是在下面啊, 然后往驾驶位正前方这里往上面掰一点点,直接对插,然后再把这个线沿着边上这个缝隙把这个面板撬开啊第二步把这个 面板撬掉啊, 然后把这个电源线沿着这边上这个缝隙塞进去, 把它塞到里面来,这样的话我们的线多余的把它往回拉一点点, 这个线沿着这个缝隙塞到这个内饰板的缝隙里面去, 走完以后啊再把这个内饰板 扣回去,然后接着把这个绳子拉着窗口挂条这里一直走,走到这个缝隙,再从驾驶员这个中间这个缝隙塞下, 走到这里的时候把这一块内饰板翘起来,然后把线沿着缝隙塞入进去, 塞进去以后再把这个卡扣返回去。驾驶员这个座椅调到最前面,然后 这下面有个线槽,我们把这个电源线往里塞过来,然后啊我们把它拉过来,然后我们找到这个后排扶手箱下面这个位置来敲棒,把它敲开, 然后把它取下来,这边有个蓝色的接口,这个地方拿大拇指往里按,然后把线头拔下来,再把这个转接线呃公母头对插, 然后磨得歪的话啊,他这个排线呢,他这个空间有点小,我们要想办法把这个线往里塞,只要能把这个盖子盖的上就可以了,无论用什么方法啊,这个线注意就不要压到就行了,这个线一定要绕在这个啊,他原车座椅下面的线的后面绕过来, 然后再把这个线往里塞,再把这个接口对插起来。要注意啊,这是一条直线的啊,千万不要插反了,它上面是有记号的,然后再把这个线沿着内饰板这个后排的出风口一直往里走线就可以了。 这个线啊,走完以后这个接口 把线往里面塞一点点,塞完以后把这个接口再按下来。
 01:05查看AI文稿AI文稿
曾经只有百万级豪车才可以选配抬头显示,今天你一百多就可以拥有抬头显示了。特斯拉有很多很多改装件,但是起点特别推荐这一款,不需要连接车机。今天给大家来介绍一款抬头显示, 他的工作原理很简单,就是电源线,这是电源线,拔了他就没电,插上他就有电,他是通过 gps 定位来控制速度的。呃,跟我们的车机虽然有点误差,但是还是比较准确的。 他的安装方法也很简单,就是把这根线往这边插着,那么他就有电了。
1159奇点 10:32查看AI文稿AI文稿
check out this new head up display for the tesla model three or tesla model y this item looks and feels nearly oem with the screen built right into the dash this play is actually part of the dashboard cap and you will need to remove your current dash to install this screen my name is evan and if you're new here welcome create a tesla content mainly in both the model three and model y consider subscribing below to see content like this in the future while i will admit this may not be for everyone my job is to showcase the many accessories on the market for your test of the best suits your lifestyle the installation process i would say is more on the challenging side, but really is quite manageable when you follow the process in this video i created at this time the head up display will only mere what your main tests the screen shows there is no option for bluetooth or a car play this will receive software updates should be attached usb port from the display should there be added options in the future so, if you are someone who would like the more traditional look of having the speedometer time, temperature, turn, sandals, state of charge and various other visuals right behind the steering wheel this may be the accessory for you now let me show you how i install this myself when you first open up the packaging you will see all the cords screws inside end caps for the dashboard looking at the rest of the contents we have our first tap of the dashboard and of course the other half with the built in screen i also want to point out that this income in a few other colors including wood carbon, fiber and black to match the rest of your interior especially if you have the blackened tesla interior looking at the section with the display attached, i have to say the quality is quite nice it felt very durable and the cover over the screen feels like a soft leather material taking the two pieces of the dashboard slide then bolt together like so and then flip it over together take the included screws and turn them into the appropriate holes on the bottom middle section be careful not to over tighten the screws now that we have one solid dashboard we are going to set this to the side and work on removing the current dash in your tesla next, we are going to remove the side panel with the pry tool and also the side trim piece if you have a gen one dashboard like i do here once you have both of these pieces removed repeat the process on the passenger side too after the removal of these pieces set them to the side and now we are going to gently tug the dashboard upward towards the windshield should hear some clips releasing on both ends of the dashboard after the dash is loosened and you're able to move it slowly bring the oem test the dashboard out of the car as set it to the side we now have to remove the upper panel on the passenger side just below the glove box taking a pry tool remove the four plastic pins and depending on your ear there may be a torque screw to remove also pull down the tray and unclip the light and speaker wires and then set this to the side if you were finding this video helpful this far consider clicking that like button for me so current and feature tests the owners can find this i would greatly appreciate it now one of the hardest parts of this install is unplugging this wire clip as you see right here i have a twenty eighteen model three and your color wire clip may be different from the light gray color i have just note that this is a middle connector that needs to be detached which has this thicker red black and green wires unclip the wire connector from the car and once disconnected your screen will turn off do not be alarm this is completely normal now take the included cord from the kit and find the end with the three plugs on it take this black box that came with the kit and plug it into the smaller plug from the cord you can't mess this up as it's all plug and play if it does not fit the connector it's not the right plug once this small computer black box is plugged in you are left with these two plugs for the connector be just disconnected from the under the glove box the other end is for the display on the dashboard going back under the glove box area take the plug from the tesla and attach it into the female end and then attach the last connector into the tesla this will be the hardest part of the install i had a hard time clipping in this adapter hopefully, it will not be as challenging for you after this is plugged in tuck away the black box be connected earlier right above the black panel you could certainly use a zip tie to ensure it stays in place it took my car about three minutes for the main display to turn back on if it does not please ensure all of your connectors are properly attached next, i had to attach these white clips onto the new dashboard depending on your model your production you may not need to do this with my twenty eighteen model three this needed to be done so the dashboard wrote properly clip into place i am assuming on the newer models there are less clips on the back of the dashboard you'll need to look at the bottom of your original test the dashboard and match up the clips with the aftermarket one to see if you need to do this taking your phillips screwdriver remove the velcro looking square and then attach the included white clip in its place with the screws, we just removed these velcro squares run all the way down the dashboard and there should be six of them if you have the dashboard i have again, you may not have to do this depending on your model year after these are installed we are not going to hide the cord from under the glove box using a pry tool tuck the cord right above this trim like so remove the side panel and place the cord upward as you see here we can now take our new dashboard with the hud display and place it over the car dash upside down like this take the cord and plug it into the bottom of the dashboard display port i found it best to use felt tape to attach the cords on the bottom of the dashboard now flip over the dash and gently slide it into place aligning the clips with the base of the dash of your test slope when you reach the end you may have excess core like i do here and i just push the extra back down to the bottom of the compartment now reattach this side plastic trim and then take the end of your usb chord and just rival it up and place it into this side slot of the car you can certainly find your own place to leave this, but i found it best in this position should you need to run a software update on the display reattach your side panels on both the driver and passenger side use slight pressure on top to push down the dashboard until you hear eclipse into place use the included side clips that came with the kit and installed them on both sides they should just snap into place then finally reinstall your bottom speaker and light panel by reattaching the plugs and plastic clips that's it we finally reached the end of the install and we can see the screen mirrors with the test the screen displays now showed your display shows celsius instead of fahrenheit or kilometers per hour versus miles per hour there is a way to change these settings in the menu display holding down your left scroll wheel of the steering wheel and scroll the right wave wheel upward will bring up the menu on the head up display that will allow such changes after you are entered into the main menu use the right scroll wheel for the item to be selected and then push the left scroll wheel to confirm the new changes to exit the main menu press and hold the left wheel and scroll the right wheel downward please pause this video to thoroughly read the instrument menu instructions fond right here once you have all the correct settings in place i want to point out a couple issues with the display which may be resolved with an upcoming software update in the future first, when you press on the brake pedal for some reason the hazard lights will appear on the head up display now they won't activate the actual hazard lights on the car, but only show up on the mini display i think this issue came up once tesla released the version eleven software then now the new hud display will need a software update to fix this secondly only the speed limit signed on the hud is not accurate as you can see when i'm driving the correct speed limit is fifty five however, the main display shows thirty four again hopefully this company will release an update soon to address these two issues already received one update from them as you can see i use my usb thumb drive to attach it to the usb chord we tucked away earlier during the install and the display auto updated itself these were the only two complaints i had with the display when you have all your settings input correctly the display does what it's supposed to do at night the display will be dark and during the daytime it's white to clarify that the time you input must be correct or the display will be too bright at night or too dark during the daytime i understand this may not be a product for everyone, but my job is to showcase the many options out there for all tests the owners if you prefer seeing your speedometer and other various settings right in front of the steering wheel then this may be a viable option for you here are some more visuals of what it looks like when super charging and driving with the new head up display of course if you have any questions, please leave a comment below this video and i promise to respond back again my name is evan until the next one see you guys。
338欧拉欧拉 00:56查看AI文稿AI文稿
安装好之后的效果我们简单展示一下,相当的灵敏,他的安装非常简单, 然后我们可以拿一张卡,然后把前面多余的线给往这个缝隙里面塞,然后通过旁边的和 a 柱接的地方,然后这现现在都是我按进去了,就是把这个卡往里边怼就可以。 然后到了这个位置,我们可以把这个胶条给掀开,然后这个线顺着胶条往下走就可以,就藏起来就好,顺着胶条藏藏藏,藏到这个位置, 顺过去插到我们的 o、 b、 d 就可以了。然后多余的这个线数还是拿我们刚开始的那个把它绑起来,就是捆一块,捆一块,把它绑起来,弄这个下面就好。
16银派轻奢车饰 01:22查看AI文稿AI文稿
你见过这样的抬头显示 hud 吗?玻璃片似的,充电以后玻璃自动上升,调节角度,我们装到车上看看效果,老规矩,大力出奇迹。 拆掉仪表螺丝,拔掉仪表插头,再装无损对插线,另外一头插到仪表上方头插入 hud, 固定好 hud 控制按钮的线,我们对插好以后把它送到对下面,固定好仪表,拆掉护板螺丝,扣掉护板 上下四个点位,打开,拔掉插座,拆掉面板,抬头显示的控制面板,装好卡回护板,复原,插上插座, 更换一个带缺口的盖子,还带了一个行车看视频和胎压的模块,我们要把它装到屏幕后面,拆掉出风口, 拔掉应急灯插头,拆掉屏幕的固定螺丝,拔出屏幕,插入模块,对转线,直接插回主机,我们通电试一下,启动 看到没有,有个玻璃盖板升起,现在就是我们看到里面显示的内容,然后通过切换,这是胎压,这是电瓶和水温等等信息。然后我们打开车门的时候也有个提醒,车门未关闭,提醒熄火以后他就会自己降低到原来的位置,漂亮吧?
1.5万车李子(上海老李) 01:03
01:03 02:28查看AI文稿AI文稿
这后面有四个螺丝,把这四个螺丝给扭出来, 然后把这个后壳取下来,这里面屏幕这里有一个连接,连接排线,把这个先抽起来,抽出来以后这有个开关,用拇指或者小指甲把它给掰起来往外拽就可以拿出来了,然后这个是放一边,这上面有三个螺丝,从来也是用这个十字形螺丝刀把它拧出来。 网吧反过来 背面找到这个一五四这个 led, 就这一个一五四的 led, 有条件的话可以用这个洗手,就把它点一下就出来了,没有的话就可以拿一个一字形的螺丝刀或者垫底小垫笔都可以把它放平下来,然后找到第五式用力扣拿去掉,这样就可以了, 然后再把它装回来,刚才的博士还是把它上回原来的孔位,再把它盖回去就解决了。 然后再把它插回来, 盖上这个对面的机盖,这个是固定不缺, 装完以后就要看一下,这后面有四个光芒开关,这个灯往下补,我们就拨下来,这个灯应该是翻到了,嗯,拨下来,这样就解决了三四顿的问题。
 07:19
07:19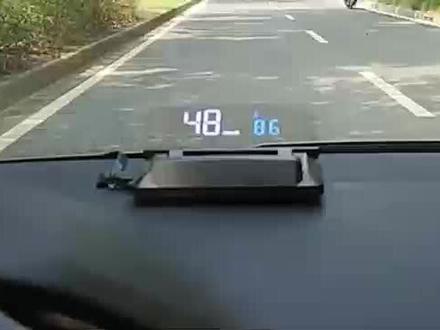 01:30查看AI文稿AI文稿
最近很多车友来问,抬头显示器容易安装吗?自己能安装好吗?我们来看一下这款 h 四百 s 的安装方法,其实真的很简单,女司机也能自己搞定呢。我们来看一下这个产品的外观,这是 o b d 插头,电源开关,多功能按键, 这个多功能按键可以前后拨,也可以往里按。找到汽车的 obd 接口,一般都在汽车刹车的上方,也有些在方向盘下方的抽屉盒内或者中控扶手箱内。这辆车是斯柯达,就在刹车的上方。 先发动汽车,插上汽车 obd 插头,再插上 hod 的插头, hod 显示转速说明这款车可以用,如果不能正常显示转, 可以咨询一下卖家哦。找到合适的地方放置 h o d, 预留好线的长度,把多余的线绑好,梳好。可以用附送的撬棒撬开 a 柱的橡胶密封条,或者用卡片什么的,也可以沿着 a 柱往上把线埋进去, 中控台上的线塞进缝隙内,或者用翘棒塞进去。看,完美的布线完成喽!撕开双面胶, 固定好 sud 就可以了。安装好了体验下效果,时间、水温、转速,这样就安装好了,是不是很简单啊?
 01:45查看AI文稿AI文稿
米哥你今天要是不把这个抬头显示给我搞定,你就别想回家了。这么大火气,谁惹到你了。一个男同事问我借车跑长途,他问我说车有没有 acc 巡航和抬头显示,我说没有,他转头就去进。另 换一个同学吗?没问你借车是给你省了。你应该开心才对啊。开心什么呀。其实我喜欢的一个男人。你的意思是车子配置不高就找不到男朋友了?就抬头显示啊,问题不大,就是可能今天晚上下班了。哎呀,没事,加班费我照样给你就是了。 除了加班费没有别的了。别的别的你还想要啥。我先干活了,你旁边好好想想吧。这 hud 是高配车型移植过来的,所以我们要把这个盖板给拆掉。拆盖板的动作是很优美的,腰不好的人是干不了好我的妈哈哈哈。哎呀,这也塞不进去啊,我们把仪表拆来看看好 哈。哎呦哈,不好意思错了,还有个螺丝,刚才表演太兴奋了,忘记这还有个螺丝了。 好,这样就下来了。仪表饰条拿掉,一排螺丝拆掉,出风口拿掉。把这个机械仪表拆掉, 拿出仪表看看这里能不能装进去。哦,也不行啊,你过来一下,现在工程变大了,要拆仪表台了。不行,那不变事故车了吗?我想了半天,我中午应该请你吃个饭呢。哎呦,我想起来了,不用拆仪表台,从下面往里塞也可以的。 什么是平局展现我邀功的时候又到了。练瑜伽不如练修车呀。平时 suv 装好了,这个地方除了显示还有藏钱的功能啊。美丽的小盖板啊啊, 宇哥你去问液晶仪表借我玩两天呗。这个东西叫刷机的,安装起来很慢。我今天晚上还约了人去玩呢。跟朋友有什么好玩的呀,我晚上给你洁内白的,都别开车等到底。 这样不好啊,你看你多累啊,喝点白的解解乏呗。来给你整上。哎,你哥好有科技感啊,这下开车都不用低头了,都在挡风板上。谢谢你哥,那晚上等你哦。
1.8万车李子(上海老李)


猜你喜欢
最新视频
- 8995n4yr