rig 7 pro教程
嗯。

粉丝2308获赞2.2万
相关视频
 19:02查看AI文稿AI文稿
what's up everyone mad here and today we are checking out five ways to use guitar rig on sounds that aren't guitars i have a commercial sync style track that i produced and it sounds cool but needs some flavor to give it a unique character if you don't already have guitar rig, you can download the player for free or get 50 dollars off the pro virgin during cyber season which gives you access to all the amps and effects over at native instruments com i already have a few instances of guitar rig on different sounds and i want to show you the before and after as well as how i found the presets and made adjustments to them to fit my song by the end of this video you should have a better idea on how to manipulate guitar rig components tweak various parameters adjust the preset mix level and more let's do the thing before we jump too far into this breakdown here's a little bit of what to expect this is before guitar rig and this is after guitar rig, this is the session right here so we're gonna start by just playing the verse back and then we'll get into the piano so again it's a commercial sync style track something you'd hear in an ad and i want to start with the piano, which i already have guitar rig on and before we get too far into it let me just give you a quick breakdown of the layout of guitar rig over here on the left hand side this is where you're going to find your presets all your individual components this is where you're going to be able to sort through different attributes such as the input sources characters amplifiers things like that you can also search for different presets or attributes right here in the middle the main window here, this is where all your components are going to be so any amplifiers or effects or anything that's going to affect the signal it's going to be right here in the middle over here on the right hand side this is actually new to guitar rig 7 and it's the signal flow so it actually shows you how the signal is being passed through which effects and which components let's solo the piano without any effects on it i'm gonna turn off guitar rig, this is already in nice pianos from piano colors, but i knew i wanted something that had really heavy compression and i wanted it to sound super clunky something that you'd hear in like a modern hip hop song so i actually just went over here and searched for compress and what's really cool is when you're searching for things this search isn't just going to search for the name you can actually see the name is dandy twang but there's a compressor inside of this preset so i went to search searched for compress and just click through a few of these until i found what i liked this one pretty much had exactly what i was looking for all i did was adjust this eq a little bit and changed the mid range and that's what gave it the sound you know sometimes it's as simple as just clicking a random preset and making adjustments for it to fit your sound and that's exactly what i did here i typed in compress and found one that i really liked and it just really gave that piano a nice punch let's hear it with the effect on on that was the piano now let's check out the synth arp that i have also in the verse, let's solo it i have guitar rig bypassed so this is a sequence happening from duets and it already sounds cool, i just wanted to give it something a little bit extra, so let's open up guitar rate for this sound i use the attributes so i went to input sources and i selected sequence loop because i'm running a sequence through it you don't have to do this you could select keys or pads or whatever you want even if it's not the sound that you're processing through it i also selected modulation under effect types because i wanted the sound to evolve and grow as it played through so once, i did that i actually just use the preset shuffle or randomized button right here and i just clicked it until i found something that i really liked and that's a really great feature something i use very often because you get those happy accidents and that's one of my favorite things in guitar rig, so once, i found this preset in the components i noticed there was two instances of flair if you click right here you can open up the component and see more of the parameters within side of it and all i did was i changed the pitch to e0 because this track is an e minor, so this flanger is playing a lower pitch and this one here is playing a higher pitch e3 other than that i opened up the quad delay originally this was not synced it was just set to milliseconds which is fine, but i wanted mine to sync to eighth notes so i clicked that changes this to eighth notes and let's turn this on and see what it sounds like that delay this without it。 哦哦哦哦哦哦哦哦哦哦哦哦哦哦哦哦哦!哦!哦!哦!哦!哦!哦!哦!哦!哦!哦!哦!哦!哦!哦!哦!哦!哦!哦!哦!哦!哦!哦!哦!哦!哦!哦!哦!哦!哦!哦!哦!哦!哦!哦!哦!哦!哦!哦!哦!哦!哦!哦!哦!哦!哦!哦!哦!哦!哦!哦!哦!哦!哦!哦!哦!哦!哦!哦!哦!哦!哦!哦!哦!哦!哦!哦!哦!哦!哦!哦!哦!哦!哦!哦!哦!哦!哦!哦!哦!哦!哦!哦!哦!哦!哦!哦!哦!哦!哦!哦!哦!哦!哦!哦!哦!哦!哦!哦!哦! and what's interesting is duets actually has a delay on it and it's playing like a dotted notes, you're getting a mix of this dotted and eighth note quad delay happening here and it's really cool, so that's what i did for this sound one important thing here is, and i did this on most of the sounds that i sent through guitar rig, when you open guitar rig, this is actually going to be set to left and it's going to be running a single or mono channel through it so if you're using a certain instrument or sound that stereo, you're gonna want to switch this over to stereo, so that way you get that nice wide sound or if you want it to be mano, you can just keep it on left for mano, but that is a another thing that i did to this sound here and let's play it back within the whole verse, they see that delay kind of hits with what the pm anno's doing which is really nice, you've heard some cool elements from the verse now, let's play from the verse into the chorus, and then we're gonna talk about the brass, that's the chorus of the track, let's just set a little loop here, and we're gonna talk about the brass on the brass group, you'll see i have two instances of guitar rig, let's open up the first one and this is the main one that's affecting the sound so let's just solo it and i'm gonna bypass it and here it is on with this instance of guitar rig, i already had an idea of what i wanted my brass to sound like i knew i wanted it to be distorted kind of trashy sounding so what i did was i went to effect type i selected distortion and then i kind of went through some of the characters amplifiers and then under genre i selected hip hop so again i wanted something that was kind of cool and modern and i thought distortion brass was definitely the move for this one once, i did that i went through some of the presets found one that i really liked and it sounded great i didn't really have to make too many adjustments these components were already open for me so i adjusted some of the saturation amount and dirt changed the compression a little bit and the only thing that wasn't included in the this preset was this instance of realm down here this reverb so what i did was i went to components selected reverb and i saw realm and i just dragged it over and if you drag it you're going to see it shows up right here in the signal flow, we don't want another instance, but that's just to give you the example of how it works over here you can hit this little x you can also bypass it, but i'm just gonna delete this instance so that was the only thing i did i added round to it just to give a little reverb and made the adjustments for how i wanted it to sound this is without the reverb you're already getting some of that natural room reverb from the instrument itself this with realm just a taste it's all it needed when i'm making these types of ad or say tracks i like to take elements from my chorus and then bring them over to the intro kind of gives the listener, a little hint of what to expect later on in the song, the important thing is you have to be tasteful when doing this and how i did it in this track here let's go ahead and play the intro back so you're hearing that brass right in the intro, but it's just not as aggressive as it is in the chorus, so let's solo the brass again and it still has that first instance that gives it that punchy distorted feel the second instance of guitar rig, here is actually a low fire preset and what i did was i just went to lofi and i went through a few these presets until i found something cool once, i found something cool i actually automated it one thing i use quite often in guitar rig is this preset volume feature here and to access this you click this icon right here that's gonna bring it up and then this is just your dry wet and then a mix between them and and again i use this all the time for automating the presets in or if i just don't want as much of the preset on the sound and i only want just a little bit go in here and you can change the mix in the automation tab you can see the preset mix volume is being automated and it slowly turns down as the verse comes in so it's all the way up for this intro and then as the verse comes in and that first stab hits then it turns down and it doesn't happen anymore in the chorus of the song other than that for this preset, i just turned off the noise machine because it was a little too noisy for this type of track so i did was click the power button here and turn it off just bypassed it and this this sound was literally ready to go again i didn't have to do much it was a cool sound and it really made my horns have something flavorful and tasty right in the beginning back on the course, i also have a synth base from massive i'm gonna turn off guitar rig, so you can hear what it sounds like it's playing the same melody as the horns that's it with al guitar rig, let's go ahead and turn guitar rig on so really cool preset and what i did here was i went to the search and i just searched for side chain because i knew the brass was just a little too aggressive and i wanted it to kind of modulate and move a little with the song and kind of create some bounce and energy so i searched for side chain i selected synth as the input source and this was the only preset here, so i clicked auto side chain and this is what it's doing this is the preset itself it didn't have the ensemble, so let's just turn that off for now and what's happening here is there's a step sequencer and this step sequencer is going through just two steps, one and two and between those two steps at a tempo of eighth notes basically it's changing the input trim of the compressor and what this is doing is it's turning the compressor input up about 25 26 decibels and by turning it up it's making the compressor react and compress the sound more, so it's kind of reverse in a weird way, but it's it's basically compressing the sound on every count so i'm gonna turn a metronome on so you can hear it and you'll hear it every time that metronome hits it sounds like the base is being pushed down in the mix you can see it off on it's really cool i liked it it kind of gives the track some movement other than that i just went over to the components tab and i went to modulation there was the ensemble, i thought the brass bass sound was really cool, but i wanted it to be a little wider, a little bit more stereo, so i just put an ensemble on here which is basically just a chorus turned up the intensity, a little bit and this is what it sounds like with that with the brass and that's what makes up the main part of my chorus i've shown you guitar rig on a piano, a synth arp brass and a synth base, but guitar rig isn't just for instruments you can also use it on vocals and that's what i'm doing here i had this vocal muted for the chorus i'm gonna play it back let you hear the vocal loop and this is what it sounds like 啦啦啦啦啦 啦啦啦 there's what it sounds like in the track and again cool vocal loop just needed some flavor, so let's solo it and turn on guitar rig, here and with this one specifically it was a mono input, so i just have it on left here what i do is i went to effect type and went to modulation and then for characters, i went to mash up and within mash up there was all these different presets you can actually see here i have a couple colors on here what's really cool is you can select these and right click them and actually basically set favorites based off colors you can have different ones you could say like oh, i know my guitar presets are orange and my synth presets purple, but i found this preset and when i opened it up, i saw all of these tractor components and i have been using tractor components forever, i love the slicers and the gators so to see those in guitar rig was just like yes, i have to use these so what we're gonna do is i'm gonna turn all these components off and we're gonna add one at a time so you can see how it's affecting the sound and i'll explain what's happening as they do it so let's just go ahead and bypass these, and we're going to start with the first two here up top i have a beat slicer and this is being controlled by this sequencer and what's happening is every time this fader is up it's slicing and when it's down it's not slicing so you can see a little meter here move when the fader is up this is happening over sixteen steps at an eighth note tempo 啦啦啦啦啦 so already that sounds super cool, right and again watch this meter every time it goes off it's not slicing and this pattern is happening based off this style here and you have a few different styles to choose from and different patterns within those styles 呀 so that's just one instance and then i have another beat slicer and this one's happening same thing sixteen steps but a tempo of sixteenth notes so it's faster and it's kind of backwards it's off and then it turns on for the last two steps of every four so i'll turn this off and let you hear that one and then we'll turn them both on how much faster that that slicer is and let's put them both on together you're gonna mix of slow and fast slices which is really cool let's keep going we'll turn on the gator again i'm just gonna bypass these so the gator is just doing 16th notes and it's basically just kind of cutting a volume out a little bit based off the shape that i have set and with everything here this is what it sounds like with the gator on so again we're getting a lot of movement, a lot of glitches and and different stutter effects happening which i really like other than that we have a delay turn delay on。 当当当 quarter note delay and we have reverb and these are all happening the delay in reverb are happening at the end of the chain so all this beat slicing is happening before it so when you have all these on this is what it sounds like here it is off in the track and here it is on and that's five ways to use guitar rig on sounds that aren't guitars if you like this video hit us with a like or a sub and if you want to learn more about guitar rig check out the video how to use everything in guitar rig with the link in the description below thanks for watching and we'll see you in the next one。
 02:11查看AI文稿AI文稿
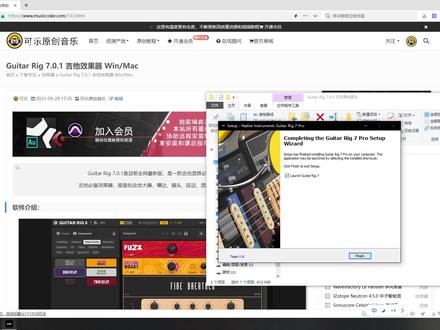
哈喽,大家好,我是可乐今天给大家带来的,这个是我们的吉他效果器的最新的版本,是我们的七点零点一啊,我的视频以及文件更新时间呢,是我们的二零二三年的十月二号, 来给大家带来他整个的一个安装的过程。首先我们要先下好视频同款的安装文件啊,可以到我们的可乐创音乐注册开通下载,下好之后对他进行一个安装,他是一个一键安装的版本啊,我们直接对他进行打开, 打开之后我们选择下一步,他支持我们的 vst 三以及我们的 a 叉,我们的 pro 兔子的格式都支持啊,我们这个地方直接默认全选,然后选择下一步, 选择下一步他会自动的去安装啊,这个时候我们就安装完了啊,可以选择打开都可以,如果你有四组 的话,他会自动的去入库到你的宿主里面啊,非常的简单,我们这里可以直接点击取消选择完成,我们可以在我们的宿主里面打开,比如说我的宿主是这个 q bass, 好,接下来我打开我的 q bass, 他会自动的去入库和扫描,打开之后我们新建一个空白工程。好,这个时候我们打开速度之后呢,我们可以创建一个音频轨道,选择添加轨道,然后他在这个地方可以插入我们这款插件啊,我们可以直接输入他的名称,就比如说这个 好,输完之后他是在这个地方啊,大家可以看一下这个这款插件是我们的最新的版本,直接打开好,他正在加载了。好,他已经加载完了,这是我们的 呃,最新版啊,我们的七点零点一这个地方他会有显示,然后这边呢都是他的很多的配套的其他效果插件啊,非常的给力,可以随便的点击打开, 这是一款特别棒的吉他效果器插件啊,大家如果需要下载视频同款的安装文件,可以到我们的可乐原创音乐注册开通下载音乐,我们都在期待与你下期再见。
123可乐原创音乐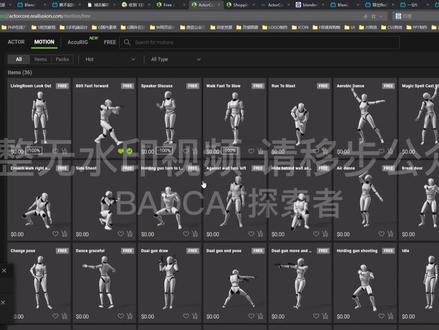 10:00查看AI文稿AI文稿
然后他会有这些免费的,免费的直接动画你可以去选择,可以去购买。然后我们来看一下角色,他这里面也有免费的角色,也可以去使用, 我大部分他这还是收费的啊,比如说这里面我们选择了这个免费的这个角色啊,点击之后可以去进行去下载下载这里面呢你可以选直追,有选项就是紧紧导出动画啊, 然后我们进行下一步,然后下一步呢,这里面你可以选择应用到哪个软件里面啊?有应用你可以玛雅呀,三 d max 还有 banana, 比如说你选择 banana 的话,里面直接点击下载就可以了,点击下载完成之后呢,他会在左下角,然后去显示一个下载的一个提示, 然后你再点击下载就下载到你的电脑里了,然后下载到电脑里呢?还是 fbx 的动动作文件,你就可以导入到布兰达进行使用啊,那么来到我们这个软件里面,我们说明一下,那么左上角呢,这边这个提示呢, 是提示我们总共有多少三角面啊?现在提示有就是两万九千六百五啊,五十二二十六个这个三角面,那么下面这个提示呢是角色的这个高度,现在这个角色的高度是一米六啊,是六十三英尺啊,是这个解是这个介绍 啊,那下面呢是给了一些这个给的这一块一键操作按的,比如说点的 o 的键加右键, o 的键加右键,或者是点击左键呢,是一个旋转 啊,有人说你按照奥德加组建,奥德加组建,这是一个挪动 连着滚轮呢,是上下放大缩小,这里面有一些移动选项, 还有就是拉锯选项,你选择他之后呢,就是旋转,选择他之后就是移动啊,就是这个,然后这个就是重置,我们的重置我们现在这个角度。 好,那之后呢,没什么问题啊,比如说现在头部呀,不一样的旋转头部也可以进行操作啊,操作完之后呢,最后你可以给他导出导出,这里面给选择了 fbs, 然后还可以 可以导出到艾克伦巴啊,然后这些选项,比如说你在导出之前呢,然后后悔了,想进行重复的操作,那你们可你可以选择 可以选择第一步啊,进行重新导入,也可以选择就是,呃,第第二步,我们不不能不能再点了哈,你可以点做第三步,重新给它的骨骼进行移动, 重新骨骼再给他移动,再给他定位啊,重新骨骼移动之后呢,你可以在手动呢,手也可以单独的进行重新的这个骨骼移动, 关节移动,移动完之后你再点击这个 chicaidamycen, 再点击 chicaidamycen, 重新,他会给再给你计算一遍,重新再计算一遍之后计算你重新重新修改过位置的这些古古和节点,然后就重新自动给 计算完了,然后就可以再再次导出了。那么这些里面这些收费的项目呢?然后他会每个月还会不定期更新的一些免费的资源给我们啊, 比如说这些角色呀,还有动画呀,他会每个月都会更新更新一些免费的赠送礼品给大家。那这边在左边呢,这些这个仕途呢,也都是有快捷键的,它上面是有提示的,比如说 f 键, a s, d, f, a s d f 这几个亮剑,还有这一件,这一件呢是我们顶式图, f 键是我们的前视图。假如说我们在一开始导入这个角色的时候没有选择这个对称,那么我们在第二步给他计算完谷歌之后呢,计算完模型之后,添加谷歌的时候,也是可以给他把这个对称给他打开 勾的,打完勾之后我们来到前视图卫衣,卫衣个卫衣完成之后呢,然后给他开始计算手部啊五个关节。 计算完手部之后呢,现在我们看我们现在移动我们的这个手部关节呢它是一个关节,一个关节移动的,那么我们让它整体移动呢?我们可以这在这边选择这个下面有个转换类型,这个选择呢我们可以选择右边这个选项,然后呢 他可以整体移动,我们整个整个一根手指的这个关节,那这边你调整完骨骼之后呢,然后想要对称到我们那个左手或者右手,然后在右边这个选项呢有这个右手和左手,然后你比如说你现在点右手,然后这边可以就是说竞相到我们的左手, 比如说你把这样骨骼给他移移到这里,然后镜像到左手,我们再来到我们的左手,我们可以看, 然后我们左手,那我们知道骨骼了,就已经移动了,移动移动过了,然后我们再给他移动到这边,然后我们再给他镜像到右手,然后我们来到右手,我们看一下我们右手呢,我们也给他镜像过来了,这样是左右对称的,这样镜像,那么相 这边呢还有两个选项,一个是镜像,这边是一个镜像,可以让我们的姿势进行镜像,然后下面这个是让我们的这个跟动画的保持,我们零点的保持到我们的圆点, 比如说我们这个动画的不在我们的原点,可以让他保持到点击这个保持到我们的原点上,比如说我们要在这里面我们要下载一个角色啊,我们这里面点免费的福瑞,点击免费的,我们给他下载这个小孩的这个角色, 我们点击加入到购物车, 然后再到我们的购物车里面,然后进行支付 啊,这里看这个小孩是收费的啊,到购物车里面去给他取消掉,我们需要是免费的啊,这个动作是收费的,关掉,我们只需要给他支付这个免费的这个模型就可以。 好,我们接着去点下一步下载我们的模型。 好,我们继续下载,点击登录,然后需要下载我们的 banana 狗屎。 好,那下面这个保持默认不变啊,下面我们给他直接下载,下载 好,我们等待这边左下角这边去给我们出现下载文件。那么我们下载这个角色呢?下载这个免费角色,它是需要时间排队的,这个时间有时候等候时间非常长,有时候就不用等候。 好,那么先等候吧,我先不管,我们需要去下载我们这个下载这个布兰达尔插件,那这里面呢?有很多这个三 d 软件呢,都都有这个插件,那么你选中这个布兰达尔,然后点击这个当老的, 点击这个单号的这个页面是在哪的?这个页面是在我们这个网站右上角这个论这个选项里面啊,这个选项点击这个 boss 啊, swf 就是这个支持软件,这里面然后会有这个选项,然后点击这个当老的,然后我们到下个页面,到下个页面呢,然后这里面有一个还会出现一个当老的, 然后这里面会出现我们这个界面介绍啊,这个软件的界面介这个插件的界面介绍,然后你再点击这个当老的,然后会来到这个 gifa 里面, gifa 我们直接点击这个当老的 vip, 点击这个当了的压缩包,然后我们下载到我们的电脑里面,然后就可以安装到我们这个装袋装袋里面,来到这个偏好设置去安装,安装好我们这个插件,这个插件名字叫 ccic toy, 然后装好了之后呢,然后就不用管他了,然后我们按按键,我们按按键,然后 找到我们这个插件啊啊,就是这个可以蹭,就是这个插件 现在显示我们当前没有角色啊,因为我们角色还没有下载完啊,这是我下载的一个,这是我下载好的一个,就是网站上下载好的免费的骨骼动画,那么他这个骨骼动画呢?分为三段, 分为三段,分为开始和过程还有结束,那么我们来看一下他的尺寸,那么开始这个是我们是这个 啊,只有一点四八兆,那么中间呢?中间这个过程呢?有一点九四兆,那么最后这个结尾有一点八一兆,那我们就用最后这个结尾的这个骨骼动画,那么最后这个结尾的骨骼动画你会看他会走的更。
 03:53
03:53 01:03查看AI文稿AI文稿
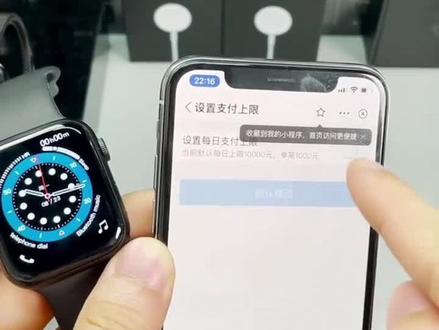
当我们拿到手表的时候,长按这边旋转扭键,发现无法开机启动,我们可以找到包装盒子里的无线充电器,然后先给手表进行充电,每一次充电最好是在两个小时以上,我们可以在出去之前给他进行充电,长按这边原件开启之后旋转按钮可以更换手表自带的表盘,而当我们收到手表时,他还是处于一个 英文字体状态。按压旋钮以后进入蜂窝页面,点击设置,找到这一个双 a 图标,然后点击进去之后可以选择简体皱纹模式,点击之后自动完成设置。如何绑定支付功能?首先打开屏幕支付宝付款功能界面,然后点击这个绑定,有显示一个二维码, 打开手机蓝牙,在没有配对的状态下进行支付宝扫码绑定,绑定手机支付宝功能完成后就可以进行手机配对了。连接手机之前,我们要先下载一个 app, 叫做 vip 的 polo, 下载完毕之后打开手表,点击这个连接 手机的二维码,通过这手机 app 扫描给他连接一下,然后再通过手机打开蓝牙连接,连接这个叫握持卡拉的一个电话,蓝牙连接完成配对之后,手表上的功能就可以开始正式使用了。
307LDL1911 02:23查看AI文稿AI文稿
大家好,我是王德斌一加七 pro 这个手机,这个手机增强画质, 嗯,他有个系统加速都是非常牛逼的,可以看一下点击系统, 这个就是加速,这个启动加速啊,这加速功能还有个工具箱, 工具箱里面有一个叫一家实验室,这个有一个有一个叫 dc 调光啊,这个 dc 调过弯也可以,可以试试,他这个说有 有,有时候有一场,所以不开也可以的。 这个手机啊,他自带了一个游戏图标,叫做游戏空间,这个软件打开这个软件啊,这个软件啊,他可以点击右上角的加号,就是添加, 就是这个这个加号添加任何的软件,这个软件都是我添加进去的,这个是播放器也可以,这个是游戏软件 都可以的,这个是一个 vr 游戏添加进去,添加进去了之后啊,他这个有下面有个游戏模式点, 点击打开,那打开来可以开启点击模式,它的速度就更快,可以点击右上角的三个小点子,三个小点子点击,然后点设置 在设置里面,这里面可以看得到他有个游戏画质真强, 打开来增强画质,不管什么软件都可以打开来的,都可以添加进去的,然后开启游戏画质增强,这个这个 这个也是一个方法,一个方法出现。
3哆哆A梦 04:52查看AI文稿AI文稿
sc pro 顶配版智能手表使用教程怎么连接手机?首先拿到说明书,找到有 f 下载二维码这里,然后打开手机微信,点击微信里的扫一扫, 扫描刚刚说明书里的二维码,选择自己手机相对应的版本软件下载,我这个就选安卓商店下载,选择通过应用宝下载, 下载好了之后,打开应用宝, 他会自动弹出软件下载小标识,点击直接下载就好。 点击安装, 安装好了直接点击打开, 首次进入,他会自动弹出权限设置,全部都选择允许 软件,可以选择微信或 qq 登录,记得勾选底下的用户同意选项,我就直接选择 qq 登录。 首次进入会有开通权限设置选项,弹出选择开启权限,找到并点击 wear fit pro 这个软件,打开授予通知访问权限, 这时拿出手表,下滑屏幕,点击设置,下滑屏幕,找到连接手机的选项, 这就是连接手机的二维码,此时返回 wifid pro 这个软件,点击进入底下的设备界面, 点击上面的扫一扫,扫描刚刚手表上的二维码,配对成功即可。怎么设置语言,首次使用手表是英文模式,右滑屏幕,点击设置一直下滑屏幕,直到找到这个地球的标识, 点击简体中文即可。怎么连接通话蓝牙下滑手表屏幕,找到并点击这个电话和蓝牙的标识,长按,点进手表蓝牙, 找到这个 what, 点击配对成功通话,蓝牙就连接成功。点击右边这个小箭头可进行设置,如果不想手表外放手机视频的声音,可以关闭媒体音频。这个设置 怎么绑定离线支付?下滑手表屏幕,找到并点击这个标识,点击同意协议,点击立即绑定,这个就是绑定支付宝 的二维码,这是找到并点击支付宝,使用扫一扫,扫描刚刚手表上的二维码,点击同意协议并绑定,等待他绑定成功。按照步骤给设备起名字, 还可以设置每日消费额度,打开设置每日支付上线就可以进行设置了。怎么下载与自定义表盘?打开 wear fit pro x, 找到并点击表盘市场,里面有多款免费且有个性的壁纸,我给大家安装示范一个, 直接点击下载,等他安装加载完,表盘就更新成功了,你看,这就是新换的表盘,表盘市场滑到最底下就有个字,定义表盘,点击这个加号就可以添加自己相册中的任意照片作为自己手表的表盘壁纸了, 你看, 这就更换成功了,但是要注意,手表每次只能储存一个最近更换的表盘壁纸。怎么实现消息推送?找到软件设备的这个界面,找到并点击消息通知,打开自己想要接收到消息的软件,设置 权限要点击允许,如果手表还是接收不到消息的话,这可能是你手机软件自身的消息推送没有打开。拿微信软件举个例子,点进微信并找到他的设置, 找到并点击他的新消息通知,打开相对应的消息提醒设置就可。如何添加 nxc 门禁?首先我们来到智能门锁前,先输入管理员密码, 然后按照语音提示选择用户设置。一用户设置请按二语言添加用户请按一删除,用户请按请输入开火信息,这时 将手机放在门锁前静置三四秒即可录入成功,录入成功后就可以正常使用了。已开锁 怎么使用语音助手?首先确保手表的通话蓝牙和手机连接成功,然后来到手表主界面,找到语音助手,点击说话就可以正常操控语音助手了。放首歌来听, 这个任务还是交给专业人士吧,如果操控不了,那就是你手机的语音功能有问题,需要手动设置一下。先找到并点击手机里的设置。找到并点击手机里的语音精灵。找到并点击他的语音助手。找到并点击语音唤醒,打开他的亮屏唤醒功能就好了。
420LEMFO 08:56查看AI文稿AI文稿
嗨,亲爱的朋友们大家好,我是爱君,今天我来解说一下这个小米手环气泡的一些比较主要的功能。 之前我已经解说过华为手环六和七还有这个小米手环六了,说一些普通手环都有的功能呢,我就快速略过了。首先我们看一下这个表盘,这个表盘是默认的,我们把它向上轻轻一拉啊,就看到了两排的这个应用 啊,这个排列还是比较舒服的,我们从第一个开始讲啊,第一个呢肯定就是这个所有手环都有的运动了,这一个气泡的手环呢,它是有一百一十七种运动的,比这个七的标准版少了三个,好像是少了滑雪这几个吧啊,一般的都有,我们看到 在这里可以看到更多的啊,像什么水上运动啊,训练之类啊,这个和普通的手法没什么区别,点开呢他就开始给你 爽运动所消耗的这个心率啊,还有这个卡路里之类的啊,这个我就不多说了。第二项就是我们之前运动过数据啊,他都会处于在这里啊,数据也是并不少,要看更详细的话呢,就要到这个 app 里面看了,这个呢我们看一下第三项,第三项就是消耗的卡路里的详述数据 啊,当天的步数啊,卡路里啊之类的,在这里的数据还是啊比较多的,还有这个战略的 啊,多久啊,这个活动的数据啊,都有,在这里可以详细看一下。第一下就是这个手环的气泡的一个比较优势功能的,我们给大家看一下所谓的跑步课程啊,这个气泡呢有这个 gps 的嘛,所以把这个区别时打开以后呢, 他可以指导你跑步啊,什么时候快跑啊,什么时候慢跑啊,跑多少距离啊?他都可以啊,在这个临时的指导你的,我们看一下导 打开好这个卫星定位中啊,第一次定位呢,可能是有点慢,等定位成功以后呢,这个速度还是蛮快的,开始运动 三二一啊,他就开始了,我现在选择的是这个快走吗?首先你这个快走两分钟, 然后两分钟以后呢,他就指导你啊,慢走或者快跑,所以这是一个比较啊,人性化的课程吗?这一个功能呢,只唯独在这个气魄里面有的,所以在其他手上你是没有,所以我觉得这个是比较好的, 好的,我们往下方这个心率心率方的很多手环都有吧,可是一些比较小手环呢,他看数据呢就不够详细,但这个手环呢,我们看到有一个区间图标啊,就可以看到什么时间啊,看你的心率有多 多高,或者有多低,我们都有一个比较清晰的数据来看一下。我们往上翻这个心率区间啊,这个数据还是蛮多的,在这里还可以 可以设置一下。他摸的是智能监测的吗?假如你嫌他不够准的话呢,可以调到一分钟,那肯定的,你调一分钟以后呢,他这个啊,这个续航就没有那么久了,一般来说呢,我们可以给他调到智能就可以了,当这个手环监测到你正在运动时候呢,他会自动的把这个 监测的这个频率啊给他加上去,所以呢,平时的话就不用那么准确吧,所以这样就可以更加省电,这是一个小米手环的省电策略,看一下这个高序列题型啊,这个高序列题型呢,我觉得他并不是运动时候,而是你在近期的时候,当这个手环在 牵涉到你坐着或者躺着或者睡着的话啊,这个心率依然有很高的话,他就会提醒你,假如你怕你在近视的时候这个心跳过高或者过低,或者怕自己的啊,这个心率有什么问题的话,你在可以啊,在这里给他调一下,然后来 检测一下,假如你没有这方面需求的话,就不用设置了,就让他默认关闭就可以了。好了,看完信息看一下血氧,血氧对于一个人的健康还有这个身体指数啊,还是比较重要的,比起六代啊,七代加了一个监测血氧的功能,我们看 看一下,往上方我们看到一个全天雪壤检测,他不管是关闭的网,因为是比较费电的,我们可以给他去开启,开启以后呢,他就会在你休息的时候啊,会给你啊监测一下雪壤, 你可以在爬山或者做一些高海拔运动的时候,当你坐下来休息的时候呢,假如你的血氧过低的话啊,他就会震动来提醒你的,平时的话呢就可以把它关闭,因为这个功能还是比较费电的,普通的一次性检查血氧的话呢,我们往上翻 啊,找到这里开始测量就可以了。好的,回到上一页看一下这个像月亮的东西啊,睡眠记录呢,他默认 是关闭这个高精度的,所以说我们可以给他打开啊,这个睡眠高精度监测开启以后呢,可以跟踪到你的快速眼洞啊啊,假如我没记错的话呢,快速眼洞就是你做梦的过程吗?或者记录你做梦的时间段,把它打开的话呢,可以比较高精度的来监测你的睡眠质量。 一般来说你假如不需要那么高兴度的话呢,也可以给他关闭,假如你带过售后价的话呢,他就会把这个数据记录在这里,然后给他啊,在连接手机的时候呢,把它同步过去,然后你可以在你的手机里面看到更加详细的记录。 好的,说完之后我们回到上一页看一下这个笑脸。这一个就是压力测试的,在这里操作呢,和悬崖一样,你可以一次性设置看一下,可以点击开始测量就可以测试你的压力。在其他里面呢,我们就可以做一个二十四小时的压力测试,在这里可以设置 啊,可以全天开启的,也是一样的比较费电。他看一下这个呼吸训练,呼吸训练的话在前几代都有了,所以最大也没有什么新的花样,一般都是配合上液功能,那个压力检测功能牙使用的就是降低质的压力啊,像于瑜伽呼吸之类的。回到上一页 看一下的女性健康点一下说明,我们看到有这个关于女性的一些啊,日期我们可以在这个手机里面给他调整,在这里我基本用不上了,所以我就没有设置这个东西,只要有女性的用户要使用的话呢,就用这个 a 来给他设置,然后他就会自动同到这里去的。看完这个我们往下翻看一下这个小爱, 这小爱呢不会说话,他这个手旁没有这个发声的单元吗?他只会震动吗?啊,所以并不会说话,可是大家看到了他会采集你说的话,然后你啊会给你一个反馈,前提是你的手旁要连接的手机,不然的话他 没有网,他也没有办法做任何事情啊。现在的话,我是连接了这个 iphone 十三吗?那首先我们来测试一下,点一下这里今年春节是几号 好,这个速度还是有点慢,我们看一下啊,二零二二年春节二月一号他这个小爱查询的过程啊,就是说通过这个蓝牙把这个数据发送到这个手机里面,手机然后去 啊通过这个 wifi 或者其他的网络去查询到数据。以后呢,也是通过这个蓝牙返回到这个手环里面,所以这个数据有点慢,所以有一个过程嘛, 通过这个小按呢,是可以控制整个屋子里面的小美智能家居的,我给你觉得还是非常满意的啊。继续往下方看一下这个天气,早上的话,一般你连接手机试,他就会把这个数据啊同步到你的手环里面,还是非常的方便的。看完这天气,我看一下下一个,下一个就是这个卡 片了啊,之前我做这个华为的啊,这个手环,还有这个小米手环六的时候呢,都有人问我这个怎么添加这个卡片,卡片一般来说呢,是需要配合手机的这个 来添加的,像这个小米手环的话呢,就需要一个这个小米的应用健康这个 a 在这里是一片空白的,还没有添加新的卡片,我们来看一下手机, ok, 看一下这里啊,我们把这个往上拉,像这个表盘市场啊,大家都懂了啊,在这里可以更新这个表盘到你的手环里面啊,像这个什么消息啊,可以给他开启 看一下啊,现在通知给他们打开,然后像这么电话啊, qq 啊,微信啊都可以给他打开,然后当你的手机收到这些 app 应用的一些提醒你的话呢,他就会马上的在手盘里面震动来提醒你。往下看。这个心率的话,在主页里面设置基本一样的,基本来说就是智商相和手盘 的一个样子,所以就没有什么好说的,悬崖啊,压力设置都可以在手腕里面设置的,所以这个没有什么区别。我们主要来看一下这个卡包,我刚才说的没有公交卡吗?所以在这里我没有办法测试公交卡,可是我个人觉得这个加公交卡和加门禁卡都差不多原理的,都是利用这个 mfc 的功能吗?我们这里往下发, 我们来试一下加这个门禁卡,点一下,现在我有个门禁卡吗?我想把它复制到我的手环里面啊,然后我下去回家或者出门的时候呢,我就不用带这个门禁卡了,我直接用这个手环第一下就可以了。模拟门卡,空白门卡,还有这个智能门锁,我现在是模拟门卡, 剪下去看这个条款,等一下请将门卡贴一设备正面,我们来给他贴上去,这样贴好的连接成功了, 他现在显示开卡中,我们就等一下,他就显示要等三分钟啊,实际上应该 ok, 行了,不用三分钟,在这里我们给他设置一个虚拟的卡面,这个比较好看, ok, 就这样这个新的门卡已经添加成功了,我们看一下左边贴近刷卡机刷卡,所以这个手环呢,就已经把这个卡的信息读进去了,所以这个手环呢就可以代替你的门禁卡使用了。我想这个公交卡 啊,还有这个打卡的机啊啊,都差不多一个原理的,大家都可以在这个 app 里面给他设置进去。好的,看完这个我们回到上一页。
2264哈利菌 01:41查看AI文稿AI文稿
no y 七 pro 的这些功能你知道吗?大家好,今天为大家介绍一款我们的最新手机 no 二七 pro, 这是我们自拍最好的五 g 手机,大家可以看到这个外观是特别的时尚,然后也是个曲面屏,贴合度特别好,手感比较好。然后我们主要也是一个拍照吗?所以今天为大家看一下相机。首先我们打开相机之后, 我们如果想拍远处的一个景的话,我们应该怎么办呢?我们可以慢慢的拖拉,找个变焦倍数,你可以直接往上移动,移动,移动,好,我们现在能显示到这上面显了个五十,大家知道什么意思吗?就是五十倍的意思,对,我们可以慢慢把它放大,放大到五十倍, 然后就是你看像这个距离,你可以拍下那个距离究竟离我有多远,然后我们相机放大之后,它上面的字体依旧是非常清晰的, 对吧?然后还有个便携功能,就是可能我们在办公的时候会觉得手平板跟手机来回切换特别的麻烦,今天来教大家一个功能叫做多频协同,然后首先我们下拉通知栏,点开这个多频协同之后点击同意,然后我们可以直接扫码连接, 打开手机的扫一扫, 好,他现在就会跳出来提醒,然后选择我们的派克扣连接, 然后我们现在连上之后呢,我们就可以把手机放到一边了,你可以一边操控着平板,然后一边看着这个手机,并且可以跟朋友啊,同事啊边打电话都不影响的。
1105言 己 01:02查看AI文稿AI文稿
最近总有人问我 win 七 polo 支付功能怎么绑定来安排,首先点击屏幕两下,打开支付宝的绑定功能,然后打开手机的支付宝进行扫描配对,扫描完成之后在手机上点击设备绑定,绑定过程当中手表和手机要保持缠烂的状态,这样的状态下就可以绑定成功了。那么手机绑定手表的支付出现 异常失败怎么办?那一定是你们先绑定了手机,然后再进行绑定支付的,很多老铁误入这一块盲区,接下来我来教大家安排。 首先在手机里的手表 apple 软件里直接解除或者删除设备,然后打开手机系统里的设置蓝牙,在蓝牙里面找到手表,然后进行忽略设备 处理完成后要把手机蓝牙关闭,重新打开刷新一下,然后拿起手表,找到手表里面的设置,进行一个恢复出厂设置,然后重点在后面,手表重新开机之后,再通过手机支付扫描进行配对,然后这一次的配 过程当中,如果弹出有需要配对手表的话,记得按取消就可以了,之后就配对完成了,然后配对完成之后,记得给手表进行一个设置名称,然后输入自己设置的密码就可以了,你学会了没有?
217LDL1911 01:38查看AI文稿AI文稿
is a level it's simple, we live we live。
180YONEX兄弟盟专卖店 07:10查看AI文稿AI文稿
nova 七 pro 换外屏教程,下面请观看,不解说了看懂赚大发!
 09:04查看AI文稿AI文稿
曲屏第六课华为六二七 pro 今天这个视频我们详细的讲解一下在分离的过程中应该避免哪些问题啊。这个和 p 三零弧度差不多,好像要大一点。 现在曲面屏是越来越多了,咱们这个从去年二零二零年的 下半年发布的手机,基本上每一款都有曲面屏,所以这是一个趋势啊。把握先机才能把握赚钱机会。我们教你傻瓜式做好曲面屏,多看我们视频,无需花钱学习, 更不用千里迢迢跑来学习。第一首不会做曲面的,你要仔细看我这个视频,看一下我们做这个方法是怎么样的。 首先这个华为的屏啊,他这个边缘上这个密封胶打的非常讨厌,如果你在分离的时候不先把这个边缘处理掉的话,有百分之九十的可能会把偏光拉到,没有拉到的属于你运气好。那这个屏的话,我们切 这个边切一下,这个边切一下,上面切一下。好。现在他就是一个直面屏,你没有去专门学习过曲面屏怎么做,你只要照着我的这个方案,你也能百分之百的把它做好,就这么简单。 很多朋友还是要问深度怎么掌握,我们总结了一下,这样操作最容易掌握。要么在手机上找一个碎玻璃渣,要么找一个好盖板比对, 你就拿一个好的盖板,你要修这个屏,你肯定有有好盖板对不对?那你把这个锯片调的和这个新盖板差不多,比他矮一点点,矮那么一丝丝, 不要超越这个新盖板啊,比较矮一点点。那这个第一刀是切个,大概他肯定是没到位, 有时候我们这一刀切过来之后是吧,切过来之后,我们不是有一个这个小工具吗?然后你去戳一下这里面,这个是硬的话,和戳这个外面玻璃一样的感觉的话啊,那他就还没有到干胶层, 那我们再给他加一个丝吗?在这个刻度上面给他增加一个丝,这样就是精确调节, 再给他切一下,再给他切一下,然后这个时候你再去再去感觉一下嘛,这里面是软的了,那证明已经到干胶了。没有,没有到没,还是硬的,那 你再加一个十,一个十,一个十的加吗?最多也就这样,加个两三次就基本上到位了。你看我这个,我这个就是设置好了,你看 加了一个丝之后,这个直接就就是切到位了的啊,看到没有 这个就我这个就直接倒到干胶层了。比如我们要切下一部手机的时候,就把千分尺刻度退回去十个丝,确保第一刀 不会切身。我们切第一刀是切一个大概深度,切到外平百分之九十的厚度之后,第二次切割就是精确切割 一根头发丝,那样的深度去增加,是绝对不可能接触到内平的。只要是会扭手机螺丝的人,都可以掌握这种最笨最简单的方法,只要有会做直面屏的基础曲屏,完全可以不用学习,轻松搞定。 新手拿到我们这个切割机啊,是不需要进行花大量时间去学习他的,你只需要找一两张这个烂屏去练习一下,找一下这个感觉,然后就可以在这个好评上面进行切割了。 一刀过来,这里就这这里就已经到位了啊,等一下拆的时候,这里就非常好拆了。 还不知道我们这款切割机是这个星球上最安全的曲屏切割机的朋友,请看以前的视频去, 这里就不再展示了。看一下我们这个切割的啊,玻璃没有震碎啊,这些还是保持原来烂的样子,这些碎的地方也可以随便切。 看一下我们这个上面啊,都是啊,你只需要上面这个位置,只需要切到这个黑边这里中间啊,看到没有,在黑边这个中间这里就可以了,不需要切过来,等下钢丝拉的时候,钢丝只要好进去就可以了。 看这边的话,这个湖边我们就切的这个也是显示屏这个边缘上啊,这个边黑边点亮之后,这个黑边看到没, 你再黑边一点点就够了。因为这个小曲面的话,这种小曲面的话,你切他一下的话,他就 非常好往下来拿了,你如果你切多的话,他粘的干胶太多,还不怎么好拿,所以就需要切这么一点点就行了。 大家看一下我们这边是没有裂的,没裂的话我们切完之后正这个玻璃也没有正裂,而且是一根完整的一根整条下来啊。我们马上分离完之后,给大家看一下这个偏光 有没有切到啊,因为这个位置的话,还没有挨着偏光,刚好在个液晶边缘上,把这个小条一一取掉的话,我们拉起来的话,那个偏光 永远都不可能把它割到。所以说我说新手,只要有这个切割机,你完全 可以把它当成一个直面屏来操作,完全没有没有任何一点风险啊。那大家看到这里啊,咱们这个道边的这个位置到这里我们就没有切了,大概还留了一点点, 我们就避免把这个边框给它切到,留了一大概一毫米啊,那我们现在要要把这个角连起来,那就把这个手指切割机拿在手上,从这个缝隙切到这里, 这不是刚刚完美吗?等一下进线拉钢丝的时候也是非常容易进去,而且能看到屏。看我们在这个特别碎的表面,我们一样可以给它进行切割 啊,这个就是我们手持切割机完美的地方啊,把这两条锯缝给它切来连起来啊。 已经购买我们切割机的这五百多个客户啊。今天你们看到这个视频, 请大家联系我们的客服前来领取这个自动对阵的这个螺丝头啊, 这个螺丝头我们经过全新的设计之后,换刀片的时候他会自动对正到这个最圆心里面。大家联系我们的客服啊,这个是免费赠送的。 加上解胶剂,用超薄刀片顺着缝隙化开,密封胶轻一点,刀片拿稳一点,不要翘,不喜欢用热风枪吹的人可以放在 离机上面,屏幕最少要达到一百度,胶材容易脱落。 来看一下我们 这个,看一下我们这个液晶,整个都在外面啊,现在你去拉的话,他绝对不可能当那些钢丝,而且这个边条非常的平直, 不会把玻璃渣,在你拉钢丝的时候把它带进去。这一集我们给大家讲解怎样去切割啊,那我们下一集给大家讲解 分离步骤应该注意的哪些思想啊。曲面屏就是拆屏容易烂,压屏没风险, 看一下啊,我们这个切割的这个效果,现在整个这个液晶都在外面啊。我们把一圈的这个玻璃渣全部处理干净了, 看一下,等一下拉的时候,完全可以说是闭着眼睛拉,只要你会做,直面 你我把这个瓶切成这样的话,你不可能把它拉坏。我们测试一下,触摸完全没问题啊。
454岳大师电子科技 01:16查看AI文稿AI文稿
粉丝寄来一个一加七 pro 啊,让咱们给他修一下外屏,先加热一百度左右,把这个屏幕从框上面拆下来。这个修屏有风险啊,下手一定要谨慎,否则就容易赔钱。 拆下来以后我们先测试一下啊,没问题,显示 ok, 再测试一下触摸,触摸也没有问题,加热一百度左右,再给它分离下来。曲面一般钢丝,曲面的钢丝现在一般零点三比较好用, 分离下来以后加热,用卷胶机给他卷掉,用胶 擦干净屏幕以后,贴好新的 o c a 胶片, 然后撕掉干胶保护膜,钛合金眼定位,定好这个位置,然后放入贴合机贴合一下,没有什么泡啊,除泡。 铺好炮以后进行装机,拧好所有的螺丝和小配件,双击加关注啊,修手机不迷路,我们给他测试好以后直接发货就可以了。

