
粉丝351获赞2235
相关视频
 01:14查看AI文稿AI文稿
他们的数据提供,这是欧洲一个啊博物馆提供数据制作的一个一八五特点,十六世纪的 他那个背面是,背面是十三十三条分布的背板,高板,然后拼接上 组成的音箱。所以说上面其他的配比啊,然后这里是手工雕刻的一个,呃,那个雕花 啊,这个弦轴也是通过这个,就是和古典其他这个弦有不太一样,他是呃木质的,呃,比较像小提琴类似的,所以他调音的话就是呃比较比较球一点这样子, 嗯,其他的其他的像这里是分布的一个啊纸板包裹。 然后我现在啊为大家弹一两首这个乳腺琴的音乐,因为可能很多人没听过他的声音。
4熹棠琴筝 00:17
00:17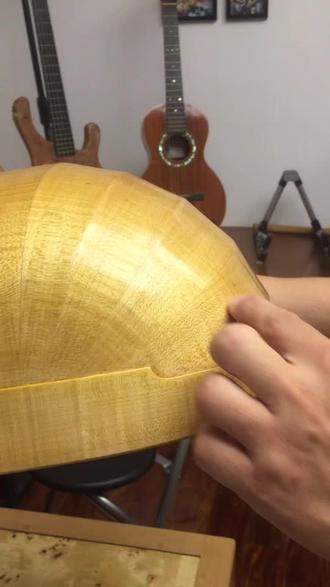 00:14
00:14 07:51查看AI文稿AI文稿
i think you're really gonna like this one so here we have the baroque loot it's a absolutely beautiful looking instrument this is the back here that is made up of individual strips of wood we call ribs in this case the wood is made out of this gorgeous orangey reddish flame maple and the top is made of spruce with this gorgeous decoration here called a rose the baroque glute gets its name from existing in the baroque period of music which is roughly sixteen hundred to seventeen fifty it was popular all throughout europe, but really blossomed in france now the instrument has twenty four strings which is a lot even for me the fiorbo as a point of reference only has fourteen now although it's true that there are twenty four when this is played it's really thought of as a thirteen string instrument and that's because each string is doubled we call them courses so there's thirteen pairs of strings and the top two are single those are called the shantohev or the singing strings this specific loot was made by the french company luteouet or the golden loot they're a company that makes great quality loots for a more affordable price and if you're a classical guitarist and don't want to break the bank, but are interested in learning asan's loot or broke loot this would be a great company to start learning now the tuning of this instrument is part of what makes it so special most guitars or loots are tuned in fourths and it requires you to use your left hand to fret notes to make a cord this instrument is tuned to a cord so if i play the open string we get a beautiful sounding d minor chord and that really opens up all sorts of new possibilities of left hand fingerings because it frees up the left hand in a new way allowing for new possibilities so the d minor chord is relied on the first half of the instrument and the rest of the strings are tuned in a descending scale, which is actually exactly what the theorebo does as well so from a we get g, b, f d c in this case i have b flat and a those those notes can be rearranged depending on the key of the music you're playing in this peg box is so intimidating to look at with twenty four different friction pegs, so there are no no mechanical gears those didn't exist until the nineteenth century these are essentially like violin pegs they just they're just held in with friction now there's some alien looking parts to this that that's that are new to me actually we have extension here called a base writer and you can see that the first nut stops here and the second extra one that has two courses gives it an extra, i don't know inch and a half or maybe two inches and that extra length actually is great for giving the base of it or so i've only had a few hours since i've got this thing in tune to start picking away at some music since this is all brand new to me, but i think i figured out the opening of a vice star bond that i used to plan guitar so i'll take a crack at it well, i'm sort of blown away by how this instrument feels to play it's bizarre because since i know this piece on guitar and i'm now playing it on the instrument for which was written it's so much easier on this instrument even though i've put in my ten thousand hours on guitar and this is my third hour or so playing this instrument one of the reasons has to be because this is a d minor suite a piece in d minor and the instrument is tuned to d minor i think another thing that changes the game is that because i have all of these open notes in the base, i don't have to spend so much time in my left hand fingering those and trying to play a nice legato melodic line they're just open played by my thumb which is really similar to what i do on furbo as well besides that i think the lower tension strings in fact they're very low i can really wiggle these around on a classical guitar they're very very tight, very high tension the low tension strings on this really makes ornaments so easy and effortless you get a sound a sound which is more equal between the pluck and the slur and i think that really helps helps the nullity along now the notation for this instrument is french tablets here tab right so if you're a modern guitar player tab is when you have the lines representing strings and numbers for which fret play this is pretty much the same thing except it uses letters for each fret cdefg etc, and the music is absolutely beautiful to look at there's this incredible aesthetic experience of playing from effect simily, which is a picture of the manuscript the original handwriting of vice it's beautiful to look at and so i'm just loving sight reading through this music it's a joy whoa an absolutely in love with this instrument but tuning the extra bass strings it's gonna take me a lot of time to figure this thing out but thank you for listening today as i learn about this instrument tune back in because i'm going to be posting more videos as i get better on this instrument and you can come learn it with me so thanks for watching and come back for more later。
 02:53查看AI文稿AI文稿
啊,很高兴啊,今天来这里就是想你是我的朋友啊,你们认识应该有七八年了,然后很高兴来到这里。认识啊,这么多 呃,玩音乐的朋友吧,然后这个是我制作,按照博物馆啊他们的数据提供,就是欧洲一个。呃,博物馆提供数据制作的一个一百五特点,十六世纪的 他那个背面是,背面是十三十三条分物的背板爆版,然后拼接而成 组成的,音箱是上面其他不太一样,然后这里是手工雕刻的一个。呃, 这个雕花啊,这个弦轴也是通过这个就是耳乎眼,其他这个弦有不太一样,他是木质的。有,呃,比较像小提琴类似的,所以他调音的话就是,呃,比较 这样球一点。这样子啊,为大家弹一两首这个鲁建情的音乐,因为可能很多人没听过他的声音, 谢谢大人。
 01:30查看AI文稿AI文稿
大家都知道吉他的前身是卢特琴,卢特琴是吉他最早最初产生的样子,那么大家看一下我手里面这只派文的 pc 五零这款琴 就是卢特琴的样子,所以在这里呢这款琴真的是延续了卢特琴的经典。同行好,我们镜头拉近,我给大家看一下 他的这个桶型呢,就是非常经典。然后呢在这里呢做了一个手工的半学的设计制作,然后这里是一个小的这个比较细的一个套手,比较符合人体工程学。我觉得比较亮的一个地方就是他的马仔,大家看一下, 非常个性,很有视觉度哦,很古典很古朴。这两边呢是一个实木的显钉,然后口轮圈也做了实木的一个镶嵌,所以迪丽把琴整体搭配起来显得古香古色。琴头我觉得也是很有视觉度的, 这中间做了一个镂空的设计,当然上面有个小小的我们一个 logo 的一个镶嵌,很漂亮。好,现在大家看一下这个图,它的材料呢是全桃花心的实物存单音色,大家可以听下我们的背景音乐,所以在这里如果你和我一样是一个颜值控的话,那么就可能这把琴你会和我一样。
17玉华乐器 01:00查看AI文稿AI文稿
the fiorbo in sixty seconds four hundred years ago in florence italy, a new style of music was created which led to the birth of opera in for this new music an instrument was invented to accompany the human voice they began them with the loot and in search for a louder deeper based range added a second neck with long strings up to six feet in length the italians called the keta ronae or tior bow in english, we call it the theor bow。
 13:29查看AI文稿AI文稿
hi, folks my name is adam and i like to make tiny nerdy things and a few days ago i was stressed eating a tobler room, bar and thought to myself hey, you know what this kind of looks like so naturally i'm going to start with the totaler own father i rather the box i mean you could make it out of the bar and eat the box but then unless you've got pika you'd probably still be stressed of course to reduce any chance of tobin ron related distraction i recommend eating the entire bar on once after all it's damn near impossible to focus on anything when you know that there is a triangular tube of swiss gold sitting in your cover the box will form the skeleton of my prison, but thin cardboard isn't really ideal for carving detail into so i'm gonna frame the box and some thin sheets of xps foam little tool, i'm using using here is a marking gauge for woodworking but it works wonder for making straight lines in foam once, i've cut my side panels down i'll find the center then mark out two straight lines off center of that then i can use a small hole punch to cut an arch in the top and with the two lines cut i've now got that weird century dealy thing in the middle of the prison wall i'll repeat the same process for the other two sides and i've caught my frame essentially built up from what i can see in still shots from the few times it shows up in the movies ask caban has mostly made a big old still in bricks so i want to make these walls bricky unfortunately this means that i need to carve out roughly 12 million tiny bricks by hand which means the time for a little redneck engineering the idea here is that if i clamp a bunch of these blades together then i should be able to cut the initial straight lines and chunks rather than one by one it also means that they'll be nicely based out since the blades are the perfect width for how large i want my bricks to be if i wanted them to be slightly wider than i can add little strips of tape or even paper in between the spacers sadly, i can't use the same method to get vertical bricks since it would be a perfect square grid and it just wouldn't look right so instead i'm gonna use a wire brush and stab my bricks into place i know it sounds stupid, but it works an absolute treat because of the size of the initial cuts and the random placement of the wires on the brush it ends up looking just like what i imagined a weathered worn brick wall in the middle of the ocean would look like if it's stupid, but it works is it really that stupid then of course i repeated the process for the other sides and i'm ready to glue them onto my tobler own box instead of cutting sharp corners to make the corners i'm just going to shape it using a little bit of gap filler and some long time viewers my channel will recognize this pale of filler as a recurring guest star on my show since it's one of my favorite materials to work with so if any of the marketing managers from ever builder watching hit me up otherwise, i've taped off the foam so that i don't feel any of my tiny bricks and i'm just gonna get the general shape of the corners blocked in this took few layers to build it up properly and a non zero number of hours to get it sanded down flat and sharp then once it's thoroughly dry i can cut the bricks into the gap filler using the exact same technique as i used to make the foam bricks to fill in the center of the prison, i'm going to cut a couple slightly thinner sheets of xps foam slide down the center then i can mark them out and cut them off flush with the top of the prison wall then i'm going to take a minute to realize that i just used a razor sharp blade to cut through the foam while using my finger as a depth gauge safety of course is always my number one priority to cover the ugly gap between the two wall sections i've cut a triangle to fit on top then cut another triangle out of that and then finally i'll add just a tiny bit of detail before gluing it into place now to make the band that runs around the perimeter of the prison, i'm just going to use some string a little glue will hold it in place and some gap filler will blend it into the wall and that's pretty much the prison finished spare chungs of thicker foam will work perfectly for making our rocky outcropping upon, which the tiny ascaban sits and then a bit of hot glue will hold the two pieces together then i can mark out where the present will sit and then it's a simple matter of cutting and tearing until i've got an appropriately rocky out gropping now, while i'm terraforming in the background i'd like to thank my newest patrons josh wakan, casty schmitt, stefan doom candy, wunderley and freshburg and martin, it's folk like you about make this channel possible, so if you'd like to help me make tiny nerdy things then follow the link in the description below of course sharing this video with commenting and subscribing make a huge difference as well so help a brother out and tell your friends with the base built a lot of hot glue hold the prison in place and i can get started adding the weird little extras onto the bottom of the prison, it's hard to find any references for how the prison is shaped since it's never actually described in any of the books since harold never saw it that being said i loved how ominous the triangular shaped movies was and there are some terrific pieces of concept art that have the bottom flaring out into a sort of wave breaker i really like this design because it's awful spooky looking, but it also makes sense because you need something to break the waves and keep them from battering into the front of the prison, i didn't really take any measurements because you know i don't really do that instead i opted to simply cut pieces out until i liked how they looked and how they fit and then as always i filled the gaps with my favorite gap filler, so this will be a post bellatrix estrange escape and a pre fixing the big freaking hole in the wall as caban, so i need to cut a big freaking hole in the wall to prime the model and make it a little bit more durable, i'm gonna mix a bit of gray and white paint into some mont podge this will give it a nice light gray undercoat make it a lot more durable i could use primer, but i find the airbrush primer takes a little too long to cure and the spray primer has a tendency to melt foam so mod podge is a faster safer solution black mod podge is my go to for this sort of thing but i want to wash the rocks on the bottom so a light gray base coat saves me a few steps with base coat cured it's now time to give the prison bricks and bottom wave breaker thingy majigi a nice dark gray making sure to get into all the nooks and crannies and once that dries i'll cover the entire model in a black wash this will sepend all the tiny bricks and really make them stand out and then once i apply it onto the rocks on the bottom it'll sepend all the recesses and really add some depth to those as well, i've come to really love washing rocks rather than painting them directly since i love the way they look with a series of blacks, grays and browns i make all my own washes using a mixture of acrylic ink, matte medium, water and flow improver these all get combined into i don't i don't now basically i mix them together until i'm happy with consistency and flow when i mix them, i like to have a spare piece of train to test the mixture on and then once my wash reaches a nice bounce of pigment and flow i call it good once the washes have dried all dust everything in a series of lighter and lighter gray dry brushes you know i love me a good dry brush and this is when all those tiny bricks really start to stand out the final painting stage will be adding some little streaks that run along the center thing that runs the perimeter as well some selective sections along the top and a few of the bigger bricks this is the sort of step that really elevates the prison and takes it from being a simple gray building with black wash on top to a beautiful gray building with gray highlights and a black wash over the top with random black wash streaks it's a veritable monochrome rainbow i hence such a good time in my last video pouring a resin ocean that i thought i'd try and do it again however, this time i'm gonna give not being a dumb dumb a shot and see if it works out a little bit better cut out a strip of perspects long enough that i can bend it into a roughly 20 centimeter wide circle then using all of the hot glue, i'm going to attach it to the bottom and carefully make sure that it is waterproof to try and reduce bubbles caused by the foam reacting to the resin i'm going to coat the base of the model with a gloss varnish in hindsight i don't actually know if this does anything but it's one of those things that made a lot of sense the time it would be pretty on brand for me to come back 40 hours later to find my prison floating on top of a rock hard resin ocean so i'll use a little uv resin to hold it all in place while the two part resin cures i want my ocean to be really dark and foreboding so i'm going to tint it pretty heavily with black and blue now the last time that i used this brand of resin i tried tinting it using acrylic paints and i left a lot of little floating bits suspended in the water i was able to pretend like it was intentional and that it was just some floating ocean detritus but given the scale of this i want to make sure that that doesn't happen so this time i'm going to try using inks instead of paints and naturally i'm not going to test it all and just go right ahead and add it to my full part of resin that is just gaze of pouring it into my mold and hoping for the best in lo and behold of the resin gods of smiled upon this simple crafter it's mostly bubble free nothing leaked out and i am left with a perfectly ominous bluish black ocean some of my viewers come into that you can use ice approprial alcohol to loosen hot glue and oh my god it's amazing the second you spray it on you can hear the acrylic cracking underneath and alcohol as it turns out is good for more than just thinning glue and overcoming social anxiety i'll clean up all the edges where the resin crept up the walls in the mold then i can get started adding the waves my weapon of choice today is going to be crystal clear silicone i like this stuff because it's the stuff i have and i like to use the things that i have making the waves is pretty straightforward i'll just squeeze out some gloves of silicone roughly where i want the waves to be and then i'll smooth the general shape out using my finger spritzing it with alcohol will keep my fingers from sticking and will help smooth the waves out to make sure the underlying section cures i'll also build the waves up in a few layers until i get the height that i'm after now i did spend all that time making a big wave breaker on the front of the island so of course, i'm gonna make a big wave to break opponent this is built up in the exact same way with big blob of silicone shaped into a big wave and then i'll poke it and prod it as it cures to help maintain that big wave shape so now i've got my waves in place, but they're not quite as foamy as i would like to make some sea foam i'll mix gloss mod podge with fine snow flock i wanted to reach a consistency that can be spread fairly easily, but i wanted to hold it shape if i'm trying to build it up again i really have no idea what the quantities are here so i just mixed it until i was happy then with the brush and some stir sticks i can apply it on to all the edges and tips of the waves and anywhere that i thought big splashy waves would become crashing off the rocks i'm normally a big fan of the less is more approach, but sometimes i like to live life on the edge so today i'm going with a more as more approach when it comes to the foam essentially i'm gonna treat the foam like frank's red hot i put that on everything then the absolute final step will be dusting the tips of the waves and any sections in between little white paint this helps to give it a bit of depth and helps the sea foam differentiate a little bit from the waves and any of the sections where i want the water to appear a little bit more turbulent and then with those finishing touches we're on to our glamour shots as always thanks for watching and if you like what you saw let me know in the comments below if you haven't subscribed yet now is a great time to do so as i upload new videos every week, and if you got a great idea let me know below, and i'll add it to the ever growing list of stuff i may never get enough time to finish otherwise, we'll see you next time cheers。
70GX 蜜蜂 14:30
14:30


