如何用plantuml画用例图

粉丝1997获赞8910
相关视频
 06:00
06:00 01:17
01:17 01:51查看AI文稿AI文稿
今天给大家分享一个呃,比较好用的画图工具,普兰特 u m l, 呃,它是一个, 嗯,通过编写一些代码,然后来生成嗯,流声图的一种工具。然后这边的话也可以看到他不光可以画呃流声图,还可以画顺序图,用力图呃以及下边的各种非 um 二的图。 嗯,这边的话他的使用也比较简单,可以在 vs 扣子上直接进行配置,嗯, 在 vs 扣子上我们点击扩展,然后在这输入 plus uml, 然后就可以找到第一个,第一个的话我们在这点击安装就可以安装这个插件,安装完插件之后我们就可以 新建文件,然后文件的后缀名要以 pu 结尾,然后就可以输入普兰的 umi 的语法,呃,这边的话他的官网官网上,嗯,大家也可以摆做他的官网,官网上也有,比如说咱们以活动图为例, 这边的话可以展示他一些简单的语法呃以及生成图片的样子, 嗯,用起来还是比较简单的。然后举个例子,这个这个代码就是我从官网上 靠背过来的,然后咱们这边点击右键,然后点击预览到光标位置,然后就可以在这边生成咱们想要的图片,然后如果想要呃保存下来,就可以在这 右键然后选择导出当前文件图表,就可以把生成的图片保存保存到咱们的本地。今天的分享就到这里,谢谢大家。
18792513927109 01:35263AI后端Marion
 13:23查看AI文稿AI文稿
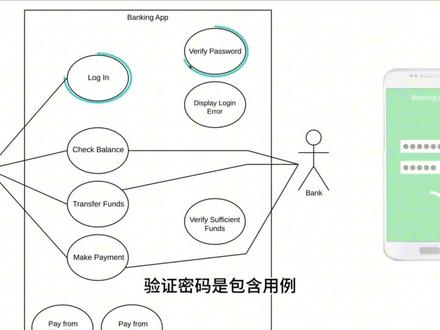
hi, my name is chloe and i'll be teaching you everything you need to know about uml use case diagrams we'll start with a high level overview then we'll talk about systems actors use cases and relationships and finally we'll build an entire use case diagram together and go over examples to explain these concepts in depth have you ever had an idea that makes perfect sense in your head, but when you try to explain it to someone else they're completely lost maybe your idea is for a new app and every time you talk about it people don't really understand how they'd interact with the app or what it would do this type of scenario is where a use case diagram is very helpful here's a simple description of a use case diagram first it shows a system or application then it shows the people organizations or other systems that interact with it and finally it shows a basic flow of what the system or application does it's a very high level and typically won't show a lot of detail but it's a great way to communicate complex ideas in a fairly basic way before we really get into the tutorial let's talk about how you're going to make a use case diagram you can draw them out with pen and paper but a diagramming application is going to be much easier today i'll be using lucid chart and you can too for free actually just click the link to access lucid charts website, enter your email address and you'll have a free lucic chart account in just a few seconds it's easy to use and you can follow along with me as we build a use case diagram okay, so we're gonna break down use case diagrams into four different elements systems actors use cases and relationships let's start with systems a system is whatever you're developing it could be a website a software component a business process an app or any number of other things represent a system with a rectangle and you put the name of the system at the top, we're going to build a use case diagram for a very simple banking application we'll call our system banking app this rectangle helps to find the scope of this system anything within this rectangle happens within the banking app anything outside of this rectangle doesn't happen in the banking app the next element is an actor which is depicted by this stick figure an actor is going to be someone or something that uses our system to achieve a goal that could be a person an organization another system or an external device so who or what is going to be using our banking app? the most obvious actor is a customer we are going to have customers that download and use our banking app another actor that we want in our diagram is the bank the bank is going to provide information that feeds into our banking app like transactions and account balances here are a couple things to keep in mind when dealing with actors first, it's important to note that these actors are external objects they always need to be placed outside of our system second actors need to be thought of as types or categories for our banking app an actor isn't going to be a specific individual or a specific organization we won't label our actors as john and chase bank we want to keep things categorical so right now we're saying that both customers and banks are going to use our app and this brings up the topic of primary and secondary actors a primary actor initiates the use of the system while a secondary actor is more reactionary so in our example, which actor is primary and which actor is secondary the primary actor is customer the customer is going to initiate the use of our system they're going to pull out their phone open up our banking app and do something with it bank on the other hand is a secondary actor the bank is only going to act once the customer does something if the customer goes on the app to see how much money is in their account only then does the bank engage with our system to provide the balance primary actors should be to the left of the system and secondary actors should be to the right this just visually reinforces the fact that customer engages with the banking app and then the bank reacts the next element is a use case and this is where you really start to describe what our system does a use case is depicted with this oval shape and it represents an action that accomplishes some sort of task within the system they're going to be placed within the rectangle because there are actions that occur within the banking app so what is our banking app going to do we're going to keep things very simple our banking app is going to allow a customer to log in check their account balance transfer funds between accounts and make payments towards bills so, if this is what our banking app does we're going to have use cases that describe each of those actions we'll have a use case called login another called check balance, another called transfer funds and finally make payment you can see that each of these use cases starts with a verb and reinforces an action that takes place we also want them to be sufficiently descriptive if this use case just had transfer that would be too big finally it's good practice to put your use cases in a logical order when possible that's why we put login at the top that's the first thing that will happen when a customer uses our banking app the final element in use case diagrams are relationships an actor by definition is using our system to achieve a goal, so each actor has to interact with at least one of the use cases within our system in our example, a customer is going to log into our banking app so we draw a solid line between the actor and the use case to show this relationship this type of relationship is called an association and it just signifies a basic communication or interaction a customer is going to interact with the rest of these use cases as well they're going to check balance transfer funds and make payment so we'll draw solid lines out to each of those as well secondary actors will also have relationships remember each actor has to interact with at least one use case so which use cases will the bank interact with when a customer wants to check their balance on the app, the bank is going to provide the cracked amount let's draw a line between bank and check balance similarly when a customer wants to transfer funds or make a payment the bank is going to follow through with those transactions we don't need to draw a lion to log in because that process happens within the banking app there's no need for the bank to actually get involved with the login process there are three other types of relationships in addition to association there's include extend and generalization let's build out this diagram with additional use cases in in order to explain these types of relationships when a customer types in their login information, our banking app is going to verify the password before completing the login process, but if the password is incorrect the banking app is going to display an error message, so let's create two new use cases for verify password and display log in error when a customer wants to transfer funds or make a payment our banking app is going to make sure there's enough money to complete those transactions, so we'll also create another use case called verify sufficient funds and finally when a customer wants to make a payment our banking app is going to give them the option of paying from either their checking account or their savings account so we'll create two more use cases called pay from checking and pay from savings let's circle back to this verify password use case and talk about relationships again how does verify password relate to the rest of the diagram neither of our actors are directly initiating this action it's just immediately going to happen within our banking app every time there's an attempt to log in this is an include relationship an include relationship shows dependency between a base use case and an included use case every time the base use case is executed the included use case is executed as well another way to think of it is that the base use case requires an included use case in order to be complete when you have an include relationship, you draw a dash line with an arrow that points towards the included use case so in our example login is the base use case and verify password is the included use case every time a customer logs in our banking app will automatically verify password this login use case won't be complete unless verified password is complete so we draw a dash line with the arrow pointing towards the included use case and we write include in double chevrons the next type of relationship is the extend relationship an extend relationship has a base use case and an extend use case when the base use case is executed the extend use case will happen sometimes, but not every time the extend use case will only happen if certain criteria are met another way to think of it is that you have the option to extend the behavior of the base use case when you have an extend in relationship you draw a dash line with an arrow that points towards the base use case in our example login is a base use case and display login error is an extended use case our banking app won't display a login area message every time a customer logs in this will only happen once in a while when a customer accidentally enters an incorrect password since this is an extend relationship we draw a dash line with an arrow that points to the base use case and write extend between double chevrons hopefully this thoroughly explains the difference between include and extend relationships, but just in case here's a very basic example to help differentiate between the two if you sneeze, you will close your eyes that's an included relationship because it's going to happen every time additionally if you sneeze, you might say excuse me that's an extended relationship because it's supplements the sneeze, but isn't completely necessary in the sneezing process just remember that include happens every time extend happens just sometimes and don't forget that the arrows point in opposite directions one quick thing to note is that multiple based use cases can point to the same included or extended use case for example both transfer funds and make payment are going to point to verify sufficient funds as an included use case, we want our banking app to make this check every time either of these base use cases occur you don't need to duplicate the verify sufficient funds use case the simpler your diagram the better the last type of relationship will discuss is generalization also known as inheritance when you make a payment from our banking app you can do so from either your checking account or your savings account in this scenario make a payment is a general use case and pay from savings and pay from checking are specialized use cases you could also use the terms parent and children each child shares the common behaviors of the parent, but each child adds something more on its own to show that this is a generalization we draw this type of arrow from the children up to the parent you can have generalizations on use cases like we have here you can also have generalizations with actors in certain scenarios you might want to distinguish between a new customer and a returning customer you can make them both children to a general customer actor which would allow you to have certain behaviors or qualities unique to each of these children one last shape that we'll quickly talk about is a use case with extension points you can see an example here the name of the use case is above the line and then there are extension points below the line extension points are just a detailed version of extend relationships this use case shows that a customer can set up their profile in our banking app and then these extension points show us that when a customer is setting up their profile, they'll have the option to navigate to a couple different screens if a customer is confused they can go to profile help and if they want details regarding their private information they can go to privacy info those extension points branch off to extended use cases go to profile help and show privacy info we can even add a note to show what sort of conditions would lead to these extension points now we have a complete use case diagram with various elements that help explain what our banking app does this is a very basic example but remember that even complex systems should be restricted to a simplistic visualization of functionality behavior and relationships if you'd like to take a closer look at this example click on the card in the upper right hand corner you'll find this exact banking app example plus several other examples and resources thanks for watching this tutorial on uml use case diagrams please subscribe to our channel to see more helpful tutorials leave a comment below if you have any thoughts or questions and lastly click here to try lucid chart for free and start making your own uml diagrams。
110观沧海,云雾初开 05:27查看AI文稿AI文稿
我们来看这个 u ml 的这个用力图啊,用力图,那现在他 地图是离线板呢,是内轴两个这样子的这个案例。那当然你可以点击更多的模板 啊,更多模板是可以在我们对应的这个呃,模板社区上面可以找得到啊,如果你觉得不错的,可以直接相应的这么一个使用,那我们来看一下相应的这种逻辑啊,我们可以看到这这个很简单这么这么一个图啊,收一块钱都有人克隆使用。 我们来看吧,随便找一个啊,松弛模板啊,对应的这个也很简单啊,他左侧的话就会有相应的这个符号了,我们把它拖出来,拖出来之后 来了对应的啊,他下面有一个名字,名字的话我们直接双击他啊,然后这个孔在这里一不小心点了一下,他会有上下左右的一个这个电头,上下左右电头呢,实际上他就可以链接到你对应的一些 啊,下一个步骤,比如说我们看这一个啊,这个会有一个什么系统之类的啊,当然你就文字有,你不需要了,你可以把它进行相应的这个删除啊,得到了这么一个形状啊,跟上面的一样, 然后按住这个鼠标左键去调整他的一个大小。那下面这个呢,也是可以调整的啊,下面也是可以调整的,那当然调整完之后,你记得这个这里这个这条线啊,这条线 如果也是可以把它调整啊,调整上面,但实际上他还是拐的,看到没有拐的话,你用你要弄的比较直, 实际上你可以把它弄成我们的直连接线啊,直连接线,然后把它拖上去,调整到水平的一个状态, 还会得到对应的这么一个效果。那当然如果你要需要改成上面的一种箭头呢,那对应的可以利用我们的开始连接线啊,连接线,那如果有有这种椭圆,那我们按住他啊,调整到合适的一个位置啊,需要的话 ctrl 加鼠标左键, ctrl 加鼠标左键, ctrl 加鼠标左键。需要给他对齐,那我们也可以框选他,然后使用我们的等距分布啊,你看现在等距了, 灯具完之后啊,记得我们的连线是怎么连呢?可以用我们的连接线连到这里,然后对应的 到这里,然后这个还是这个点往下,这个点变成红色的点啊,然后往下又得到这个,那当然有人要把它改成对应的这个直的,直的,我们怎么调整呢?点一下选择 把他这些线,可以把他扛抽上去啊,扛抽扛抽扛抽。右键来看一下啊,右键,当然这里出不来的话,那那对你们来看啊,或者一个一个来吧, 当你弄完一个之后,再给他复制粘贴,可以看直的,然后对应的这里也是直的, 这个也是直的连接线,这个是 知道啊,知道,然后给他做相应的口臭 选择啊,他刚刚刚抽完之后,实际上应该也也把他的这个电头设置一下来看啊, 对这种电头或者其他的电头都可以做相应的调整,看大家的这种距离的需求,那当然这边是按逻辑也是差不多,那,那既然这边有了,我们就可以 come to 把它按住它啊,而且 come toccome tov, 然后箭头已经有了,那对应了,我们可以 ctrl, 然后旋转一个方向,然后移动到合适的位置,继续 ctrl 一个出来,然后移动到合适的位置,那这么一个图案就可以出来了。当然还有一个矩形 举行啊,举行填充一个颜色,那在下边可以快速的填充,然后无线条,可以弄成无线条啊,或者其他的颜色, 然后双击,比如说我们的一个九折优惠券, n 七 o q, n 七 o q 啊,如果这个有九折优惠券没效了,大家可以看我的个人签名啊,对应的我们可以点这个加号, 可以更改他的这个字体的颜色,比如说白色啊,但是很简单的这么一个图的绘制,那更加更多的图, 思路基本上大同小异。这个颜色呢,是可以通过我们刚才说的下边的这个颜色条去给他做相应的填充啊, 没看这个五块钱啊,人呢?也有一个人克隆,如果有好的图呢,你可以把它发布到模板社区,发布到模模板社区 付费克隆啊,点每下载一次,那你就可以得到相应的报酬,也是这么一个情况,九折优惠券是在这个我的优惠券这里面输入啊,对应的 n 七 oq, n 七 o q 兑换,那奖励了就会点进去啊,用钱购买,买马子购买图的,是啊,给我们这么一个情况。
173蝰蛇设计-万兴专家


