倍加福光电开关两个按钮是如何调节
有传感器问题,上买到传感网。

粉丝1.1万获赞4.1万
相关视频
 00:35
00:35 01:12查看AI文稿AI文稿
又是一批贝加福的激光雷达维修测试,正常这一批贝加福的激光雷达 在客户那边是有的是连接不上,通讯不上,还有的呢,直接是这个外壳撞碎了,用不了。 然后我这边的维修方案是像这种连接不上,通讯不上,肯定是主板这一块出问题了,需要维修主板,更换损坏的芯片。 然后像这种外壳撞坏的呢,就要首先检查一下电路板,看一下上面有没有把东西撞坏,撞坏了就维修电路板,修好电路板以后呢,再更换外壳,这就是他的两个维修步骤, 现在这一批机器已经修好了,准备出货。
15工控仪器维修严工 01:27查看AI文稿AI文稿
智能制造与自动化产线中,传统接触式检测开关易磨损、寿命短、维护频繁且检测精度不足,常导致设备故障停机,影响生产效率。今天小姨给大家推荐德国贝加福按 b b 二到八 g m 五零一二电感式传感器, 专为解决此类痛点而生,为工业检测提供稳定高效解决方案。该传感器采用非接触式检测,无需接触被测物体即可完成位置检测技术等核心功能, 从根本上规避传统接触式开关的弊端。 m 八规格机身小巧,安装灵活,工业级防护搭配反极性短路双重保护, 耐用抗噪,可适配各类复杂工业环境。检测精准无延迟,电气兼容性强,能直接对接主流控制系统, led 指示灯更让粤梅变得便捷高效。产品广泛应用于机床设备、 汽车制造、三 c 电子包装、物流及各类自动化专机,可适配形成线位、零件技术精准定位等多种工业检测场景。凭借德国严苛品控、精湛工艺, 贝加福 i b b 二八 g m 五零一二传感器以精准、稳定、耐用的核心优势,为生产线高效运行筑牢保障。 作为制造业最值得信赖的 amaro 备品备件服务商,我们可以为您提供来自原厂的正品保障和价格优势。关注一科赛尔,让我们成为您关键设备背后最可靠的那张底牌。
2溢科赛尔 00:38
00:38 00:37
00:37 00:50查看AI文稿AI文稿
背夹符接近开关又称无触点接近开关,当金属检测体接近开关的感应区域,开关就能无接触、无压力、无火花, 迅速发出电器指令,准确反映出运动机构的位置和行程。即使用于一般的行程控制,其定位精度、操作频率、使用寿命、安装调整的方便性和对恶劣环境的适用能力,是一般机械式行程开关所不能相比的。 接近开关应用于工业控制机构执行元器件的位置信号反馈,比如步进电机的原点、气缸的位置等等。在自动控制系统中可作为线位技术、定位控制盒、自动保护环节等。
 13:18查看AI文稿AI文稿
hi, my name is jim bashirs, i'm a field applications engineer for pepperolin fooks here in the united states and the ctss for magnetic inductive and capacitive sensors in the americans today, we're going to look at installing and how to operate a basic pactware demonstration, including the dtm and the usb iolink adapter so first let's go ahead and open up a web browser i use chrome and go to pepperol and fooksa's website and we want to load the software pack just that has packed where the dtm configurator and the usb adapter driver in it, so we'll go to products industrial communications i o link we want software tools after that and if we view all products in the group not a very big group there's only one so the offline parameterization tool is what we want to use so we click on that go to software and it shows up as a link down at the bottom we will click on that and download it okay now that that has downloaded we will drag it onto our dust top and we do not need the web page anymore, let's go ahead and open the zip file and we want to extract all of this i'm gonna put it on the desktop in a folder okay that showed up here let's drag it down here, so we can see it better and now we do not need the zip program anymore, so let's delete that and double click on the parameterization tool okay you can see there's a few folders and a couple of license agreements and read me files in here what we want to do is click on this i o link parameo tool set up program and this will conveniently download everything we need into it, so we want to make changes and we like english here in the united stage, you have an option of either english or german and as you can see we'll get picked where five point oh with the direct connect version and then we will get the iolink usb master dtm and the iodd interpreter dtm which is a really important part of this so just like everybody does go ahead and read and accept the license agreements i know we all fully read those, we'll give this a little bit of time to go ahead and load so you can see up here as this is operating that we have installed pack where five point already and the packed where five pointle version with the direct connection in it so we have those two so far we have the dtm configurator installed down here close to the bottom so that's done that program can be run independently of packed wear okay so we have everything done we don't need the tool anymore, so let's close that out and we're going to before running packed where make a dtm file so let's open the dtm configurator and you can see here i have one for a uc four thousand already and the way i got that there's actually a few ways you can do it if you have your iodd file in a folder you can click on this and it will convert that into a dtm if you have a zip file with a lot of iodd files in it you can compile them all at once with this button here and if you want to you're out the or your desk or whatever and you want to go and you don't know where to get these you can go to a website called ioddfinder com and it will automatically find the iodd file for the device that you want to operate downloaded to your computer so that being the easiest and most up to date let's look for that now we have a uc four thousand up here let's go back and find out how we got that so we'll type uc four thousand if i was to put pepperol and fooks vendor name or id in here it would populate this box with every i o d d file from peppero and fooks and there would be a thousand so you really don't want to do that if you know the device name that in iolink revision, i mean it would just come and put everything in there that it found that had the right revision on it, so let's go for uc four thousand that's a pretty unique nomenclature for pepperon folks, so you can see here that it found two versions of the uc four thousand it has the two digital outputs and the iuep version is pepperon fook's analog output ultrasonic so both of these are going to be loaded if you notice up here, it says it's a uc four thousand thirty gm two ep iov fifteen and it also includes the iuep so both of these sensors can be configured with the same dtm file so when you do that you click on get data from my odd finder, since we have that we want these two so that will be included in this file, so we'll click on one of them down at the bottom it says add selected i o d d we'll click on that and we don't have any fdt frame applications running so we'll click on that and we would in this case want to replace it because i already have it you won't have that if it's not available, so since we have everything on there you can see we've got the two ep and the iuep version we are going to let's refresh it just to make sure okay it did keep it let's close this this is very important here it says please ensure that the next startup of the fdt frame application which is packed where the device catalog is updated, so we want to make sure we do that now we're going to run packed where that we now that we have a dtm file for the sensor click on packed wear here first time you operate packed where it may take a little bit of time for it to compile itself so we're going to skip ahead on this so we don't have to wait for the program to compile for the first time and we're getting an opening now here we go so now that we have packed where open we need to update the device catalog so we can either go over here on the right to the device catalog tab over here and we can see that it's already here but had we installed a new dtm file we go down here to update device catalog and click on that it asks if we want to create a new packed where device catalog we say yes and we wait again the other way you can do it other than the device catalog tab on the side here go on view and then click on device catalog or press f three and you might have to do it a couple of times and it will open up there it is okay so a couple of ways to get to it just make sure you update your device catalog and then you should be good to go let's close that out now since we've installed the dtm for the uc four thousand program automatically installed the usb master so let's go in here and build a tree when you you do that you go under the project tab and you can see that right now we're in the host pc the structure for this project tab is to build your way down to the device you have first we need to add the usb master because we have to go through that to get to packed where so we're going to install that okay now that we have the usb master added to the tree we need to add the uc four thousand beneath that so we will click on the uc four thousand and add that device okay now if you notice here there's a connection status icon we need to right click here click on connect and that will connect the four uc four thousand to the usb master we got a green connection we have a green connection here that means that it connected to the hose pc the uc four thousand connected to the usb device so now, we can if you want to see these information about the usb adapter you can double click on it and again everything loads slowly the first time you use it so here's all the information about the master it's connected now to port five or comfive on your computer so information that you need if you have issues installing this it's probably a comport problem so you can if it's not connected go down here click on this and select a different comport so let's go to the uc four thousand and see what we can do with that the first time you open or actually every time you open a device you're going to want to upload the information from the device into pactware, so we want to upload that so the pactware has all the relevant and up to date data from the device and you can see the status bar down on the bottom it's about thirty percent done now packed where will actually read the information that comes in on the dtm file from the iodd file and put the default values for the sensor in when it first opens up and you can see data transfer happening over here in the menu tree, it's working on parameters now and it jumps back and forth between all of the different data sets that it needs okay, so now that it's complete let's see what the sensor sees and this is not meant to be a tutorial on how to use packed wear in the uc four thousand this is just kind of a quick overview on how to download it and kind of navigate your way a little bit around packed wear and a little short information session on what you can do with it in a sensor so now you can see observation one point one six meters from what it saw when the sensor was downloaded the process data this is actually one point seven to five meters now if i would like to see this continually update there's two little icons up here one of them is if i want to see just the process data i can click on this one going to process data and you should see it continually update okay there we are so you can see the little green data transfer icon however, if i go to observation it's not changing so if i want the observation to change and not just the process data we have an icon for that too so we'll change the observation data to cyclic also, so you can kind of see it doesn't update is fast and as the process state it will but it still updates and on this particular sensor you get an echo amplitude, which is kind of nice you can use that in programs that you're using the sensor with an a plc or some other device that you can read the process state out of so to stop that we'll turn both of these off this is to read the information out of the device this is to write the information to the device so just a basic kind of standing of packed wear i hope this has been helpful and if you have any questions about anything please contact our tech support group at pepperl and folks and we'll be happy to help you thanks for your time and have a great day。
 23:58
23:58 05:46查看AI文稿AI文稿
大家好,我是百威,很久没有更新视频了,今天来带大家看一下这个琴脚传感器,这个是一个背家服的,看一下它的外观, 后面这个黑架子是个固定壳, 这个是他的方向旋转的方向所标识的一个指针,下面是他的接线 冰是二十四伏,下面 bk 是开关量的 q 一, wh 是 q 二开关量的 gy, 这个是四到二十毫安的反馈, bu 是零服。然后我们看一下它的接线啊,我们来找一个开关电源,把它供一个二十四伏电源给它装上,我们来调试一下, 那接线就是这样子的, 然后蓝色的话是他的灵符的副端,这个棕色的是是二十四伏, 这个的话是灰色的,灰色是他的二师傅反馈,现在我已经接好了,这是算接一个万用表,今天我们来调试一下这个, 来给他送个电啊, 好,电已经送上了,现在装的时候 一定要注意这个,一定要按他的指示针,这样子,要么这样装,要么这样装。也可以这样装,但是这样瓶装是不行的, 看他都不会有反应,看见没有他的电流是不会变的,这样子是不行的, 一定要这样装,这样装,然后必须得顺时针 看这个电流才会动。 现在我们来定个位试一下,定位的时候这两个 t 一和 t 二同时按 啊,按错了,哎,这东西不好按呐,重新操作啊,注意看他的指示灯。 好,现在就是进去了 设置的时候,这两个 t 一和 t 二同时按,按完了之后这个绿色的灯会消失,这两个橙色的灯会交替闪烁,不是交替闪烁,闪烁同时闪烁,然后我们按这个 t 一, 让他变 t 二的灯向熄灭,现在就可以了。 嗯,我们在定位,现在是必须得顺时针 看好,现在是四号安,我们来定一下,按这个按住之后这个 t 这个灯他会长亮一点五秒,然后又开始闪烁,就说明这个零位已经定好了,然后顺时针旋转这个东西, 看着这个指示灯啊, 然后继续按这个 看不见了,放高一点吧,放这个杯子上, 继续按这个灯,按住他,他还会显示一点五秒常亮。好,先保存再退出,一直出来了,然后就显示二十毫安,这个有点不太准啊,这个是有问题,是换下来的。 然后就是我们现在定完,定完了,然后看着这个变化,我顺势逆时针旋转, 看到了吧?就是这样定的, 定完位之后 他就会退出来,自动退出来,这个绿色的灯会亮,常亮这个就会消失, 这个灯常亮的意思是啥?这就是两个那个开关量的输出点。
45工业百威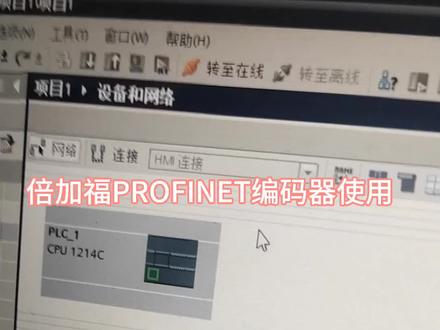 09:00查看AI文稿AI文稿
五月九号睡觉之前给大家分享一下 perfect net 编码器的使用,这里呢,我已经打开了薄图,插入了一个幺二零零, cpu, 先放这里, 然后我们呢找到那个编码器的硬件,那么这个第三方的这个编码器,他就会在这个硬件目录的这个 perfect netl, 因为我们这个编码其实 perfect net 的就是网线通讯的,然后你就点开, 点开这个 perfect, 还有这个菜单,然后找到这个,你看这个是英文 in incoder 啊 incoders, 然后再点这个是贝加福的一个文件夹,再点他就 会出来一个前端模块,这个前端模块就是编码器,你标准我们用的是标准,然后上面这个是这英文是多圈的意思, 下面这个是单圈,我们现在用的是多圈,然后我们用的是这种幺二幺三,然后你双击他,他就到这里了,对吧?然后你就点这个未分配,然后再点这个,他就自动连上了,自动连上之后呢, 那么怎么使用它呢?它这里是它这里首先是不能使用的,就说你得插入一个, 插入一个子模块,这个子模块是编码器的,那这里写了背 家福编码器的豹纹八六零,双击它,嗯,这怎么弄不上去呢?啊?要把它打开,嗯,双击这个编码器图标,然后再找到它, 再找到刚才那个子模块, 哎,这回过来了,在这里,然后你看他写的地址,你看啊, i 是二开始的, q 也是二开始的,那么他怎么使用呢? i 二到九啥意思啊? 这个 i 二到九呢?这个 i 字表示是输入,输入对 pr c 来讲它属于输入啊,就是二到九,一共是八个字节, 嗯,二到五就是四个字结,对吧?然后呢八个字结呢,就是四个字,那么就是说八个字结,四个字,就是就是这这个四的意思啊,二到五是四个字结,就是两个字,就是这个意思,也就是说这个编码器是有, 嗯,有这个四个输入字节和两个输出字节。那这里面 怎么用?含义是什么呢?那我们先,我们呢要编一个程序啊,接下来呢我在这里,嗯,设计的一 f b 块, f b 块的设设计呢?嗯,就直接点添加新块,然后呢 点击 fbf, 我在这里顺便说一下 fb 和 fc 有什么区别? fb 呢,你调用的时候它会产生一个背景数据块, fc 就不会,那么这里我用的是 fb, 然后你 点击 fb, 然后点击确定,这里的确定就可以了,但这里我已经弄好了,然后设计了一个嗯,他这样的。 呃,音 pro, 首先这里啊音 pro 就是表示输入,我这个块的输入 output 是输出,然后编码器我定了几个边量编码器的脉冲地址,也就是说我这个编码器要读这个脉冲的 地址是多少?这个地址就是刚才看的那个 i 二, i d 二, 因为这个数据类型是 dent, 所以叫 idid 二,然后速度就是 id 六,因为中间要隔四个嘛,就是 id 六, 这里有个编码器的线数啊,对于我们现在使用的这个贝加福编码器,他线数就是每转一圈他是多少个脉冲,这个我查了资料是八幺九二个脉冲, 然后这里我选择了一个校准脉冲,校准脉冲就是这是输入的,就是因为我这个编码器是需要校准的,比如说把它校准到某一个脉冲,那么你把这个变脉冲值校准一下就行了,然后这个是校准的,这个 就是如果是一他就校准,然后呢输出就是输出当前的脉冲的时数,因为我们在计算的时候呢,通常都是需需要时数计算的,而不是这个整数计算啊。 然后呢叫零,也有地址的,这个叫零,地址呢就是 qd 二,因为我们这个是 d wordqd 二,就是刚才那个二到九和二到五啊,然后速度,因为我要算出这个编码,记得速度,然后具体的下面就是,其实这个也很简单,首先 编码器的地址是 d indiant, 就双轴,你要把它转换成瑞尔,就转换成实数,我们一般程序里运算都是都是实数运算的,然后 校准校准脉冲,也就是说我我要给,比如说我要给变化器校准一万个脉冲,那我就把这个脉冲值,当然也要经过转换,我这个脉冲是个 是一个实数,然后转换成 dentdent, 再转向 d y 的,然后再给这个校准脉冲脉冲编码器的速度,也就是 id id 四六六, id 六 id 六给它,然后变慢器的校准,就是如果按下去这个是一的话, 如果这个是一的话,那么就是说校准的话,就是把你的校准脉冲,这个是异或指令,异或指令一个异或一个这样的一个指,这也是说明书上给的, 然后就给他就可以了,否则的话就给个零,这个就这么简单。然后呢我们在 o b 一里面把它调用一下,然后这里,然后他就会让你搞一个 d b 块,我们直接就按确定, 然后你把那个地址,刚才那个输入地址,啊,是是那个二,对吧?在哪里呢?我让大家再看一下啊, 你看这个输入地址就是在这里的二,输入地址也是二开头的,那么输入我们是需要两个的,一个是呃脉冲数,一个是速度,也就是 id 二 和 id 六,输出就只有一个校准脉冲,就是 qd 二,我们再返回来, 那么这里你就直接填 i d 二, i d 二,下面这个就填 i d 六。 嗯,这个线首先不管它叫准脉冲,当然你这里可以搞一个变量啊,你也可以直接就是用用这个 d b 快也可以,然后叫声你也,你也搞一个, 搞一个这个变量也行,不搞也行,就直接用这个 d b 块的也可以,然后呢叫零地址,你要写了,这就是 q d 二, 这样呢你就可以把这个编码器的数据读出来了,这里呢我再讲一下 这里,大家看一下啊,这里是一个二十五位,二十五位啥意思?二十五位就是二的二十五次方, 二的二十五次方,再除以一个他单圈是八幺九二,再除以一个八幺九二,就等于四零九六,也就是说我这个编码器是多圈编码器,最多可以转四千零九十六圈, 之后他就会变成负数,根据你的工程需要看是不是超过了这个这个圈数,如果超过这个圈数的话,可能就不能用,就到这里了。
401佛山秦岭科技有限公司


