chemdraw如何打出有颜色的框
今天给大家介绍一下拍不到十四点零左侧的这个工具都是什么意思?上面这两个呢是 选择工具,这个选择工具呢一个是方框的,一个是这种圆圈的,这两个呢有一些区别,这个区别主要在哪呢?在选择的时候,我们比如说要选择下面这整个结构的话呢,我们就选这个方框型的,这样拉一下就好了,这个比较方便。 但是如果说我们只想选择这个结构中的一部分,比如说下面这一部分怎么办呢?我们就必须要选用这种套索型的, 用这种圆圈形的这种套筒工具,然后比如说我们选中之后呢把它颜色改为红色,这样的话呢这个不规则,我们不可能通过拉来选择这一部分,所以说呢这是这两个区别,这个呢是一个立体立体视图,就是 说我们选中了之后呢,我们可以通过推拉,然后呢看他的这个立体的结构,立体的旋转。 下面这个是单件,这个呢就就是说我如果说我们要画单个画眼线的话呢就选这个,然后这个呢是橡皮擦,就是说呢我们想要把某些东西擦掉来选这个就行了,我们可以点点着不不松,然后呢一直划,然后呢我们所有的东西呢都可以划掉, 然后这个呢是化学键、双键、三键粗细键,然后呢要持续键等等呢这些化学键都在这里面,这个呢是一个文本输入的内容,就是说如果说我们想要输入一个文字的集团,比如说输入按键, 我们需要先点击这个,然后呢在合适的地方,比如说这个蓝色光标出现的地方呢,点 a 选一个 a 区二,这个呢就是 可以了。下面这个呢是虚件,这个呢是钢笔工具,钢笔工具,这个呢是也是一个虚的键啊,这个一般用来做这种立体结构的。然后这个呢是箭头,箭头呢有好几种,比如说这种 这种这个双电子的,或者说呢箭头大一点的,小一点的空心的,然后呢弯弯的,这种表示单电子转移的那种鱼钩型的,鱼钩型的箭头包括可逆反应的箭头等等,有很多种类, 这个呢是谢行界去的谢行街,这个呢是轨道,就说 s 轨道、 p 轨道的轨道等等这类的轨道,那轨道的下方呢是各种图形,这个呢大家需要区别区分一下,这个图形里面呢有圆、椭圆,然后呢方框等等,还有这种实心的, 包括这种长直线,长虚线,然后波浪线,还有这种弧形线等等,这个呢是十的线形键,虚的线线线。然后呢这个是波浪舰,波浪舰呢一般表示断剑,对吧?比如说我们这个想要在这断一下,然后我们就选中这波浪舰,哎,在这点一下就好了。 这个这个地方呢就是比如说是括号,有方括号、大括号、小括号等等,好了再往下面呢,这是电子,各种各样的电子符号,表示正电和负电荷,分电子、自由基,双电荷等等, 这个呢是表示对已有的图形的进行进行标注的,这个呢是画表格的 a b 图,比如说呢比如说我们在这画,或者说呢你点击一下,然后他让你写 几行几列,比如说这是二行字列,比如说写三行五列,然后 ok, 然后这个新的表格就出来了, 这个呢是画那个波桑斯湖版的,波桑斯湖版的这个呢是画长的这种链状结构的,比如说我们要画一个正几弯,正几弯,六个碳,对吧? 六个菜呢?我们这样画的话呢,这个比较慢一些,如果说我们直接选中这个结构,然后直接往右边一拉, 哎,这六个碳已经出来了,这个呢是模板,模板里面呢有很多内容啊,大家看一下这种彩色的这种人体的结构和玩死不要撞,然后氨基酸的侧链氨基酸,还有这种人体结构,小动物,然后方环球环,定环等等,还有常用的这种 实验室的仪器啊,小飞虫,然后各种玻璃仪器,然后各种构像帽环,就是说芳香环,帽环,然后那种大的 放完听电 a, 然后各种关灯团,然后各种各样的,反正这里边呢有各种各样的这种就是 我把大家用的时候呢可以找一下,然后再往下边这一部分呢,就是这三用环、四用环、五用环、六用环、七用环、八用环,包括正九就是缓解完以示勾向,还有这个环环的吸合 比较懂啊,对吧?这是我们常用的这一部分结构内容,这个结这个工具呢,我们就说到这,谢谢大家。
粉丝52获赞517
相关视频
 01:23查看AI文稿AI文稿
首先敲黑板,划重点,这是一个全新的合集,主要讲一下化学结构式绘制软件 cam jo 以及 cam 三 d 的相关教程。今天我们讲的是如何绘制这样一个多彩的含本环结构的化学分子。我们先随意绘制一个含本环的有机物, 单击左侧本环图标,先绘制第一个本环,再选择左侧单件图标,将鼠标定位在第一个本环的碳原子上,绘制一根单件,用类似的方法将这个有机物画完。 画完之后,我们单击左侧套索工具,将遇上色的本环圈住,右击本环,依次选择颜色,减去环形填充颜色工具栏,这样就 会出现一个新的工具栏。接下来你就可以选择自己喜欢的颜色给本团上色了。如果没有你喜欢的颜色,可以单击更改自定义环,填充颜色按钮。接着选择规定自定义颜色, 调好色后,单击添加到自定义颜色即可。在左侧自定义颜色中进行选择上色,如果不想着色的话,单击 remove 按钮 即可将颜色擦除。今天简单讲了一下本环上色的方法,后续我还会分享更多有关 camera 的知识,我们下期视频再见。
432Return3656 00:21
00:21 12:54查看AI文稿AI文稿
今天给大家讲一下这个 kfco 的一个基本操作,然后主要是三点,第一点是 啊怎么去啊?绘制这样比较漂亮的这种看着比较舒服的这种呃结构,这种分子式的一个结构, 可以看一下像这种的式的方式怎么画出来的,这种分子式我觉得看着非常舒服,然后这个方再加一个基本的一个练习。然后第二点是这个本环,那个上色的 加上一个快速输入同类型的圆子和圆子团。呃。接下来的话我们进行一个操作,先大概去输入一下, 以这个为例子,大概输入一下他的一个呃个体式, 然后这个地方我们来先试一下,先试试来试一下这个格式,然后这个地方在这个肺袄里面 点这个 o o 喷 clc, 然后找到这个接 h e t p p p p。 这个叫来是从这个格式,因为我这个地方已经点过了,所以我这个地方就不再点了,你们自己点之前这样点一下就可以了。然后接下来的话就是一个呃换元件的一个位置, 然后我们先点这个单点,然后往上,然后他是这个点一下,点一下, 然后这样的话我们再去上这个圆球,可以把这个调出来比较方便。这个在哪里?这个也是在这个 vivo 里面,在 是在奥迪的那个太空的,我们点出来就比较方便输入这个原子了。呃,然后另外的话我们就可以来输入物理方,我们双击一下,然后选下七, 放置一下, 嘴巴是一个蛋,嘴巴是一个蛋, 其中这个 r 的话需要输入一下,好像没有 r, 然后他的地方还有一个青,但是在下面我们选这个 服,然后输入一个七, ok, 把这个七往这拨一拨, 哦,这样的话接下来是那个箭头,箭头的话我们先用这个先点着, 因为呢其实就是这个点 也差不多,应该是这个箭头的头太大了,换一个 感觉他的用的是第二个箭头,第三个,第三个箭头吧,然后对用的这个,然后我们先画个箭头, 还有下面这个箭头的话,应该用的是这个,应该用的是这个,然后我们再来试一下, 放大一下,然后按这个调整一下, 我们再点一下箭头,把它这个后面这个位置这样调整一下。对,然后弧度调整一下,然后再把这个移上去, 然后做一下鼠标,然后让他一一踩,那个感觉要让他重合,还是有点重合的感觉,往下来一点 好,其实差不多应该在一点这个他这个怎么一下就一下子啊?这两个线还是不能重复的,我发现 这样就差不多了,然后然后我们就来输这个字体,这个我们是可以前输的字体可以直接选中,然后按住 ctrl, 然后拖一会过来就可以了,然后这方我们再放在这个单键的 这个命令一下,然后我们双击一下,然后输入 sos, 还差一个二号,其中的二,我们要给他来一个这个下下表, 我们同样按住 ctrl 键,给他按住鼠标左键,单手左键不动,往上拖一下,然后这边把它复制,复制一个过来,我们再按一下这个按键, 在单线上面念一下,啊,是这个, 这个是个下标,不要下标,不要下标, 当然我们也可以直用这个,这个就比较方便。好,前面还有个二。好,我们整体把这个移一下, 挨的太近了,我们框选这个,没框选没框选他,把这个心放 别太近了,我的天,这个键在一起加选,然后往这边移一点,像他一样往这边移一点距离,然后再选选这个,看着看错键,往这边再移一点,就这一份。 嗯,这边的话直接在改原子,在单件的形式下,然后双击这个,然后点一下绿,双击一下,点一下绿, 然后这个地方其他地方是一样的。二四, ok, 然后在这个框选情况下,发现这个地方有很多警告,我们选选,然后右键点 把这个去掉,就是说就出来个玻璃。 ok, 这个其实后面的就是往后面梳一梳,大概就是这个样子。 接下来我们讲这个怎么本还上色,就是这个的第二点,本还上色,这上色有几种,可以是直接上色又上这种,这种带带类似于渐变色吧,我觉得这样称之为渐变色。 然后这地方的话我们直接来接着看, 感觉有点卡,我们来看这个例子,然后我们先画一个本环,然后画时间啊, 然后准备,然后再来一个粉画,然后其实也不需要给他画成一样, 我这个地方是不知道有没有这个物质,随便点的一个, ok, 看看,就是这样, 我这边的还有蛋清,这边是一个蛋清店,然后还是刚才那样的放低的这个地方,然后给他一个蛋, 然后点一下,然后再给他一个心往下,对方给一个心, ok, 就好了, 然后给他上色,这上色有好很几好几种,然后有比较比较方便的是像比如说上色,我已经把它归到这边来了,当然你们也可以在这个右边,然后有一个,有一个上色, 看一下在哪里。 哈尔,这个瑞奥卡尔,这个你们随便选种颜色,选一种这种淡色他就穿好色了, 然后这个其实比较方便,然后当然像这种渐变的颜色就是另外的方式了。我先把这个地方,然后还把这个东西固定在这里了,然后这里面随便点一下,上一下这个颜色。 好,这这这地方先在这里,然后我们再不至于分,不至于分的话 这个上色我看能不能去掉尾部。 ok, 全部去掉,去掉我们再上这种第二种颜色,像这种上色的,这种的话一般是需要给, 嗯,是用钢笔工具,然后先点一下, 然后选一下这个右键看一下, 哦,要在这个地方点一下,我看是点哪里?对,有时候点出来是不一样的。点这个点,哦,点这个点这个点 他有一个叫贝尔的填充,填充模式,用这个模式,然后这样收拾好了就把这个删掉,然后我们再来填充, 再来填充的话我们继续进行一个 操作。呃,接下来的话我们就继续来操作,然后就开始点这个线,点一个点,找到本环的四角这六个角,再点一个点,再点一个点,再点一个点,再点一个点,再点一个点, 好,再点最后点这样的话他就重合了对方的颜色,我们可以进行一个设置,然后我先把他移出来右键,我们可以点个卡的,卡的话可以给他来一个 这样一个绿色,绿色他这样的一个形式有几个就废的配色,然后那个这个借着这个看一下不错, 但是你看放进去他就不是这样的,所以我们需要给他右键给他置顶,置顶较不容易区分,我们就 点上去,然后把这个移过来, ok, 这样的话就完成这样一个,其实后面的就直接复制,按住反锁键不动,然后再给他复制一个。 但是这个地方其实我们还是要重新右键给他本子刷,然后给他放进来,然后再把它的颜色修成其他的颜色就可以了,这地方填了一个蓝色, 同样呢我们再把这个地方卡住,按着不动,再复制一个,然后这个地方又是右键把它点一下不允许放, 然后把这个再移过来, ok, 这个颜色我们同时也换一下绿色、紫色, ok, 这个颜色也还行吧。呃,这样的话就等还上色就完成了这样 个一一一个过程,当然这样的甚至是稍微稍微好看一点点吧,就看你自己的一个意愿。然后第三点是快速输入同类型的圆组合,圆组团,当我们有的时候,他这个比较多的时候,比方说像类似,像这种他我们都是一样的。 好,我们举个例子 哦,然后这个地方给他每个集团这个地方 先给一个七,给一个七,然后这个地方给一下这个取下, ok, 然后你点下 a, 因为我最后输的是那个三十三吗?所以这个地方 双击他就变成 cs 三了。如果说我们这个说是清的话,他就是变成清,然后我们点一下这个坏键,然后然后他这一方可以输入一个清 啊,对, ok, 然后我们再点这个 a 的话,他接下来就是输的很轻, ok, 大概就是这么个意思, ok, 谢谢大家的观看,这本期的视频就是这么多。
740研理科研线 03:28查看AI文稿AI文稿
啊,给大家好,那么最近的话呢,看到某个平台上面有小伙伴的一个帖子啊,就是啊就是讲像这种一个呃算是一个寡居物吧,就是这样聚合物啊,他这里的这种外面的这一层这个圈圈啊,怎么去绘制的一个问题。 那么这个的话呢,我们来看一下子,嗯,这里的话呢,我能想到,呃两种方案吧,算是。呃,比如说我们呢绘制一个这个本环啊,就是当做这个 啊,当做这个用的,然后呢我这里的话呢就是找到这个弯曲的这个绘制一个这个九十度的这个 好,那么在这个地方放一个,好,跟它这个贴合在一起,然后水平复制到 左边来,然后呢给它旋转个九十度,然后再往回移一些啊,然后的话呢再复制一个这个这样子的一个键 啊,在这个地方给他可以可以把它放大一些,然后给他调整一下这个位置,然后再把它水平过来放在这里。 好,然后这个的话呢在竖直向上复制一份,然后呢旋转个九十度,然后呢给他贴住, 然后在水平向右,然后呢再给他旋转九十度,好,调整一下,好,接着的话呢再给他啊复制这样子的一个这个键,画一根好,然后把这个地方呢向右 水平延长好,然后呢选中这个部分啊,然后在这个按住 shift 向上拖动啊,这样的话就可以绘制出来这样子的一个一个框架啊。 那这是第一种方案,就是我们用这个这个弯曲的这个九十度的这个壶呢,给他组合一下啊,就是这个样子的 啊,进行一个组合,就是把这四个角给他画好,那么另外一种方式的话呢,我觉得可以用这个,就是这里面不是有一个这个吗?啊,我们这个绘制一个这个东西,在这个这个地方 好调整一个大概,呃,我们这个两个的话呢,给他居中居中显示一下啊,这样对齐一下,然后呢把这个给他拉长。好。这个时候的话, 你看到有个什么现象,就是这个这个带弧线的这个方框呢,把这个地方呢就是挡住了啊, 挡住了的话呢,这时候的话,你把这个呢就是你,你就算把它放到前面来啊,他也是没有用的,因为这个这条是一个实线,对吧?那你可以这个怎么样的呢?我们来这里加一条这个白色的,这个就是加一个这个绘制元素啊,这个矩形的绘制元素。 好,那我们呢绘制一个这个矩形的框啊,放在这个地方, 这个时候的话呢,我们把这个矩形的框呢给他颜色改成这个白色的,然后再把这个结构式呢给他放到这个最上层。 好,那么这个样子的话呢,也可以啊,大概就是类似于这样子的一个啊,一个绘绘制方法啊,那么呃分享给大家啊,希望的话呢对大家有所帮助啊,谢谢大家。
 02:48查看AI文稿AI文稿
啊,各位大家好啊,最近的话有小伙伴呢问这样子的一个,就是这种彩色的啊,这个渐变色的一个,这个本环应该怎么绘制啊?就是这本环里面的话呢,就是这个边上的话呢,是这种有色彩的,然后中间的话呢,是这种 呃近乎白色的这样子的一个渐变色的一个这个本环的一个颜色填充啊。 呃,那实际上这个的话呢,他应该是用这个 cambridge 这个至少是二零版本的啊,或者说二一版本的他去进行一个绘制啊。 呃那个版本的话,你在右键的话呢,这个 colors 里面会有一个这种填充的这个选项,然后你去选择这个啊,但是我这里的话呢,是这个二零一四版的,二零一四版的话呢,我们只能说 使用这个就是呃这个铅笔工具啊,然后这里面选择这个第二个, 然后的话呢你去绘制一个啊,在这个呃折点上面去绘制一个这个封闭的这个六边形啊,比如说我们这个是本环的话,你就绘制一个六边形 啊,这样子得到一个封闭曲线之后啊,你把这个曲线呢啊选择这个,呃这个呃 shaded 啊,他就会变成一个这样子的,但这个的话呢,他这个渐变色的话呢,他这个呃并不在这个正中心啊,就说这个浅色的部分,嗯,就说你比如说改变他的一个颜 颜色啊,比如说是这个样子的啊,但这个空白的这个地方呢,并不是在这个像他这样子在正中心啊。嗯,然后这个对象的话,你再把它放到这个背面去, 好,就是这样子的一个效果啊。啊或者的话呢,我们把它改成这种蓝色的啊, 就是这个渐变色的话,就是在二零一四版的话呢,这个,呃渐变色的这个空白的这个地方呢,他不是在这个本环的这个正中心啊,他是在这个左上角啊,和这个的话呢有一些区别 啊,那么这个的话呢,我想应该是用这个二零版本的,我之前也安装过二零版本的,是可以这样子去绘制的,但是的话呢,我现在这个已经不是二零版本的了,所以的话呢啊,因为我觉得这二零版本的话没有 这个二零一四版的好用啊,这个反正用起来的话呢,所以后来我又安装回了这个二零一四版的。呃,那么这个的话呢,就是也是一个类似的一个啊,呃,就是这样子的一个渐变色的一个绘制啊,呃,希望的话呢,对大家有所帮助啊,谢谢大家。
40DJ_Tokyo 00:39
00:39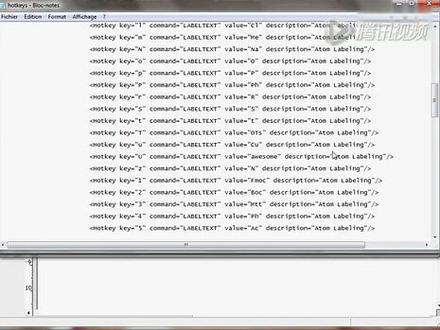 14:48查看AI文稿AI文稿
hello, everybody, my name is pierre and this is my advanced kendra video tutorial that is intended for everybody using this software who would like a way to draw molecules a little bit faster to show you what i'm talking about and what you actually can do with kendra as an introduction i am going to draw viagra under twenty seconds so you're probably wondering how i'm doing this while that is the point of this video and i will cover that very soon and we're almost down here and that will be less than twenty seconds now so to be fair i could have also done this under five seconds as i happen to know the genetic name of viagra is sealed in a field i type select control shift n and i get the structure and this way you can also double check that but i didn't do anything wrong before we get into details i'll start with general shortcuts let's just draw a molecule quickly here this is l syrian so with the market all selected if you double click on a molecule you select the whole molecule and if you hold shift while you move it it moves it straight, horizontally or vertically when you have a molecule selected if you hold control and then drag you will quickly make copies of the same molecule so of course now we can combine both control shift and then drag and you will quickly make a line copies of the same molecule if you hold shift and continue double clicking you will select defined objects and double clicking again on it will deselect them now a small trick for reactions let's say we have a reaction like this and this reaction with reagents and conditions so if you take the marky tool and double click on the arrow you select the entire reaction including what stands above and below the arrow and this way you can quickly copy entire reactions now a couple more shortcuts let's change molecules for this i'm going to go with trip to fan yes, i like amino acids so with the molecule selected if you hold control shift out and then h you flip the molecule horizontally and with the v you do the same vertically note that if you do not hold out only control shift and then h or v you flip them all here but you do not retain this tv your chemistry a convenient feature of this action is that you can flip only a part of a molecule so for this i'm going to introduce another shortcut to the lasso tool when you have the market tool selected if you hold out it switches it to the lasso tool so this way you can conveniently access only part of a molecule selected like so and now if you press ctrl shift out h you flip only a part of the molecule lastly, i'd like to cover the cleanup function and for this i'm going to draw quickly your porefriend scaffold i'll draw a couple of five input drinks here that i connect and if you're wondering how i'm doing this i am simply holding out down while i'm using the solid bond tool and it allows me to get the bone length that i want so now i'm going to select the molecule press, ctrl shift k and in journal i'll have to press it several times to get to something that i'm satisfied with so now we're going to double check the structure as usual i write porf hearing i select press control shift n and i get the structure there you go okay let's not move on to the real thing and that is the hotkeys hotkeys are the reason why i'm able to switch between drawing tools like this without even reaching the toolbar also this is how i can modify bonds and atoms for example by default if you go over a bond and press two you make it a double one if you go over an adam and press o you get an oxygen and press n to get a nitrogen so it's all very intuitive but in practice i'd prefer to have it customized my way and this is what this video is about to customize things you need to find one file named hot keys xml to locate it you have to go to file then preferences then directory's tab and that will give you the pat to several kendra folders and you have to follow the one that ends with kendra items now for windows user you have to be careful about one thing is that program data is a hidden folder by default, so you need to enable show hidden folder options in windows okay, so once you have found that file you go to hotkeys you open with a basic text editor and this is what things look like inside so it's important to know that one given hotkey can have up to three different actions and this is why in this file you have three different sections so the first section here object type equals atom is where we're going to find all the shortcuts that apply to single atom in camdrow in the second section object type equals bond is where we're going to find all the shortcuts that apply to bonds and the last section the generic section is where we're going to introduce shortcuts to quickly access drawing tools so to show you how to customize things yourself i'm going to fully customize one hot key that i don't use and that is the hot key u so first i'm going to go to the first section and just copy paste one line like here and now i'm going to change the hotkey value to you the command is label takes so it modifies an atom and i'm going to change it to see you so now when i will go over an atom and press u it will label it with a copper to show you that things are case sensitive i'm also going to introduce another hotkey capital u, that will label an atom with let's say the word awesome don't worry about the description what is written inside the description part has absolutely no impact on the hotkey or the shortcut itself now we're going to go to the bond section and here i'm going to copy paste again one line like so and i'm gonna assign the hotkey u the command is bond order and i'm gonna give it the value force so now when i will press u over a bond it will transform it into a credible bond so now i'm gonna go over the last section and i'm gonna introduce well, you can see that i have already quite a few things customized myself so i'm gonna copy paste one line and i'm gonna introduce the hotkey you as a generic action it will select the tlc plate tool so the command is tool mode and the value here now is tlc plates and i will show you the different commands a bit later so now we're done i'm going to close and yes, i want to save the changes so now we're gonna check that everything worked properly i'm gonna draw a couple bones like this now i will go over this atom and press u and then i get a copper over this one i press capital u and i get the word awesome if i go over this bun and press u i get a quadruple bund and now over nothing i press u and then i get the tlc plate tool and you're welcome important note before you start playing with that file and suggest you make a copy as a backup so here copy paste and be original and emit backup so rule number one if you change the syntax of the hotkeys file none of the shortcuts you've made will be accessible so for example the hotkeys backup file that i just created will not be recognized by kim joe anymore rule number two customize your keyboard one key at a time and make one change close safe and make sure that it's working as you want also stick to letters and figures no symbols or punctuation among all the commands available in kendra, there is the sprout command that i find to be the most useful one and yet not many people know about it so by default if you position yourself over in adam and press zero you sprant one bond if you press nine, you sprant two and if you press eight you sprant three but then of course i have it customized a different way the very nice feature of this command is that it works when you have other drawing tools selected for example i have the bentin ring tool and i can just sprout one bon here and then a couple others like this without changing the tool and this way i draw a trital group very quickly another very interesting feature of this command is that it applies to the last active atom meaning the last atom that was either generated or touched with the cursor for example i can quickly generate an out yell chain by positioning myself over this adam moving away and then pressing repeatedly the hot key corresponding to sprout one bond same here and the same here additionally you can label adam and continue spreading bonds for example i spread a couple once i introduce an oxygen, a couple more more oxygen and then i want to end dimethel so i'm going to introduce a nitrogen and then press sprout two bonds and then of course i can continue, but i have to be careful about one thing is not too type two different characters too quickly one after the other otherwise the software will assume like here that you're trying to type something and the text tool will come up it may also happen that the bonds you're generating with the sprout command close into a six member drink and i don't have an answer as to why it happens sometimes yes, sometimes not but my advice is assign a hot key to the asyclic chain tool like this and when you have an al gail chain to draw then just use that tool and also by the way when you have this asyclet chain tool selected if you hold ctrl, while you move it it follows the movement of the mouse you also have the possibility to quickly generate fused ring systems by positioning yourself over a bond and press five six seven or eight and by default if you position yourself over a bond and press zero you get a chair cycle hexane now one crucial detail is if the last cycle tool that you used was non aromatic then all the rings that will be generated will be saturated if the last cycle tool that you used was aromatic then everything you will generate will be unsaturated like this if you would like to customize these yourself then the command for that is fuse ring and it's present by default on pc versions of kendra, but not on mac where you have to input it manually in the hotkeys file and it may not work on early versions of kendra, if you're in interested here is my personal setup for kendra, and i have described things for aquarity keyboards i'm only giving the shortcuts that i use most often so you should feel free to use it as a starting point and customize it for your specific needs since we all do different kinds of chemistries if you want to customize the hotkeys with during tools i have written below here all the commands responding to each tool and i guess there are self explanatory remember they have to be placed in the third section of the hotkeys file and written in capital letters so in the last section i will go over another very useful feature of camdroh and that is the nickname i will demonstrate how useful nickname can be by drawing taxel here under five seconds there you go so of course the point here is that i drew taxole myself beforehand, but i only drew it once and then i created a nickname for it and now if i need to draw it again i can just type this and and the label you're already using nicknames yourself when you type the name of protecting groups for example the buck group or tvdps here kendra understands which group you are drawing because their structures have been pretty fine to check what they are you can just select the labels individually or a whole molecule and then go to structure like here and expand the label or the shortcut version of this select out s then e, but more than protecting groups you can also define nicknames for large molecule that you may use on a daily basis for example combat seat, attramethel, rotamine or tamara is a commonly used fluorescent group and right now i am just drawing it quickly using all my shortcuts and i will show you how to create a nickname for that and there you go one important thing is when you define the label you need to select the molecule without a connecting bond and this is where the lasso tool becomes really useful remember you hold out with the market tool selected and then select everything accept the connecting bond then you go to structure define nickname and you type what you want in my case tamara be careful it's case sensitive and then you save now again the shortcut version since you may have noticed that i like shortcuts out s then n and then you define the nickname so we just sew a single connection label but you can also create a label with two connecting points and one convenient example of this would be if you use a polyethan like spacer let's just say that you use the backspace area like this one you need to press dot over the atom that you want to define as the first connecting point be careful with the order that you define as it will determine how the label is connected when you draw it later and i define this one as the second connecting point by the way you cannot define more than two connecting points now i take the lasso tool i select then shortcut out s then n and i defined the nickname as peg so now we're gonna make sure that everything worked properly i'm gonna draw lysine the lazy way i type lysine i select control shift n now i draw one bond and i write peg now another bond coming from the peg and tamara, and you will notice that nothing lights up in red and that if ask the molecular weight i actually get a number so let's make sure everything is properly connected i'm going to expand the labels and then some clean up with control shift k and there you go so that's it i hope you've enjoyed this video if you have please spread it around to your friends and colleagues who use kendra, if you'd like to know more about me my name is bl malu, i'm a unc chappell who graduate in pharmaceutical sciences and now opposed to okey msnol chemistry you can find me on linkton and if this tutorial has been helpful to you you can just drop me a line to say thanks now thank you for your attention and have a good one。
496Murphy 03:02查看AI文稿AI文稿
啊,各位大家好。呃,那么最近的话有小伙伴求助就是如何在这个 cambo 里面绘制这样子的一个图形啊? 我们可以看到这里的话呢,呃,有有这么四个小的这样椭圆形和一个这个大的椭圆形,而这个小的椭圆形的话呢,它是呃覆盖在这个大的椭圆形上面,相当于把这个给遮挡了一下子啊, 把这个给他组合取消掉啊,你看到他身上在背面的时候,这个椭圆形大的椭圆形是完整的,然后只不过是有一部分被这个小的这个椭圆形给遮挡住了。那我们看一下这个开门胶里面, 开门胶里面你要绘制这个椭圆形的话呢,有这么两个地方啊,一个是这样子的一个奥比特是就是轨道,另外一个就 就是这个绘制元素,那么绘制元素里面你比如说我找一个椭圆形,然后再画一个小椭圆形的话呢?嗯,我们发现啊这个椭圆形小椭圆形他没有办法遮挡住这个大的椭圆形当中的一部分啊, 那所以这个的话呢,应该是不可以啊。那么我们使用一下这个轨道里面的这个椭圆形看一下 啊,轨道里面这个椭圆形它画出来这么大,我们可以把它放大一些啊,嗯,然后的话,哎,你看它是可以进行一个遮挡的,那这样的话呢,我们把它哎 这样子做出来四个椭圆形之后把它呢复制,复制的话呢,你可以按住 ctrl, 然后这个,呃,这个 呃鼠标的这个手掌上呢会有一个加号出现,那就表示你可以复制了,然后用鼠标左键拖住他啊,把他拖到某一个位置之后,然后松开鼠标左键他就复制好了,然后按图案的方法, 我我们可以选中这个对象,然后的话呢右键在这个对象设置里面,把他的这个宽度呢设置的宽一些,那么要注意的是这个宽度的设置的话呢,他是不能啊,不能这个值是不能大于后边的这个,呃粗度, 那么所以的话呢,如果你想要把它,比如我现在改成零点七,零点零七,他俩是一样的,那是可以的啊,你可以看到他会变粗了一些啊,但如果你想让他再粗一些的话,比如说我把这个改成零点八,零点零八,哎,他就会告 告诉你,他是啊,就说这个粗度啊,他必须要比这个线宽要大才行,所以说你如果要改大一点的话呢,这个的要相应的一起一起改大呢才可以啊, 那就是这样的一个这样的一个绘制方法,然后你可以拿这个图呢在开门叫里面呢去啊,为你自己的绘制呢,去做这样一个图,然后根据你的需要呢去进行一个啊绘制啊。那我们这个视频就讲到这,希望对大家有所帮助啊,谢谢大家。
 02:42查看AI文稿AI文稿
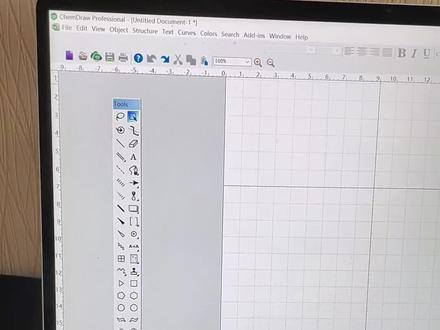
大家好,今天自学一下,就是开门做这个软件的一些功能啊,我们一般就是画化学式的话,一般是把在 vo 这一块,就是把这几个画上对号,就让它显示出来。 嗯,然后在那个 vivo 这一块的话,我是今天感觉特别有趣的一个功能,就是,嗯,他的那个 taplase, taplase 里面有 他可以画一些就是功能性的集团呀,然后还有还有还可以画小动物,就比如这个 mos, 你点开的话, 这里面有很多不同的小动物,你就可以随便画了点一下,然后就可以画上去了,我感觉特别有意思。 嗯,下面看一下这个 structure 的里面的功能,就是它里面有一个功能,就是 convert name to structure, 也就是 直接你输入那个,假如你想,你想就是直接就是用他的英文名字,然后转变成结构的话,就是直接输入他的英文名, 比如写个饼胶纸的英文,点击 ok, 他就会直接出来饼胶纸的结构啊。如果进一步你想知道这个呃单体的那个核磁的那个谱图的话,就是 选中它,然后再再点击 structure 里面的 protector 这个和呃预测核词清谱, 然后点击他就可以看到他的核磁清谱的大概普图。那如果我们是要将这个 ctrl 里面的结构,然后复制到这个核磁核磁里面的普图上的话, 不能直接就是选中,然后靠配,然后进去,然后直接粘贴,这样的话就是那个碳那个那那些原原子就是出不来的,而是在 ctrl 里面选中它之后, 然后在核磁软件中点击 idator 编辑,然后是呃 pastor special, 然后是选择这个 cs camera 装领,然后 点击确定,然后再点击,然后这个图就出来了,现在就是过来的图,就是跟 ctrl 里面的图是一模一样的。
389一觉睡到小时候 01:02
01:02


