AI盒子安装easytier
ai 盒子的安装和使用方法啊?大家好,今天给大家介绍一下博士的 ai 盒子的安装和使用办法,大家看这是我们博士的 ai 盒子,非常小巧,全铝合金, 然后呢一根网线接入我们的交换机,这个交换机呢分一个网线接入我们海康或者任何品牌的硬盘录像机,另外 交换机接一个网线接入我们的这个任何厂家的普通摄像机,海康大华的都可以。然后呢在我们的盒子后台就可以去配置这一台海康的摄像机。我需要什么样的算法?我们现在配置的是安全帽和反光液的算法。大家能看得到实时识别, 我们博士的 ai 是第三代的 ai 技术,我们直接在实时视频上识别,大家可以看到是动态,而不是给你 一张一张的照片。同时呢,你如果需要了解更多,在远处查看,你可以登录我们的 appapp, 上面可以看得到今天所有发生的实事视频以及一些事件。那么大家如果想了解更多的博士的产品,请和我们联系,谢谢。

粉丝2511获赞3.2万
相关视频
 07:1851阿水视频
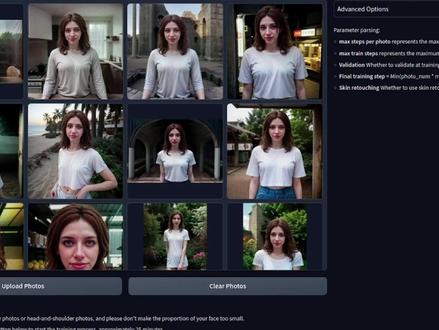 15:36查看AI文稿AI文稿
easy photo is an easy way to swap faces in photographs train, a face laura pick a photo to face swap and then generate yes, hello and welcome to more nerdy rodent geekery where today i explore the easy photo extension for the automatic eleven eleven web interface see how to use it if it can do video what it does well and also what it does not quite as well this is indeed also available for comfy ui but i just like to switch things up a little as usual with these extensions you can install it via available from the extensions tab click load from to get the list click install for both easy photo and control net if you don't have both of those already and then apply and start however, be warned the first time you run this you'll be in for a little bit of a weight you'll also need to have a good chunk of disk space as this can take up to sixty gig for all of the downloads it will be less if you have some of the files already just so long as they are in exactly the place it expects with the file names it expects to things it downloads includes the chill out mix stable diffusion, 1.5 checkpoint and sdxl checkpoint and a whole bunch of control net models also as usual with these extensions its requirements may clash with those of other extensions you have installed if you have issues where the easy photo tab won't appear you may need to disable some of your other extensions for this video the version i'm using is the one displayed there 9c 78259f and in my tests the rungs here need at least ten gig of vram for training though of course your mileage may vary in addition it needs at least three control nets for inference so be sure multi control net max models is set to three or higher also take a look at the easy photo extension page on github or any updates as well once installed hop on over to the easy photo tab where you'll need to start with training the defaults work well, though there are advanced options available as well should you wish to change those do exactly as it says on the screen upload your photo following that guide 5 to 20 half body photos or head and shoulder photos please don't make the proportion of your face too small training's gonna take about twenty five minutes and perhaps try to limit your photos to about one and a half meg each okay, so let's get this going click upload photos and then you will be able to upload a whole selection of photos there i'm just selecting them all you can upload them all at once and those will appear in your gallery this is also known as a data set because it's a set of data alright so there it is there's my data set 14 images following the guide provided apart from i made all my images formake because i'm extremely naughty sometimes you'll also notice that they do have a rather limited wardrobers here at rodent studios we don't really have much of a budget and hats off to her she did really well being barefoot that day anyway, if you don't want to pay somebody to be your friend for the day and take photographs of them you could always try taking pictures of yourself or as i actually did here simply use my reposer workflow to generate a variety of poses instantly from a single image anyway with that data set upload or all you need to do now really is click start training when you do that it is going to give you a little pop up and ask for the name of your laura, it's going to save for that as a laura file, so don't overwrite any of the ones you've got there it'll pop up and say hey this name is already in use, but before i click that let's have a look at these advanced options as you can see there some barely standard things it's also got a bit of information down the bottom there about the parameter parsing now by default you just get those two to start with those are the two models it downloads, but if you click the refresh button then you'll get your usual list of models so the model you want to use there and there you go that's someone i'm gonna use and you got all these different settings across here resolution is good at 5 12 increasing that will of course need more v ram for example if you put that up to 640 then you're gonna need at least 16 gig validation and safe steps default to 100 meaning with the max steps at 800 you'll get up to 8 checkpoint saved in the easy photo user id, infos user weights directory as well as the final model there as well, so with each of those being a hundred and fifty one meg, i personally set that value a little bit higher and usually use around half the number of max train steps so there in that example, i set that to 400 and it saves few of files along the way max steps per photo default there to 200 which in this case would usually mean a total of 14 photos i've got their times that 200 max steps per photo giving me a 200800 steps, but as i have the max train steps there set to 800 that's the actual limit, which is going to be applied again if you have more vram, you you can change things like the train batch size and gradient accumulation as well, but having played around with this for a while honestly those default settings are absolutely fine the same goes for the rank and network alpha if you have experience with lore training already then you know go ahead and change those, but the defaults are absolutely fine it does have another option there for enable reinforcement learning that will take a little bit longer, but can improve the quality of the result you've also got other options there validation and skin retouching okay that about covers training so for the most part really all you want to do in the advanced options is change your base model perhaps the resolution if you have more vram, but mostly those defaults are absolutely fun so all you really need to do is click start training and then there where it says user id it's not really a user id it's just a name that you're giving for your training subject here now obviously the naming convention you use is entirely up to you, but as the results do come out better when you use the same stable diffusion checkpoint that you trained with one thing i tend to do is put the a sort of summary of that checkpoint which checkpoint are used in this case analog madness at the beginning of the user id so i know which checkpoint i trained this model on all you need to do then is click ok and wait for around 25 minutes once you see the message the training has been completed then you're ready to go over to the inference tab the four options here template upload, batch upload and sdxl beater the template tab as you can see here simply has a variety of example images that you can select and then transfer like i've done there your newly trained face on to so all you have to do is pick an image whichever image you want and then down the bottom here once again you can select your base checkpoint the user id that's the one that we just trained remember when that little pop up box where you put the name once again the default absolutely fine to all you really need to do is just click on start generation and that will transfer over if we crack open those advanced options as you can see there are quite a few in there and it's got some more information at the bottom if you need to know more about what they do, but essentially there you can see you got face fusion before so how much of the face do you want to transfer before and after number of diffusion steps by default 50 the d noising strength, which can go all the way up to note point six or all the way down to note point three so they're limiting the ranges there for fairly sensible things second step diffusion and also the denoising for that second step diffusion plus a whole bunch of options down here as well now as for the face id there is meant to be something for multiple faces in settings, but all i have is cash pre process model in inference that's that's the only setting i've got there for easy photo now this isn't quite what it says in the read me, i haven't got this select number of face id so i don't know whether that's just the way i've installed it or there's a bug who knows but for now i can only select the one face so back over here we've got that number of face id just leaving that one okay onto these other settings basically, i leave all of those alone crop face all of that super resolution you may or may not want one thing you can probably see missing from there is the actual resolution because it takes that from the input image so if you're dragging a really large image into the upload section, which will look at in just a moment and you've got super resolution as the last step then that can result in a very large image indeed and will take quite some time to process but one thing to note down here however is this makeup transfer option if you try to use this option chances are you'll get the same error i did which is related to numpye saying these aliases were deprecated in numpye one point two zero and that's a really old version of numpye, which doesn't play well with python three point ten so for now i just leave that option unticked these can take quite a while to generate so be prepared to wait much longer than usual as well, i've also found that you actually need to do this template gallery step first before you can use some of the other tabs which is a bit strange so always just do one of those first okay the next tab is upload and this is where you can use your own images time to put things to the test what can we throw at it here all right let's put in this picture here now this person has glasses so what is it going to do with glasses let's just use all the defaults and start generation and it seems a bit touch and go there we've got sort of a bit of a glasses frame, which has almost turned into her hair, but it has removed her glasses which i guess is correct because there weren't glasses in the original photo how about if we are much kinder to it there we have a photograph without glasses okay, that's a bit better it does seem to be quite nicely uncanny valley the eyes are weird but yes, it's transferred her face across obviously it's kept the original hair and just changed the actual face portions there, i know this is easy photo but what about if we use a painting excellent that has come out completely strange as you can see it's tried to make it more realistic if it prefers realistic how about if we use a photo, but it's a photo of a statue looks to be equally as strange i like it it's still a little bit statuesque it sort of done some blending in there, but my is that weird how about the other way around though if you're training a cartoon face as it happens i trained one earlier using this data set so what will this one come out like pop over to inference and change that one to the cartoon yes, that is certainly still just as strange you got some really weird eyes going on there, alright, how about one final test air if we try to change the cartoon into a realistic photo uh okay well, there's there's your alter i i guess i guess personally i think it does much better on photographic style images, but do give it a go yourself and see all right the next tab is batch upload and i know what you're thinking can it make videos well judge for yourself and see uh yeah it's a little bit flickery isn't it for these i turned off super resolution as well there it is super resolution at last no, thanks as processing already takes ages even for these 90 frames the sdxl beater tab is the last one here and i found this a little bit touch and go often it would generate the first image, but never again hopefully this will work, but maybe not this works slightly differently in that you can't upload an image instead it generates one using sdxl and then does all the technical face swapping stuff afterwards this also needs at least 60 gig of vrm so make sure you've got enough being marked as experimental i'd expect some updates in the future to make this a little bit more stable all right you can see there obviously you've got loads of different options you can have upper body or headshot girl woman type of cloth you can have different colors all that sort of stuff so let's see if it generates or if it just crashes okay looks like we got lucky this time and you know it works quite nicely when it does so they're a completely new generated person, but with that trained face transferred onto it just to finish off here it will also create a laura, which you can use as normal so there i've put in the laura will have it was struck length one because why not see what this generates and there we go she looks a little bit raggedy there maybe perhaps slightly worse for wear, but nevertheless quite a good output it looks like easy photo does appear to be easy and you can use it to swap faces in photos i guess it does what its name suggests a bit like reposer my workflow which not only generates a version of the face you provide, but also the hair, body and clothing to all in a few seconds without any training just from a single image。
54喜好儿网


