ae牛顿动效海报教程

粉丝408获赞2552
相关视频
 02:02查看AI文稿AI文稿
最后我们讲解的是一个动力的技巧,在 讲动力之前,我们需要安装好动力插件牛顿,那安装好之后我们就进行牛顿插件的讲解,新建 牛顿插件安装好后,通常是放在了合成的最下方,这里姗姗下的是牛顿三, 我们给这个合成打上一个你想要的路径, 就是它的落点。这里强调一点最新的图层,这些图像都是必须单格分层, 所以说你在建立的时候必须点一下外面,再去新建这个图层,点一下外面,再去新建合成。打开牛顿这个插件, 我们给最底下的形状就是钢笔画出来的路径,给他打上静态,接着我们播放一下试试。那如果做好了之后,我们预览好效果后,我们可以点击渲染, 等他渲染完毕,我们他就在合成二中新建了一个自动新建了一个合成,我们点击新建合成,我们就可以看到在这里的牛顿他动力插件带来的效果。 那今天对于六个技巧就讲解结束啦。 m g 动画制作过程中,这六个技巧是经常被用到的,所以希望各位小伙伴 多多尝试,多多学习,那今天的讲解就到此结束啦。
45后期动画特效师 03:17查看AI文稿AI文稿
大家好,今天我们在 ae 中做一个有动力学效果的绳子悬挂文字掉落的动画。本期要使用牛顿插件, 首先在试图中输入你要展示的文字,然后我要借助一个脚本把每个字符拆分成独立的图层。当然你也可以不用脚本手动逐个创建每个字符,调整一下位置,现在每个字符的锚点在底部,我要自定义每个字符的锚点,因为这些锚点的位置就是之后绳子要绑定的位置。 然后使用竖排文字输入一些圆点,调整好字符大小和间距,把这些圆点转为形状图层。打开牛顿插件, 这里会问你要不要把这些圆点拆分为独立图层,我们点击拆分按钮,拆分完就会进入牛顿界面。我们先关闭开界面,选 用这些圆点图层,使用比如 motion tos 之类脚本,把锚点对接到中心,接着 ctrl d 复制一份,放到下一个字母的上方,标记为另一个颜色,然后调整一下图层顺序,把每个字母放到那一组圆点的最下方,然后打开牛顿插件 框,选第一组,点击这个添加距离关节图标,这样第一组对象就都连在了一起,然后为下一组也添加关节,选中最上面这一行点左边类型,这里 我们改为 style 静态播放,看一下,顶部就会固定住,然后来调一下字母与绳子的绑定点,选中字母,选中关节,切换到锚点工具,调节底部,这个点到字母 a 的顶端字母外也是相同的方法,锚点可以放到分叉处。接下来把这些字母 圆点都移到画面上方,控制好中间的间距,还可以在字母上方点右键选择旋转,给一定的初始角度播放看一下, 然后选中所有点,在高级选项里把它们归为组 b, 并且把组 b 的碰撞关闭,这样这些圆点之间就不会产生碰撞,以免太乱。而字母在组 a, 它和圆点之间就有碰撞,两个字母的阻尼可以增加一些 播放看一下,如果满意了,就设置好结束针的数量,然后点击渲染, 渲染完成后它会回到 a e, 这里会有一个新合成,打开合成二可以看到动画效果。 然后我们打开 connect layer pro 这个脚本,选中一组对象,点击第一个按钮就会产生连线,选中第二组对象也是创建连线, 选中这个连线图层,在效果面板中把模式改为曲线,曲线函数改为自动被塞尔张力 隐藏这些原点,选中另一条线也是相同的,设置隐藏这些原点,这样动画就完成了。最后可以根据你的需要修改文字的图层样式。
559教AE的李老师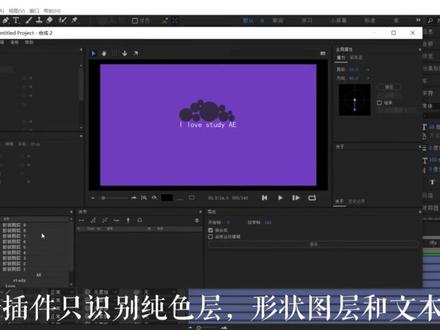 03:11查看AI文稿AI文稿
心静何尝? 点击文字工具,输入文字, 将文本居中一下,特加 d, 复制几 成文本进行文字拆分,这个过程我就加速了, 拆封完成,文字就单独分离出来了。 特加二,打开标尺工具,从上面脱下来一条水平线,为了看的比较清楚,我就新建一个纯色背景。 使用标尺工具是为了更好的摆放小球,因为标尺工具有自动吸附功能。 接下来使用椭圆工具画出小球。 画好之后就是今天的重头戏了,牛顿动力学插件,点击顶部菜单栏,点击合成, 找到下方的 note, 进入插件界面,这个插件只识别纯色层、形状图层和文本。我们先将下面的纯色背景的模式设置维 c, 这样就不会影响到其他物体了。然后再点击色块,更换一个对比度大的背景颜色。 然后再点击爱和 love 这两个单词,给他们添加一个距离关节。同样的操作,再给 steak ae 添加一个距离关节,然后再将要动的单词的模式修改为动, 不动的修改为静态。点击播放,预览一下看看。 ok 啊,画的就是这个效果,点击渲染就好了, 渲染完成之后,在项目面板会多出来一个合成,这个合成就是牛顿插件对原合成进行动力学解散后的合成,我们可以把原合成中的图层删掉,拖入插件生成的合成到时间轴面板, 这样就完成制作了,你学会了吗?
56粥粥C4D 03:20查看AI文稿AI文稿
在 a 中如何快速模拟动力学效果?哈喽大家好,本期给大家分享的是一款牛顿动力学插件,它可以完美的模拟动力学的各种属性,包括重力、碰撞、 摩擦、弹跳等,操作简单方便,只需要给不同的物体赋予不同的属性即可完成运动效果, 有需要插件小伙伴可以给我留言,接下来我们再来看一下安装方法,安装方法也是非常简单,我们只需要把牛顿这个文件夹复制到 ae 的插件目录下即可,然后打开 ae, 在菜单栏的合成这里可以找到插件, 再输入一下注册码,完成之后就可以正常使用了。然后我们再通过一个案例简单学习一下,我们 打开 a, 在新建个合成右键,新建一个形状图层,再添加这里添加一个椭圆,大小给一个五百,再添加一个描边,描边宽度给一个五,然后按下啊键,给旋转打一个关键针,在第五秒这里 让他稍微转两圈。接下来再做一些小球出来,右键新建一个形状图层,添加一个椭圆,大小给个二十,再添加一个填充, 修改填充颜色,重新命名为大圆一, ctrl d 再复制一个出来,命名为小圆一,大小改为十二。调整一下位置,把隐藏图层的按钮打开,再 ctrl d 复制,多复制一些小球出来, 这样图层稍微有点多了,我们就可以直接隐藏掉。然后在合成这里找到牛顿,进入插件里面,我们看到椭圆这里是有灰色的填充的,我们可以先退出去,在椭圆这里右键转换为贝塞尔曲线,再重新进入牛顿里面, 选择这个圆,把它的网格精度调大,再选择小球,给小球一点随机分布 在这里插线也可以直接为我们生成地面和围墙。现在我们看到圆圈是跟着一起运动的,这是因为在样式这里现在为动态的状态, 如果我们把它改为静态的,这样圆圈就不动了。我们刚刚在圆圈的旋转上是有打关键针的,现在我们把样式改为运动穴, 可以看到圆圈是会动的,再改为休眠状态,可以看到当小球碰到他的时候他才会动,再把样式改为死, 这样圆圈就相当于不存在了。然后在右边这里还可以调节他的重力和方向, 调整好之后直接在这里渲染就可以了。然后在项目这里我们可以看到它自动为我们创建了一个合成, 我们进入合成里面,然后再任意选择一个小球,按下优键,可以看到上面添加了很多关键针, 操作也是挺简单的。好的,本期分享就到这,有需要插件的可以给我留言,我们下期再见。
155后期君小野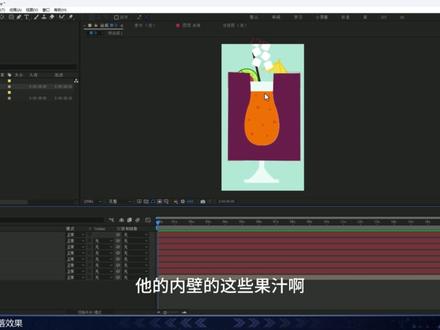 06:49查看AI文稿AI文稿
首先项目窗口当中双击选择素材,点击进行一个导入,选择合成,保持文档大小就可以了,双击这个合成就可以看到分层的内容,那么我们这里的话,选择这个果汁啊,给他右键一下,给他创建一个轮廓, 打开这个轮廓的路径啊,并且呢我们去重新新建一个纯色层,注意匹配一下合成大小啊,给他随便命个名称吧, 然后重点是右键一下这个存设成啊,右键一下,然后呢去给他创建一个新的蒙版,之后呢把他的这个蒙版路径给他打开,回到刚才的这个轮廓路径啊,选择他 ctrl 加 c 复制, 选中蒙版路径这个位置, ctrl 加 v 粘贴,然后双击一下这个蒙版,给他对一下位置,选择工具下把它画面放大框,选一下最顶上的两个点啊,注意啊,框选两个点, 在其中的一个点上,右键给他选择,把这个已关闭,去掉框,选其中一个点,然后切换到钢笔工具, 再次进行继续的一个绘制,把它的这个外轮廓给它框选出来。那至于形状的话无所谓的啊,你只要匹配到它的这个内壁啊,以及这个进口的这个位置啊就可以了。好,然后为了防止干扰,全选下面的所有这个图层,给它愈合成一下。 好,然后呢我们可以去把它隐藏掉,然后呢在右键我们去新建一个存热层,那么这个存热层的话呢,我们给它改成一个 偏白的这个颜色啊,并且呢把它改成一个啊,正方形的一个分辨率啊,名字的话随便取啊,那这里的话给他一个一百五啊,比较合适啊,然后点击确定就可以了。 好,我们把这个画面给它放大一下,选择这个形状工具下的一个圆角工具啊,选择它,然后呢在这个最中心的这个位置,按住 ctrl 键加 shift 键啊,把它画这样子的一个形状,并且呢我们滚动你的鼠标滚轮啊,滚动鼠标滚轮去调整它的一个圆度, 绘制好了以后呢,我们可以去适当的去调整一下他的这个大小,把这个形状呢把它放到瓶口上方的一个位置啊,然后呢去给他多次进行一个复制,选择旋转工具,对他们进行一定的这个旋转,让他们不会那么的统一,完成之后再合成 窗口下进入牛顿三插件。进来了以后呢选择这个碰撞体啊,把他的这个精度给他稍微提高一下,在左上角有一个网格精度啊,我们可以去把他的这个数值往上提高, 这样的话你就可以看得到他的这个网格体的这个精度啊,就比较合适的啊,那同时呢我们在这个上方啊,去把他的这个类型啊改成一个静态的 框,选这些冰块啊,然后呢我们这里的话去把他的这个弹跳啊,去给他稍微的给他降低一下啊,给他一个零点二左右啊, 然后呢我们去往下走啊,他下面的话会有一个角速度啊,我们可以把它提高一下,那么角速度的话就是这个冰块后有一个旋转,同时呢他在下落的时候,我希望他 它有一定的这个阻力啊,我们把这个线性阻力给它提高到零点六左右。好,然后呢我们点击进行一个播放,预览一下效果 之后呢,我们在文件菜单下勾选啊,这个保存缓存啊,保存缓存,这个要勾选之后呢,我们退出来,退出来了以后呢,我们 去到他的这个愈合层里面,我们去观察一下他的内壁的这些果汁啊,他的一个最顶端啊,他是在什么那个位置上啊,那我们可以通过这个杯子啊,去进行这样子的一个参考。 好,然后我们回到果汁的这个合成当中啊,我们把它关掉显示,然后重新进入到这个牛顿山 插件当中,点击播放,观察每一块冰块啊,他到达这个果子顶部的一个位置啊,他的这个帧数要特别记住啊,记住他的这个帧数,然后呢我们打开他的这个线性阻尼的一个关键帧啊,在这个位置点击一下 这里的话,点击这个加号,我们可以去创建关键帧啊,然后再一次点击,我们创建两个啊, 那么第一个关键字这里的话设为一啊,然后呢他的这个对应数值的话,呃,给他设为一个比较合适的一个状态吧, 设为零点一啊,然后第二个关键针,这里的话,我们设置为一个我们刚才记住的这个关键针啊他对应的针数,然后呢这里的话设为一啊,在左上角切换到高级选项,那么这里的话有 有一个重力啊,把它的这个关键针给它打开,点击下加号,那么第一个这个关键针的话,我们保持为默认就行了,然后再次点击加号,把这个关键针呢针数给它改成一个刚才记住的这个关键针,然后呢 重力给他设为零点三啊,点击播放,注意看我们这个关键针啊有没有起到作用,那因为后面的这些冰块的话,他是没有关键针的,所以呢他会把他推着走,那我们来看一下第二个冰块,我们也去给他添加一下, 好,注意看第二个冰块,他到达了相应的位置啊,我们要记住他的这个关键针,那么我们这里的话呢,使用我们刚才同样的这个方法啊 啊,经过操作,所有的冰块都贴 添加了关键针,那我们预览一下,可以看到我们所有的这个冰块的话呢,他们进入到这个液体的时候,下落的速度明显会变慢了很多, 那我们来回播放的,确定了它最终的结果是我们想要的以后呢,那么我们需要去勾选一下,支持这样子的一个运动模糊啊,勾选起来,然后呢我们这里的话点击进行一个渲染啊,就可以了, 自动退出来了以后他这里的话会多出来这样子的一个合成。我们双击进去啊,在这里有一个果汁二啊点进去,然后在这个合成就是他生成的这样子的一个最终的一个结果, 然后我们这里的话去把这个愈合层给他打开,然后把这个碰撞体给他关掉,然后我们最终去进行一个播放,检查一下,可以看到我们的这个结果还是不错的, 好,喜欢这个效果的请点赞思密达。
97ruyi 08:20查看AI文稿AI文稿
hi, guys jay here recently, i've been playing about with newton a plug in for after effects made by motion boutique newton is a hudey physics engine within after effects it's really really handy, i've used it for lots of different purposes, but one of the things i love creating is fluid animations so i've made a few different food animations and post them on my instagram and today i'm going to show you guys how to create the same effect with newton blurs and levels as all you need let's jump into after effect and create a composition so my composition i'm set into 300 frames and name in it main comp now we need to create a square make sure your anchor point is in the center of a square i'll display the shortcuts to do this on screen now open up for rectangle settings and change for size to 350 we then want to hide for fill layer and make sure you have a stroke mines at five pixels and select any color you want, but i'm going with bdf six f9 it's like an off white duplicate the box layer and go into the settings of your duplicated layer change the path convert it into a basier path you want to select the pen tool and select the top two points of your square right click go to mask and shake path and uncheck for clothed button duplicate for open layer and rotate it by 180 degrees we can then hide this layer to i've decided to make my back background colors now, but you can do this later on i'll display the colors i've used to create my background layers i've decided to go with a two layered background approach here for hex values they're on screen now for bottom layer i'm used as a solid color and the top layer i'm doing as a gradient if you decided to create the background layers now make sure to hide them now we want to create a 10 by 10 grid of circles my circles have a size of 15 and make sure it doesn't have a stroke it's just filled in with your 10 by 10 grid if you want it fluid to be multicolored you can alternate the colors within your grid to create a multicolored look that's what i've decided to and the colors i've used are on screen now if you want to go with a single toned fluid make sure or your suit because are set to the same color you'll then want to create a funnel i've decided to go with a rounded funnel but you can use a diagonal funnel make sure you also create a breaker in the middle this stops your grid just falling directly into the box now let's get into ministy gritty and open up newton as my funnel is rounded i'm going to raise for mesh precision value to 10 and i found the best way to make your circles look like a fluid is to change perfriction across all your layers to zero this allows them to move smoothly across for surfaces now select the box and the funnel and change your type from dynamic to static and hit play to get a sense of what your simulation looks like i think mine can do with a bit more bounciness to it to get some splashes within a fluid so i'm going to upper bouncing us across the grid from 0.3 to 0.6 this will allow for circles to bounce more off each other it should hopefully make it look like a water is splashing within the container now you want to find for first frame for circles end of a box all of them so mine is about frame 76 so once we found this frame we can close newton and go to frame 76 in your composition set for m point for your box layer to frame 76 and set the endpoint of a duplicated layer to frame 76 then go to frame 270 and move the second open layer to this frame and put the end frame of the box layer to this point with a box layer we're going to set the rotation to zero at frame 76 jump to about halfway through the comb and rotate the layer by 150 degrees we're then going to want to go to the endpoint of this animation so i'm going to frame 220 and i'm going to change rotation to minus 90 so it's flat again now ease your layers however, you want then i'm going to adjust the speed of the animation to my preference i've gone with an influence about 50 on the in and out point of of middle frame now what you want to do is make sure you have a position keyframe at the end of your layer this will stop it from just falling off screen as soon as it stopped animating now we want to jump back into neuting three and select all your boxes hit the advance set in at the top and change a collision group to e and check for collide with e option select for box layer and change for type to kinematic this will take your keyframe to master effects into newton and hit play once you're happy with your animation make sure to have it apply to new composition button selected if not this will just render it to your current comp having this on allows you to go back if you want to change any settings later now once your animation is rendered go to the project window and select main computer this is where you'll find the animation from newton? what we're going to want to do is delete for funnel layers and for opened box layers as we won't need them anymore then drag for in point and the out point of a box layer to begin in an engine comp and if you've already created your background select them back on but one thing we do want to do which is for most important bit as pre composer grid i'm calling mine fluid and we'll have to apply effects this later one thing to check is that your box doesn't have any keyframes before and after the main area of animations once you've done this you'll want to duplicate your box layer and now turn on the fill which we hit earlier on and remove the stroke what we will do with this duplicated layer is use it as a mask for the fluid layer and if you're going with a too tone look then you can also use it for your gradient once you've set up for look of your animation hit play to get a sense of what it looks like you can leave it at this but obviously it doesn't look like a fluid so what you want to do is add a few effects to your fluid comp first, you want to add a gorgeon blur i'm setting mine to 50 you'll then want to add a levels and change b alpha, so select the rgb drop down menu and change it to alpha you'll want to then change for gamma to zero and for input white to 25 once you've blurred it your notice for colors become a lot more muted so i'm adding a human saturation and increasing a saturation by 50 and hit play and now here it is i have a play about with the blur and with the levels because you can create completely different looking effects so here are a few i made earlier for what on the left i've just changed for blur settings and also adjusted for levels whilst for one on the right, i've changed for colors used and also i've changed for settings we've been newton so some of the surface a bounce here and it's just slightly different compared to a woman we've created in the tutorial anyway, that's everything for today guys if you have any questions, please let me know in the comments and i'd love to see what you guys create sure to tag me because i'd love to see what you guys come up with have a great day guys and i'll see you in the next one。
16dream 00:29查看AI文稿AI文稿
动画圈真的太内卷了,这种物体掉落动画竟然也能通过插件一键生成了! rotten 这是一款能把现实的物料效果带到 a 一中,把平淡的二地合成图像,变成固态物体。 植物体的属性包括类型、密度、摩擦力、弹性和速度都能轻松调整控制,让原本复杂的关节移动都能一键搞定,是后期小白必备插件之一。含泪分享,这次一定关注!
20豪哥自习室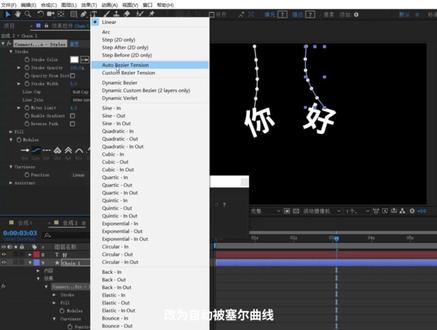 04:29
04:29 02:14查看AI文稿AI文稿
今天我们用牛顿脚本模拟一个向下坠落的效果,这里的话我们先建几个形状图层,这里的话我们先给他创建一个地板, 再去创建我们的一个正方形, 然后把它移动到我们的一个合适位置就可以了。最后在我们再创建一个小, 我们把它关掉,然后开启我们的一个隐藏,这个话我们直接去 复制,完成之后我们全部全选,全部隐藏掉, 这里的话我们选择我们这个牛顿胶板,这里选择我们的一个地板,这里改成一个静止,然后这里上面这些的话我们就不用去修改,那他的话已经有一个简单的小效果了, 这个话我们还可以去把它弹性改一下, 这里我们能看到我们他的话是可以往下去坠的,我们这里给他加个框,这样的话他这些小球的话都不会往下去坠, 这弹力的话我们都是可以随时去更改的。 然后这里的话我们可以改为两百,让他预览到两百帧就可以了。然后点击一个提交的话就可以了, 点击提交那么他的话就完成了,完成之后他会自己创建一个合成, 我们播放看一下。
108AE零基础入门教程 03:20查看AI文稿AI文稿
在 a 中如何快速模拟动力学效果?哈喽大家好,本期给大家分享的是一款牛顿动力学插件,它可以完美的模拟动力学的各种属性,包括重力、碰撞、 摩擦、弹跳等,操作简单方便,只需要给不同的物体赋予不同的属性即可完成运动效果, 有需要插件小伙伴可以给我留言,接下来我们再来看一下安装方法,安装方法也是非常简单,我们只需要把牛顿这个文件夹复制到 ae 的插件目录下即可,然后打开 ae, 在菜单栏的合成这里可以找到插件, 再输入一下注册码,完成之后就可以正常使用了。然后我们再通过一个案例简单学习一下,我们 打开 a, 再新建个合成右键,新建一个形状图层,再添加这里添加一个椭圆大小给一个五百,再添加一个描边,描边宽度给一个五,然后按下 r 键,给旋转打一个关键针,在第五秒这里 让他稍微转两圈。接下来再做一些小球出来,右键新建一个形状图层,添加一个椭圆,大小给个二十,再添加一个填充, 修改填充颜色,重新命名为大元一, ctrl d 再复制一个出来,命名为小元一,大小改为十二。调整一下位置,把隐藏图层的按钮打开,在 ctrl d 复制,多复制一些小说出来, 这样图层稍微有点多了,我们就可以直接隐藏掉。然后在合成这里找到牛顿,进入插件里面,我们看到椭圆这里是有灰色的填充的,我们可以先退出去,在椭圆这里右键转换为贝塞尔曲线,再重新进入牛顿里面, 选择这个圆,把它的网格精度调大,再选择小球,给小球一点随机分布 在这里,插件也可以直接为我们生成地面和围墙。现在我们看到圆圈是跟着一起运动的,这是因为在样式这里现在为动态的状态, 如果我们把它改为静态的,这样圆圈就不动了。我们刚刚在圆圈的旋转上是有打关键针的,现在我们把样式改为运动穴, 可以看到圆圈是会动的,再改为休眠状态,可以看到当小球碰到他的时候他才会动,再把样式改为死, 这样圆圈就相当于不存在了。然后在右边这里还可以调节他的重力和方向, 调整好之后直接在这里渲染就可以了。然后在项目这里我们可以看到它自动为我们创建了一个合成, 我们进入合成里面,然后再任意选择一个小球,按下右键,可以看到上面添加了很多关键针, 操作也是挺简单的。好的,本期分享就到这,有需要插件的可以给我留言,我们下期再见。
94AE百柯教程 00:20查看AI文稿AI文稿
如果你想学会如何制作 mg 动画,那一定少不了这款 newton 三 ae 的牛顿动力学插件,它可以让二 d 图层附带重力属性,非常神奇, 支持蒙版文本形状图层调整,并且碰撞、重力、弹跳等属性都能控制。汉化插件和教程我都准备好了。
167也就那样吧


