油管plasticity大神是谁
粉丝108获赞129
相关视频
 04:00查看AI文稿AI文稿
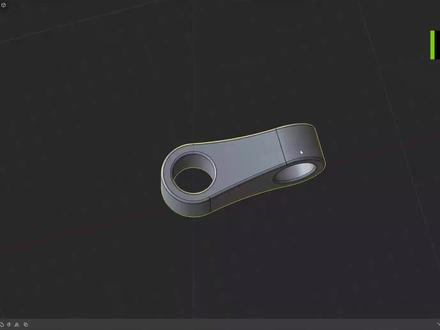
嗨,小伙伴们今天来练习这个新的软件。呃,样例的话呢,是在油管上看到的,这个软件比较简单建模。 嗯,我们今天先尝试做第一个呃模型吧。哦,对了,然后这里说一下我用的 啊软件是贝特版,一点三零的贝特版啊,然后的话呢,版本的话是开心版,有需要的话呢找我要吧。 好了,今天做一个这样的模型,下面开始进入正轨,再轻点, 首先我们画一只一个正圆大一点都没有关系。嗯, 这里需要确。嗯,注意的是我点的鼠标右键就等于它的 这个软件。嗯,有个神奇的地方就是你每执行一个步骤需要点一次确定,嗯,如果说点键盘的话会不方便,所以说建议大家点鼠标右键,习惯就好啊。鼠标右键 这里我们再绘制一个矩形, 按一下键盘上的 c 键,它可以进入到对声模式,然后确认移动一下,给它移动一下啊,然后修剪一下边的路径, 这里再绘制一条曲线, 然后这个曲线我们给它对称过来镜像一下。好嘞,就这么简单,我们给它挤出挤高一点都没有关系。确认 键盘上的数字 一二三四几对应的是这里对应的是这个显示的模式,我们选择设置四键,直接给他复制一个 ctrl c ctrl v 就可以复制,或者说直接按几啊?快捷键 shift 加 d 也能直接复制,分情况吧,这个东西后面有 有相关案例的时候再跟他着跟大家着重讲解复制的区别吧, 这个东西真的很难。对啊,按着,哪怕是说按着鼠标键盘上的 ctrl 键也不好。对,所以我们直接在输入吧,九十确认,然后再再选 这一次 一百八直接 bra, 然后这里我们选择交接,按快捷键 shift 加 e 啊确认, 嗯,到边模式下选中所有的边。 好嘞,搞定。
53大柱 08:20查看AI文稿AI文稿
mmm coffee, what is up everybody my name is ben tk and today we'll be learning how to do that gimbal hypersoom you just saw this has been one of the most requested tutorials i've ever had and i'm finally putting together a few guys now before we jump straight into the editing first, we have to learn how to film this correctly so it goes together really well in post so today we're my home city of melbourne and in order to do the gimbal hyper zoom you do need to get a gimbal you need to have your gimbal in lock mode this is the mode where you turn around and it just stays put in the exact same direction you set it in but today we're also going to be needing to turn some corners around these alleyways so for that i've changed it to the follow mode so when i turn it turns with me, but it doesn't go up and down now all you really need to do is just point your gimbal straight down an alleyway or a straight laneway and walk from one side to the other i guess it's time to begin even though we have a gimbal it's still important to keep it as steady as possible so we have less work to do in post the best lens to use for this is anything between a 16 millimeter and a 24 millimeter lens garbage truck god damn garbage trucks okay so now we have all our clips inside premier pro as you can see i've got the alleyway clips here at the front i've got this beauty beautiful shopping more clip here with the awesome light on top of the roof, which i've spun around with the gimbal and shot off in the other direction because i like to shake things up a little bit you know and i've got these other clips here of a walkway with some bakeries and coffee shops now the first thing that you want to do which is absolutely crucial is to make sure you place the clips that best match each other next to each other for example this clip here ends with a turn and this clip next to it starts with the turn and they're both in the same direction, so at the end when we fix this up it's gonna look seamless, so to create this effect we can realistically do this in premier pro premier pro is a little bit limited when it comes to doing really awesome effects so to get the most out of this gimbal hyper zoom effect we're going to highlight everything right click and replace with after effects composition, so if you have after effects awesome keep watching okay, so now we are in after effects the first thing we're gonna do is we're gonna do some timer mapping to make things a little bit quicker and not like this i shot this in a low shutter speed because i was experimenting a little bit right click on the clip go to time enable time remapping and these two markers that get put down they get put at the start in the end of your clips so let's go to the very end of this clip so let's go to the timer mapping create a keyframe we don't need this other one we're going to drag the m1 really close to the other one and this will speed up the clip condensing the time in between these two keyframes and now i'm gonna do the same thing to each one of these clips here okay, so i've just time remote each clip here so now now they all move together really quickly and i've also organized them and put them neatly next to each other so now it's looking pretty good this is a clip of me walking down the alleyway for a very very long time do the time we're mapping thing with this as well enable time remapping and because this clip is really long i'm just gonna stretch it out and then find the endpoint that i want probably where this guy puts his hands up, i'm gonna set a keyframe pull this all the way back, so this is gonna speed this clip up dramatically so we want to pick a speed that looks about right this is actually pretty good i'm actually quite happy with that speed i might just leave it how it is there's not much, it's not much else i really need to do to that next clip, we have this beautiful clip of the shopping center inside and that light on top of the ceiling okay, so i'm gonna right click on this timer remount this clip as well, we're literally gonna time remount everything okay, we want to speed everything up, so it goes really fast and shoots back out perfect now, we actually want to transition these two clips, we don't want them to just be hard cuts with each other as you can see at the moment it just hard cuts into the next clip but what we're gonna do is we're gonna drag the newest clip, we just adjusted on top of the other and we're gonna pull it across just a little bit what we need to do is we need to click on the arrow here on the clip, we're gonna adjust go to transform opacity set a keyframe it's on a hundred percent of the moment so we're gonna move it further on and then we're gonna set we're gonna set another keyframe and change it to zero and this is gonna allow it to fade in nice and smoothly so when it turns to the corner it fades into the next clip like it's part of the alleyway that looks great awesome next clip coming from the bins out to the coffee shops and the bakeries i'm gonna do the exact same thing and when a time remap that and i'm gonna do the opacity transition technique as well okay, that's looking pretty good sweet we're getting somewhere so when this one turns the corner towards the end of the clip this one starts turning into the next clip, so we can easily match those up, i've just adjusted those two clips you can almost not even tell that there are two different clips okay, so the next thing we're gonna do is we're gonna do a masking transition so we're gonna go from this clip into this clip here but we're gonna mask it i'm just gonna grab this clip here and i'm gonna drag it over the last clip just a little bit now what i'm gonna do is i'm gonna come up here and grab the pen tool or the mask tool and i'm gonna create a hole in this doorway just by are drawing around the edges gonna cut that guy out as you can see the mask is cut out this little section for us now what we want to do next is click on our mask which is on that layer and then click mask path so it saves the path and saves every change we make to it nothing worse not clicking that and doing heaps of adjustments to find out it's done absolutely nothing, so i'm actually gonna click subtract now, we can see the other clip okay, so i'm just gonna go along and try and adjust the mask as close as i can to the door here and now what i'm gonna do is i'm gonna duplicate that clip that i just masked and obviously it's gonna have a mask on as well, i'm just gonna delete that mask, but i'm gonna do the opacity trick with this as well, so i'm gonna go opacity set a keyframe move it to 100 towards the end and 0 towards the start so now i've got a gradual fade in of this clip here looks like they're all a part of each other i use the same techniques as i use previously in a few other clips and we were almost done now for the final two clips super easy i ended this clip here by looking up at the ceiling and i started this clip by looking up at the clock so these are two perfect matches so i'm just gonna join them and already i don't need to do anything like it just transitions pretty well, but now it's time for the most important part the thing that's gonna absolutely tie everything together and make it look really really really good we need to add motion blur without motion blur it's pointless it just it looks cheap and all the effects won't blend in as well so right click on your composition click new adjustment layer and then we're gonna go to effects type in motion and then you should have some motion blurs pop up choose cc force motion blur click and drag this onto the adjustment layer and instantly we have motion blur on all of our clips now as you can see with cc force motion blur we have some frames here that we can still see from the motion blur these are the motion blur samples we want to make this look more smooth i'm just gonna go up and click the eight here and type in 30 and that's gonna make it look a lot smoother instantly you can see a dramatic change keep in mind the higher this number here the longer it's gonna take to render on your computer so i'm actually pretty happy with this and i think i'll render this out and show you guys what the final result looks like。
2649陈橙 04:38
04:38


![油管大神Natalie Lynn [ 在这一刻,我感受到了自由 ]电影质感VLOG 把Vlog#拍出电影感 #每一帧都是热爱 #电影感 #摄影 #剪出电影感](https://p3-pc-sign.douyinpic.com/image-cut-tos-priv/5f6a47e5b92522ea35c404e52876b7a3~tplv-dy-resize-origshort-autoq-75:330.jpeg?lk3s=138a59ce&x-expires=2079367200&x-signature=yaKjMCerak62GLmM1AzOL6EFCe4%3D&from=327834062&s=PackSourceEnum_AWEME_DETAIL&se=false&sc=cover&biz_tag=pcweb_cover&l=2025112502273383FB32C1F397BC35B82F)


