动漫仰望的脸怎么画
hey, everyone cynics here today's video is all about helping you improve at drawing faces from any angle from imagination it's a question that i've been asked and explained in a handful of different streams, but i realized it would be a lot easier to simply make a video on the topic i'm going to break it down into a few different levels that will hopefully help people of every skill level it's important to note this is simply a method i made to help myself there are lots of methods for this stuff many using bridgemen or lumis, but personally i'm not a fan of using circles and organic drawings so this is my technique okay let's dive in level one is going to revolve around a basic sheet of paper visualize that sheet of paper in your head it's a simple rectangle now lay it flat on a table hopefully, you have no problem drawing a flat sheet of paper in perspective, but if you do maybe practice that first the next part is where it becomes very important imagine the paper having a slight curve to it just straight down the middle this is going to be the shape we care about and don't worry if my description was terrible, i'm drawing everything out, so just look at it and hopefully you can understand it if you really want to get good at drawing faces from any angle you're going to have to be able to draw this curb sheet from any angle i'll draw a bunch of random examples now now, i recommend practicing a lot of these just start with one of the curved sides in a random perspective and then build it out from there, i think that's the easiest way to do it i'll add a bit of coloring just to make them stand out a little little bit more and for future reference i'm just going to ignore any lighting or anything like that and just paint them all in a very universally colored way regardless of direction these first ones are giving you any trouble whatsoever just keep practicing them you can practice them as long as you want until they become very second nature anyway level two is where things start to actually begin to resemble a face i'll draw up some simple level one sheets to start things off, but it's going to be from now on that we can always visualize a center line running down the length of our sheet and i'll just draw it in the first view of these, so you don't have to visualize it that hard we're going to be adding a nose of sorts to do that we need to just have an oblong diamond shape embedded in the middle of our sheet you can make it bigger small as long as the geometry lines up, you'll probably be fine it can be a little tricky and you might have to erase some lines when the nose overlaps the outer edge of your sheet, but hopefully you'll get the hang of it this nose is really the only thing that matters in level two, but getting it to look good can really ramp up the difficulty, we're also going to add a couple of dots for the eyes not too far above the halfway point of the face and halfway between the bottom of the nose and the bottom of our curve sheet, we can draw a line for the mouth just remember this line is on the surface of the sheet, it will always follow the curve of the sheet the bottom edge of the sheet can even be a handy guide for what the curve of this flat mouth should look like once again just explore away as much as you can draw this level too shape from any angle you can think of with just these simple it's probably enough to get you comfortable and drawing simple stylized characters in any direction i kind of like this little paperboy character he has a little bit of a charm to him now that this sheet is pretty filled out i'll just finish these all off with some color i'm gonna be adding a little bit of brightness to the top parts of the noses and a little bit of shadow to the bottom parts for level three things will only be getting harder to be honest after level two there could be as many levels as you like you can either build up each plane of the face and really comfortable with each one or you can just skip all of that and dive right into finished faces for this video i thought there were a few features which should gain some extra attention though in level three i'll be adding cheek lines which in turn will help dictate where the ears will go and i'll also be adding some mentioned to the lips as well as the interior eye sockets you'll notice i only said interior eye socket this means the part of the eye socket closest to the center line if you were to rub your hands around on your face you might notice that the interior eye socket has a lot of depth to it right up against the nose meanwhile the exterior side further away from the nose just blend smoothly into the side of the head when we draw eye sockets or anything really we only care about the places that actually cast shadow and show form as far as the lips go, it's not too complicated just remember that both the top and bottom lip need to come forward i will hint at the gel line in the first drawing by using a blue line, but it's not important to draw right now just understand how it works and how it plays into the area under the lower lip, it's a bit silly, but i actually had more difficulty drawing these faces than i did drawing realistic faces for me these ones all fall into a valley of being pretty unappealing, but that doesn't mean they aren't very useful for practice it's just a little creepy they almost want to be human, but they like chins and things of that sort i'll just zoom through these bumping up the level of details and shading just a little bit to hint at all these added forms if you can do these ones well, then that's probably a good sign at this point you've hopefully tackled some pretty complex forms and your brain is getting a decent workout when it comes to turning objects in three dimensional space, i'm going to jump straight into the fruit of this labor and just make a bunch of fully formed human masks from different angles and perspectives the days of the paperboys are over and we've graduated to maskmen you might be thinking that masks aren't the final stage and i should be focusing on completed heads, but i find that visualizing every face as a mask helps a lot with the mental gymnastics involved in creating really solid looking characters from imagination my biggest help for all of you is that you will reach a point where the idea of making a straight on view of a face seems so incredibly boring that you just find yourself filling sketchbook pages with imaginary character faces from the weirdest angles you can anyway this last level is really for people who have a pretty good grasp on facial anatomy and plains of the face already don't worry if they're still giving you trouble i'll be making anatomy videos on noses and other parts of the face in due time just practice those paper curves if nothing else you may notice that in a lot of these faces i'm still using the basic paper curve for most of the top of the face and really only modifying it heavily once things dip low the ear and get into the more angled features of the jaw and chin always keep what you can get away with as i color these all in with my basic paper looking colors you might still be thinking well how do i get to the rest of the head i'll quickly throw in some lines to show you how it can work just remember a lot of the areas outside the mask will usually be controlled by the hair shapes and more graphical elements but even if you just want to do a bunch of ball characters i'm still going to make the strong recommendation that you avoid circles use sloping shapes or rounded boxes anything you can to punch a little life into the head shape personally i'll take a boxy looking head over a circular one any day just let the angles flow and taper into the neck and whatever graphical way feels right to you if you've been around art long enough your brain has some level of instinct for shape appeal locked in there somewhere just don't overthink it all right i guess that will do it for this video i hope it will help out some of you or maybe just give you an alternative view on things that you're free to consider and disregard at the very least thanks for watching a big continuing thank you to everyone that supports these videos via patreon you guys are the best around so don't ever let anything keep you down see you guys。

粉丝750获赞2.0万
相关视频
 01:47查看AI文稿AI文稿
大家好,这里是画师萌脸,画的好不好就决定了你画的到底是人还是贞子,而不同角度的脸型能够表达人物不同的情绪。 好,这些角度可以让你的人设性格特征更加鲜明,那么本期就来教宝贝们画仰视面部的一些小技巧和注意事项吧!正面仰视我们在画脸部的时候,先把头的框架确定好,在仰视的角度下,辅助线要跟着脸部的结构向上弯曲, 脸部的下半部分会大于上半部分,定好框架之后再开始刻画。无关眼睛的话,相比平时两边的眼角都会往下垂一点点,鼻子的话,鼻底会变成三角形,可以把鼻孔画出来, 或者直接上阴影也行。而整体的五官都会向上挤一点,耳朵会偏往下一些,嘴巴和下巴的距离会拉开,曲线也会变得比较平缓,能够直接看到下巴的底部。斜侧仰视 洁厕仰式的脸,也就是面部的中心线向一边侧,同样的跟着脸部的曲线走,所以一些结构辅助线也可以稍微的带一带,方便宝贝们对头部立体感的理解哦。 侧面的眼睛会被鼻梁挡掉一部分,睫毛会跟鼻梁形成一条断开的弧线,额头会变短,脸颊的面积会增大。下巴的延长线连接耳朵可以在削弱下巴的尖锐感。侧面 侧面的话,脸部的中心线会直接变成轮廓线,下巴连接耳朵的辅助线会稍微往上抬一点,下巴呈现立体感,能直接看到脖子。 侧面俯视的话也没什么好说的了,基本上会画侧画的小宝贝,画这个俯视角度基本上都没什么问题了,只需要把五官的相对位置往上抬一抬,确保能看到下巴的底部就可以。 视线从上往下,嘴角微微一提,可以表现一种轻蔑的表情或者傲娇的人物性格。常用于普缺性的人物,或者设定是御姐的人物形象。人设练习力可以用到这个角度来凸显人物的性格特点。
5.0万画师萌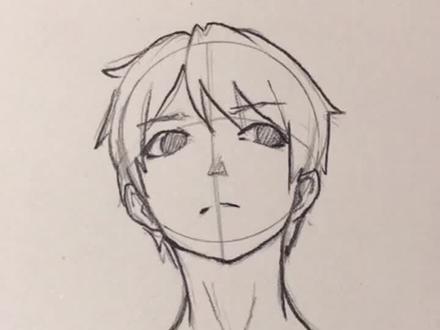 00:54
00:54 00:24
00:24 00:25
00:25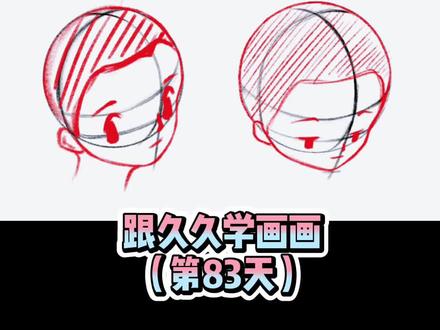 01:07查看AI文稿AI文稿
教你画动漫人物的仰视和俯视。先来说仰视,画一个圆,由于仰视是在下方观察近大圆小的关系,中间的这条线会靠上向下做延长线,这条完整的弧线就是脸的中线。找到眼睛所在的线。由于 后视参考线自下而上,呈现由疏到密的排列。找到下巴所在的位置,开始绘制面部轮廓。眼睛的地方稍稍凹一些,下方大概二分之一的位置腮帮鼓起。我们要把头想象成一个球体,耳朵位于前后半球的中间,他的大小依然是从眼睛连接到鼻底。 现在你可以根据前几节课学到的知识,把剩下的五官都加上了。一样的方法,还可以画出仰角更大的视角再来学习俯视。与仰视相反,这时平分的这条线要更靠下一些。画出眼睛所在的线。中线向下延长,找到下巴 所在的位置,绘制脸部外轮廓。依然是眼睛往里凹,下方大概二分之一处,腮帮鼓出,把脑袋想成球体,耳朵就在这条线的后面。现在你可以在其他参考线上添加上五官了。怎么样,这几个角度的小脑袋你可以试着都画出来吗?
7509画久久 03:18查看AI文稿AI文稿
我们来画一个仰视头,然后呢我们先打开定一下头看看,我们是这样往这边看的, 头稍微画斜一点,这耳朵还有眼睛大概处于中间的位置,然后呢这是额头,脸蛋,然后呢头稍微扁一点, 但是他这只耳朵,后脑勺的位置,哎,然后呢我们把眼睛画出来,放到这里的位置,我们可以这样大的话会实现。然后呢上眼连线,画出来 最雅致的时候呢眼睛往上看,眼睛稍微偏离一下,下眼缘也就是这样偏离一点,让他有向上看的感觉,那么这里呢啊,因为突死的原因,他比较扁容,也是这样子,像稍微脱离,然后让鼻子来,然后呢 确定之后我再给他画上发型啊,可以画的随意一点, 自己洗完了脸得怎样? ok, 然后呢我们把线勾上,从哪里都可以,你可以从最顶面可以勾,也可以从那个五八开始勾,那我们就可以从最顶部这里开始勾啊,头发随意换, 然后呢画头发的时候呢,稍微定一点,这样画一下,然后呢这条线给勾上, 稍微做一点点修正, ok, 然后呢把他的上眼莲花眼睛画, 然后呢给他画上眉毛, 我们可以多练习几遍,多画几个没关系的,画错也没关系,我们就随便瞎画,因为我们不是人生就这一幅画,基本这样,画出来就向上看的样子,然后呢 中间先画出来, ok, 眼睛的位置,鼻子的位置,然后呢我们要先勾勒出他的额头,脸蛋,下巴,然后呢画过去,然后呢后脑勺,耳朵在耳朵给画上,然后呢我们呢就是画一个女生, 女生的睫毛比较长,可以画长一点,眼睛稍微大一点,圆一点,也是一个向上看的样子。 要不要画长头发? ok, 就这样把头长头发画上,然后觉得这里是太大了。没关系,我们再稍微修一修, 收拾了就可以了。然后呢,把线给勾上,这是我们从五官开始画起。嘿, 脸蛋倒过去,头发 在不要的地方擦掉就可以了。
28子木简单画 00:52查看AI文稿AI文稿
有手就行的面部仰视画法,很多小伙伴会画正脸和侧脸,一到仰视就开始乱了,今天教你一个超级简单的仰视画法。首先以十字辅助线为基准,因为仰视角度的轮廓 其实和正脸的轮廓是一样的,所以在辅助线上画出正脸头部的轮廓就可以了。仰视的耳朵都是低,至于眼睛的下方,所以我们横线下方的位置便是耳朵。接着要跟着脸部的结构画出一条向上弯曲的弧度线来决定脸的仰角,而线的弯曲度就决定着连仰视的角度。又因为仰视下颚线的位置都 会比正脸下颚线高,所以我们要画在正脸下颚线之上。然后以弧度线为准,并位出眼睛的位置,画出眼睛的轮廓。仰视的眉眼之间的距离会变小,两边的眼角都 会往下垂,鼻子会变成三角形。相对于正脸的嘴巴和下巴的距离,仰视的距离会较远。整个操作下来,面部结构会形成劲大圆小的透视关系。最后我们细化一下,加上好看的头发,仰视的人物就画好了。
1510梨涡的小画馆


猜你喜欢
- 3.4万湘灵手绘