简单的花朵方法用海绵宝宝做的

粉丝1.1万获赞10.8万
相关视频
 00:51查看AI文稿AI文稿
哈喽姐妹们,超简单亮眼的海绵宝宝珊瑚花小挂件教程来了,快快和我一起学起来吧!拿两根扭扭棒给他扭成一根, 然后给它切成一个圆,再用食指掐出五个圆,用手指箍出来的形状就特别至整形, 大致形状出来后,再调整一下,珊瑚花就出来了,链子一串就好了。是不是句句句简单?记得交作业哦!
4391吴扁扁 04:51
04:51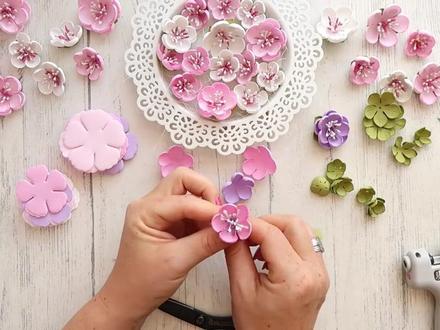 15:00查看AI文稿AI文稿
hello, hi, it's amilia here welcome to my new video today i want to show you how you can create those lovely flowers these are farmer and flowers and i just call them cherry blossom because they're very similar to jam and these are super super easy to make look i have made so many and they are just gorgeous so in that tutorial i will quickly show you how you can create them? i think the the like most important part here are the statements maybe not the most important but they do the job so we will focus on that as well today and i will be using lady design dies and i used flour one and flour nine so flour one is used for the flowers and i have used those two sizes this one for that and this one for that i know they look much smaller than they die but this is when the magic happens so i we will be using that and for the leaves i used this one for the little flowers and the bigger one for the big flowers okay, i will show you what us do we need so we will need some die cards and i started to do them in a lavender color as well, so i've got few here for the flowers for the leaves okay, so we will need that i already started doing this so maybe i will finish them we will also need some statements and i have the mixture of statements here so they also mud statements and for one flower i am doing a mixture of four of each color i've got three colors lavender, white and like darker pink it's between pink and purple so i will use 12 statements for one flower there are four of each color that mixture and this mixture looks really nice you will also need a little wire to put this diamonds through your flower altogether ion and the ion is very important here and the hot glue gun okay, we'll also may need some sponge or something for your flowers to press into and that tool which is not necessary here you can you can use a brush maybe let me just grab some brush you could use a brush because we will not be shaping the flowers just pressing them in the center down, so i will use the brush here to show you that it works and the ion for the flowers will need an ion between 2 and 3 dots so it's quite warm and i will say few words about the iron okay, because for to create those flowers like that you really need to control the like curlness of your flower on the ion that's why your ion cannot be very very hot because the farming run will curl straight away and the shape will be weird basically, so to have a really nice shape we need to keep the flower on the iron longer and it needs to just curl slowly i will show you um you can see that my flowers were colored on the edges and i just use the pink ink maybe i will show you on one flower let me just grab my sponges so i just ink the edges, but it's not necessary because the white flowers are without any color and they look great as well, so if i wanted to ink the edge i just grab them few together and just go with the color on the edge so when i do many flowers i will take the whole bunch and just go with my sponge on the edges of the flowers and you can use any ink oil pasteurs or soft pasteurs to do that and also i use the green one for the leaves and i did did it in the same way, i got the green one, so i take a bunch of leaves trying to keep them all together then i just go on the edges i didn't worry too much about coloring those because they are on the bottom of your flowers and not so important okay let's do the flower so when we've got the layer ready we need to place it on the ion and if it's not curling like this one it means oh yes, it means your iron is switch off great so let's wait few moments for it to be much warmer oops i'm sorry i had to close the window because my neighbor stock was barking and i think my aisle is ready so let's do the flower now you will place it on the ion and you just have to wait for it to curl okay and look it's curling slowly and this is what we want we want it curl it quite a lot so then i'm slowly releasing the flower okay when it's much much smaller than die cut layer and then i press just a little bit in the center and look this is my this is my flower okay i will do another one so place it on the ion and wait for it to become smaller and i'm holding only in the center of the flour of the layer you do need to do it slowly because then you will get the best result when it's much smaller you can slowly start to reduce it okay and then press in the center so you can do one layer flowers i did one layer i think the most, but some are like two layers stuck together i've got two layers here so maybe i will do a few lavender as well just to show you that it works every time we just need to be patient here but you know these are easy to make oh it's not curling so i will do the ion will make it hotter because my ion works like it's switching on and off so sometimes i have to wait longer for it to be hot come on let me just do it slightly hotter okay when you place it once on the iron and it's not curling then it's oh it is going now okay and i i'm pressing to just just a little bit okay, not hard i don't want to create any like pumps there, it's just to make the center slightly like to for me to have a guide later where the center actually is when i'm putting this diamonds through it's easier and another one okay now i will switch it off and i will just stick them together to show you the complete flower i can actually i will remove that because it's quite hot and i don't need it no i will i may also do the leaves straight away, so i so when it's still hot you can place the leaf because the leaf we only want to place for like two seconds so it the patters were slightly cover i will do a few this goes really quickly because i don't want to keep them on the iron it's just making them not so flat, but you can see the ion is switched off already, but it's still warm so it works great okay and now i will need a hot glue and the statements i already prepared some bunches of statements so i've got it ready here like i said three mixed color of course you can do it whatever you want but i think this looks really nice so i place the wire in the center of my statements like i always do and then i will fold the statements it's nice if you have the statements the same length i are not, but yeah would be would be better, but it's okay if they're not exactly the same length as well and i will go through the center so let me choose smaller one because i will do one double layered one single layered so i go with the center with this diamonds through the center and keep them quite long you can see longer a bit than my petals and then i will just add glue around my statements and in the like in the center of them and i'm going to push them slightly lower and spread with my finger you have to be careful because glue may go on the other side okay and then i'm just spreading them because glue is around these diamonds so they should stay in the position i am giving them okay like that so you could keep it one layered like i said or this one we will do two layers so go through the next one and now you can overlap the patterns or not it's depend on how you like it i will like it like that so i will add clue between the layers as well okay and we've got that flower ready look this is super super cute i'm looking for my scissors now because i will cut these diamonds off i mean on the bottom of course and i'm going to attach a little leaf so look the little one will be okay we could use the bigger one as well if you want to have the leave to be seen on from your from the top of your flower maybe the bigger one so i'm all adding the glue just little dots over glue and then i will place that i have to be careful not add too much glow and this is it look at that super super easy and super super cute right so i will do another one single layer doing exactly the same what i did with the first flower some taking this diamonds placed the wire in the middle oops one is sticking out fold them fold the wire and go through the center of your flower so you can do them in any color you want actually it will be great in many different colors i think they can they can, they are not too big so they can go on the cards and on the other projects as well and because they are hmm created on the ion they are like the edges are not super soft so these are much stronger than like any order for meran flowers okay, so other glue around the statements and。
38燕回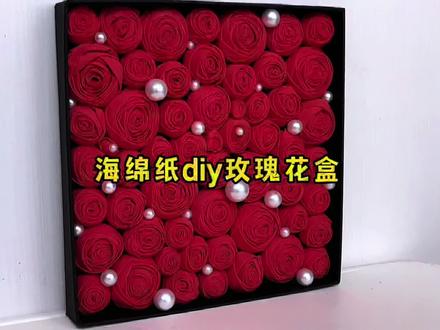 01:25查看AI文稿AI文稿
今天用礼品盒的盖子和海绵纸做了玫瑰花盒,女孩子都会很喜欢吧。把海绵纸剪成宽三厘米的长条,中间每个一厘米剪开,注意不要剪断哦。顶部剪成圆弧形状, 袋子不够长,可以用双面胶粘贴延长哦。接下来像编麻花辫一样编起来。结尾打胶固定, 用剪刀剪掉多余部分。顶部粘上一小袋双面胶, 然后把它一层一层的卷起来,尽量卷紧一些,会更好看哦。结尾用胶枪固定,注意一定要少打胶哦。胶太多就会一出 出来了。这样一个玫瑰花就做好了,按照刚才的步骤再多做一些吧。一共做了三个尺寸。玫瑰花做完了,接下来把它们固定在盖子里面吧,大小蹭蹭,效果会更好看一些。 就差最后一个玫瑰花了,完成啦。空隙部分用珍珠再装饰一下。一起来看看效果吧,真的是太美了。
145十一手工制作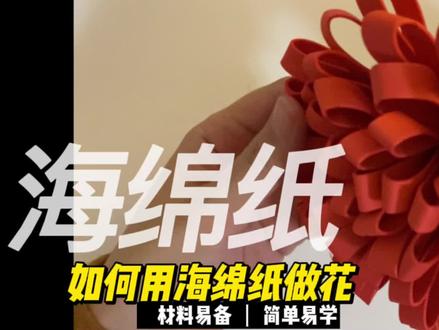 03:29查看AI文稿AI文稿
做海绵纸花之前,我们首先要准备双面胶,尺子、剪刀笔、彩纸刀,一次性筷子,筷子用来做花枝,还有海绵纸, 首先我们用尺子在海绵纸上量出十三厘米的距离, 我们要剪出一条十三厘米宽的海绵纸条,两端都在十三厘米这个地方画上点,然后就用裁纸刀把它裁下来, 裁出一条十三厘米宽的长条,长度呢可以长一点,大家可以看一下你的海绵纸有多长,就可以裁出这么长的距离。 好,然后我们要在这个边贴上双面胶,在他的边部涂这个,贴上双面胶 好,贴上之后呢,我们要把两端贴起来,大家记得贴的时候要贴齐一点, 贴完之后呢,我们还要在他的外面再贴一条双面胶, 贴好之后我们就准备剪刀,然后开始剪出我们花的花瓣, 大家在剪的时候呢,一定要注意不要剪到这个双面胶贴的位置, 剪的时候呢每一个花瓣的这个粗细呢要是一致的, 这样的话我们最后做出来的这个花呢才会好看一些。如果大家的家里没有海绵纸,也可以选择普通的纸来代替啊,只是我们的海绵纸最后做出来的效果呢,会显得蓬松一点,他不会折叠在一起。 好,这个剪的过程呢稍微有点慢,大家耐心一点,剪完了之后呢,我们就可以开始进入到最后一步了, 我们就拿出我们的一次性筷子,然后把它给卷起来,大家把这个双面胶的地方撕掉啊,然后我们就可以哎开始贴了, 在贴的时候啊,我们先把这个筷子放在啊中间,贴的时候一定要注意把边都对齐, 对齐了之后最后我们贴出来这个花的效果,他就会有一种盛开的感觉。 好,那么所有的这个海绵纸都贴完了,这一朵花也就完成了。
246鱼子 03:47查看AI文稿AI文稿
don't grady or tattle them to keep us in i saw the bakadi to go nor karaki quitter by your got a cake coated you。
250俊妈做早餐 03:34查看AI文稿AI文稿
为了能去比奇堡吃美味蟹黄堡,我决定把房间改造成海绵宝宝一样的快乐废物屋,能够坐在沙发上看水手电视,打开门就是比基尼海滩,原来的房间长这样呃,一个杂物间。海绵宝宝房间的同款壁纸咱们也要安排上,但是在网上查找了一下海绵宝宝的壁纸, 打扰了打扰了!根据动漫里的画面参考,我做了两张简单的壁纸图案,先定一个小样看看效果感觉还不错,下面就可以贴大墙纸了。 已知一盒两百克的糯米胶粉兑三点五公斤自来水,那么一盒一百五十克的糯米胶粉需要多少水? 把水倒入桶中,一边加入糯米胶粉一边搅拌热乎的糯米胶就大功告成了。如果说贴墙纸简单,那么一个人贴四米长的墙纸真的太不简单了!别别别别别别, 这是贴了一个小时的样子。友友们,长按点赞帮我一键加速吧! 贴好了看还是有点瑕疵,希望把这些家具布置上之后会好一些。下一步还原动漫里的棕色天花板,这一步还是比较简单,刷两边棕色乳胶漆顶面就可以搞定。但是我的脖子已经搞破地了, 等期干的时间,把买来的麻绳按照动画里的样子打出绳结,需要一边打一边测量尺寸,织成一张绳网,再用热熔胶固定到顶上。但是整张绳网真的太重了,为了不让粘好的绳结脱落,不管做什么我都得拖着他。小野子,你可把我扶好了, 我掉下去有你瘦的!花了一个晚上,把所有的绳子都粘上去,你就会得到一个崩溃的改造博主, 整个神网都粘歪了,不说了,我要开摆了!考虑了一个点赞的时间,最后还是决定重做, 给顶面重新补上乳胶漆。等了两天,发现新买的绳子商家竟然发了假物流,没有收到货就显示签收,如果重新购买又要等两天啊,这 还是线下靠谱。第二次,为了不再粘歪,我使用水平仪重新定位,把每根绳子单独粘上去,唯一的区别就是不能打结,但是看起来没那么歪了。再用蓝色的丙烯勾出动漫里 墙面的边线,这不是手抖的感觉,是手绘的感觉。动漫里的地面是沙滩的地面。我买了最便宜的办公室地毯做底色,再用红色、蓝色、黄色的颜料兑水滴上去,模拟出五彩斑斓的沙滩。墙上的小窝当然也要安排上。 最后再来看看效果吧。 底子已经有了,大概现在还缺点家具,是先坐沙发呢,还是菠萝屋的大门?
26.2万野不是不行


猜你喜欢
最新视频
- 2554哈啰猫