粉丝1773获赞1.1万
相关视频
 08:58
08:58 02:26查看AI文稿AI文稿
第六种,小船劈划艇,步骤非常简单,只需要一张纸就可以完成半张 a 四纸折出三条这样的折痕,第一条折痕,第二条折痕,第三条折痕需要翻过来折, 折好后我们给他翻回来。注意看,沿着折痕两边向中间推,上方顺势压下来,我们再把下半部分向上对折,右下角向上折, 左下角也这样折。注意看,我们把右边这个角向左折,折出一条中线撑开后,我们再把右边的部分整体向左折对去,中线折痕压实。同样左边的部分整体向右折对去,中线折痕压实。接着右下角向左折对去中线,左下角向右折对去中, 中线折好后就是这个样子的,现在我们把右边的这个角向左边收一点点, 左边这个角向右边也瘦一点点,现在我们把它们撑开,再撑开。注意看,这里有一条折痕,这边也有一条折痕,我们把这两条折痕像这样反向捏一下, 两条折痕的中间我们再给他折一下。 现在沿着折痕,我们把这一页纸推上去,按住不动,把右脚向左折对去,中线折痕压实。左边也是同样的折法,向右折对去,中线折痕压实。接着我们找到这条折痕, 给他像这样捏住,沿着折痕把他向中间推,下方折痕压一下,上方折下来。同样的步骤,我们把左边也像这样折出来。 都折好之后,我们把左边这个角沿着折痕向回收一点点,右边也是同样的步骤,最后一步,我们把它从中间撑开, 撑开之后,我们再把这里整理一下,后方也整理一下。好了,这样一只皮划艇就折好了,你学会了吗?喜欢的话给个免费的小红心吧!
769慢动作教折纸❤️ 陈馨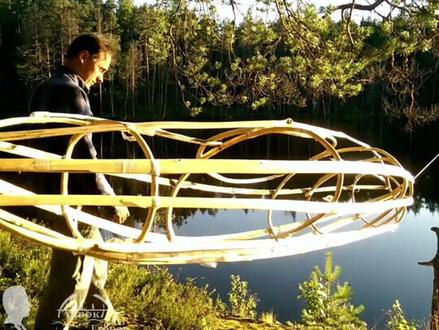 09:11查看AI文稿AI文稿
但同时,他的框架和塑料薄膜的外皮却足够结实,可以抵抗一定的顿力冲击。 我也曾用同一个框架将单人皮挺改装成双人皮挺,只需要安装一个额外的座舱。我得出的结论是,双人皮划艇的框架应该制作的比视频中的还要长一些。 有些朋友可能在我的俄语频道看过我的视频。我曾经用山树条和绿色的防水布制作过一个皮划艇, 那个皮花艇的设计和质量我都非常满意。然而,他与我的塑料薄膜皮花艇相比,还是有一些弱点。因为用防水布制作皮挺成本更贵,一旦撞上水下的岩石,修复漏洞也相当麻烦。 我的透明皮划艇几乎是免费的,而且如果塑料薄膜一旦破了,用透明胶就可以修补了。胶带可以严丝合缝的粘在塑料薄膜上,密封性比粘在防水布上要好许多。这是我头一次设计用树枝做框架的皮划艇。 接下来,我又对他做了很多改进。 你现在看到的是我的第一艘皮艇,因为船体太高,风阻也比我想象中更高。如果在大风天的拉多加湖上划船,过高的风阻会是一个很大的问题, 下一个船体的框架就会矮许多。你可以看到,塑料薄膜会挤压皮挺的框架,导致船的龙骨和肋骨都有一些突出。要解决这个问题,可以在其中 突出的肋骨中间增加一些肋骨。这样一来,船体框架的流线型会更好,水组也会相应的更低。制作一个透明的皮划艇,在框架上包裹塑料薄膜只需要几分钟的时间,但最耗时的部分是制作船的骨架。 我曾在俄语频道上发布过制作皮挺框架的视频,如果你们感兴趣,我将来也会在中文频道发布。现在我只会简单的介绍一下制作过程。 我的皮花艇框架是由弯曲的冷山树枝和木板组成的,其中包括两个圆形肋骨,一些椭圆形的肋骨和八根龙骨构成。 我曾经尝试过不同类型的木材,最后发现冷山的树枝是制作弯曲肋骨的最佳选择。这样的肋骨重量轻 而且耐用,剥皮后的树枝会在一天之内就变干定型。 下一步就是要找到一个好的材料制作船体的龙骨。我发现了一颗倒下的冷山, 打算使用他的木板制作龙骨。这种因为自然的原因,从树干玻璃的木板,因为木材的纹理没有被锯断过,而是随着木板的方向而生,因此非常坚固。这些木板的重量和坚固程度几乎和碳纤维相当。 为了制作座舱的框架,我把它固定在活雕的凳子上,就是我之前发布过的活雕座椅那期视频,然后让树枝自然风干一天。如你所看到的这些用 用来制作龙骨的木板,我可能一辈子也用不完。我把制作好的船体框架挂在树上,这样每次我回来需要皮花艇的时候,只需要花十分钟时间在框架上缠绕新的塑料薄膜就可以了。 我只用了四分之一卷的塑料膜就能缠三艘皮艇的外皮,剩下的四分之三卷塑料膜被我用来包裹圆领小房子了。 我要提醒大家一下,我用的塑料薄膜是工业用途的,也就是说,相比于家用厨房保鲜膜,我的塑料膜更加宽,也更厚。 其实这个项目的主要想法就是,如果你在荒野中露营或 或者徒步旅行的时候遇到了想要越过的水域,你可以在一天之内制作一个皮划艇。这种自制皮艇的功能完全可以与户外专卖店出售的皮艇相媲美。 我发现在包裹皮挺时,把船体框架掉到胸部的高度最为方便。每缠绕一圈塑料膜的时候,你只需要轻轻拉扯,就可以保证塑料膜紧密缠绕。而当塑料膜层层紧密缠绕时, 你不需要任何胶水,他们之间就会形成密封。如果你有一个小伙伴帮助你一起缠绕塑料膜就更简单了。 根据我的经验来看,只需要缠绕三层塑料膜就可以达到防水的效果了。然后我会用胶带贴在龙骨的凸起部分对其进行加固,同时也提高防水的效果。 我在二零一五年制作了第一个框架皮划艇,这是我的第一个设计。从那时起,我用这种方法设计和制作了十多个皮划艇,每一个都比上一个有所感情。 如果你想了解更多关于我的皮花艇的设计,也许你可以访问我的伊斯特格莱姆主业。当然,我也会把皮花艇的制作图纸公布在 b 站的专栏当中。 我可以告诉你,制作这种皮挺只需要一天的时间,制作过程也十分令人舒适。 在冬天,我会把缠绕了塑料膜的皮挺放在我的小木屋里。如果你没有靠谱的存放场所,我建议你剥掉皮划艇的塑料膜,并把框架挂在树上,这样他就不会腐烂了。 二零一七年,我用两只皮划艇做了一艘双体船,其中一个船是用防水布包裹,另一艘是用塑料膜缠绕的。这艘双体船上,你既可以划船,也可以用船翻航行。
1015麦克斯 叶戈罗夫 03:19查看AI文稿AI文稿
双翻皮划艇,双翻皮划艇,双翻皮划艇, 双翻皮划艇。准备一张方形纸,折出两条对角线, 两条对角线相交有一个中心点,方形四个顶点对齐,中心点进行折叠。 选择一组对边,分别与中线对齐进行折叠。 把左右两个对边与中线对齐进行折叠, 此时出现三个折痕,分成了四段,把此小边与中线对齐进行折叠,形成一个三角形, 其余四块相同的折叠方式 啊,压平形成一个等腰梯形,剩下折叠方式相同, 翻面沿此线进行对折。 好,此时撑开皮划艇完成。
28慧玩手工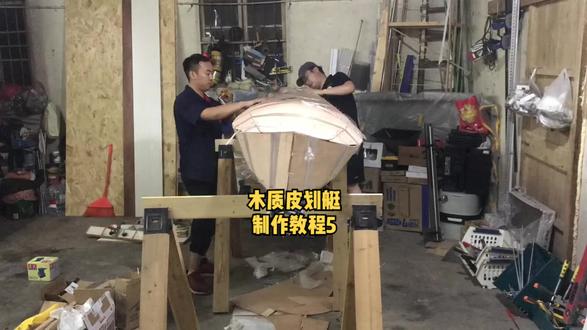 08:48
08:48 00:54查看AI文稿AI文稿
朋友们大家好,在本期视频中,我要教会你如何用冷山树枝和塑料薄膜制作一个透明的皮划艇。这个想法简单明了,如果你在野外,手里有刀,塑料薄膜和透明胶就可以制作一个功能齐全的皮划艇。 他的重量还不到四公斤,并且绝对防水,材料费基本可以忽略不计,一天的时间就能做完。 由于船是透明的,你在划皮划艇的时候将会更加刺激和有趣。你甚至可以看到鱼儿在船底来回游动。试想一下,在这个透明的皮划艇上钓鱼是一种什么样的体验呢? 我的皮花筒动量很轻,我完全可以单手举起他。
4196麦克斯 叶戈罗夫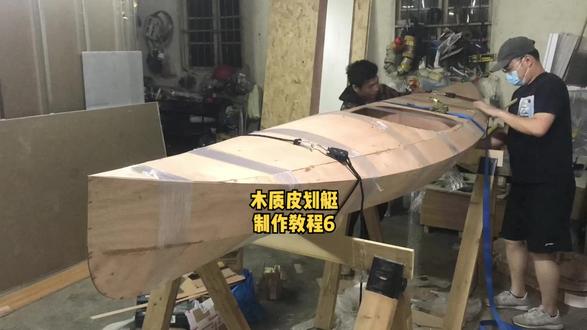 10:05
10:05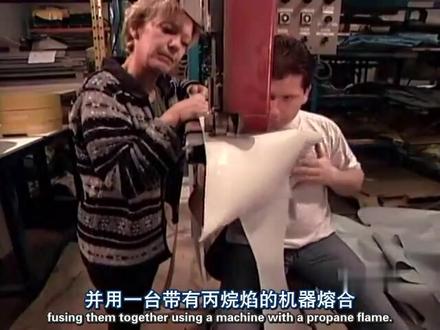 04:50查看AI文稿AI文稿
today's inflatable watercraft ranged from rafts and dingies to canoes and kayaks they're less expensive than conventional boats and easier to store and transport you don't need a trailer just throw your boat in the trunk then unfold and inflate it when you get to your aquatic destination whether it's a raft shooting the rapids or a motorized boat gliding across a calm lake an inflatable watercraft begins with sturdy waterproof material this company uses a millimeter thick pvc fabric that has a nylon or polyester fiber core after workers trace and cut out the pieces that will form the boat they connect them with a strip of the same material using the come together using a machine with a propane flame the intense heat melts the surface of the pvc until the piece is bond here's that bonding action in slow motion next they fuse a strip of pure pvc to the underside of the joint this ensures that air won't leak out of the boat where the pieces connect inflating the boat will pull on the materials surrounding the air valve so they reinforce that area with a round piece of pvc called a doubler this high frequency welding machine applies one hundred and twenty seven kilograms of pressure and heat generating fm waves to fuse the doubler in place then they cut a hole in the middle of the doubler for the air valve next come the cones cones support the weight of the motor and enable the boat to plane to rise above the water when traveling at high speed using the propane flame machine workers seal together the ends of the boat then insert the inside cone piece just before they closer up completely they finish off the seal using the high frequency welding machine then pull the cone piece through they inflate the boat until the pressure forces the cone piece into place they seal all around it with heavy duty calking stick on the outside cone piece then screw it securely in place they inflate the boat fully now to perfect the seal and to expel the excess cocking now they install what's called the transom a plank of wood that supports the motor at the rear of the boat they cover it in boat fabric using a plastic resin based glue that's resistant to the fiery heat of the sun they apply the same glue to the piece of material that will become the underside of the boat then position it in place after gluing on a bumper made of hard pvc they coat the boats underside in a liquid plastic resin this protects the bottom when the boat runs aground over rocks and sand they test inflate the keel a stabilizer that runs the length of the boat then they deflate it and begin installing the floor the floor is made up of five connected pieces, three made of aluminum and two made of fiberglass plastic or wood the hole in the floor is for the keels a air valve after inflating the boat they inflate the keel now they can take measurements to determine where to position the oars first, they glue on the oar locks the pieces that hold the oars in place the oars are made of aluminum so they're lightweight and they won't rust the motor is six horsepower to fifty horsepower depending on the size of the boat。
47躺赢主要靠实力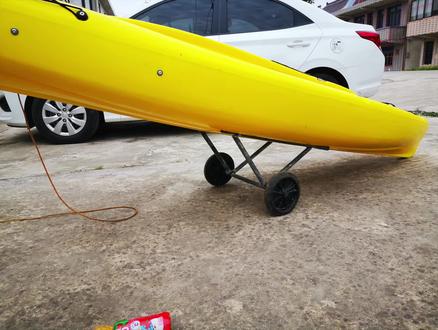 07:52
07:52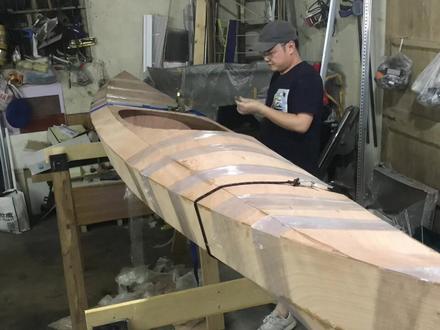 08:41
08:41 01:21
01:21


猜你喜欢
最新视频
- 1.1万淇心手工