ue4EDITOR用来做什么的
greetings and welcome in this video i'm going to give you a really quick rundown of the user interface in unreal editor now i'm going to make this as painless as i can for starters what we're looking at is the project browser? which is what appears first when you initially launch the engine now i've jumped over to the new project tab so we can create a brand new blank project of course you don't have to do that if you have a project you wanted to open i'll call this one ui demo just so i know to delete it later we'll make sure that copy starter content is active to give us something to look at and i'll click create that will take just a second to load up and now once that comes in we have a very very simple level and a few things that we can actually look at the scene now i'm going to make this again just as quick and painless as i can when you first jump into the editor probably the first thing is going to draw your attention is the viewport which is this gray big window that dominates the center of your screen this is your view into the three d world we're actually going to talk more about viewports in a future video so i'm not going to get to carry it away with them now starting at the top from here we have the main menu bar now this is pretty much like any menu bar you see in most computer applications like a file menu where you can save what you're working on you can create new levels new projects etc and so forth we have the edit menu your standards undo redo cut copy paste also though you're going to find your preferences for the editor as well as your project settings in here definitely worthwhile at some point to dig through at least the editor preferences and see the things that you can change around here inside the editor now that's something you probably want to do a little later actually you've been playing for a while, but it's good to know that that's there next the window menu super important because this is where you can show and hide parts of the interface that are not visible by default as you may already know unreal editor is a very deep application there's a lot of different facets to it and to keep you from getting overwhelmed a lot of the stuff that you can use is actually tucked away here under the window menu, but we're not again we're not going to get too deep into that straight out of the game then we have the help menu of particular importance here are linked directly to the documentation as well as a link to some initial tutorials that can really help you out if you're just getting started, so i highly recommend if you haven't yet to at least go through the welcome to the unreal editor and camera navigation tutorials as well so now moving down from there i'm actually gonna jump over here to the toolbar the whole point of the toolbar is to give you a series of common tasks that you will normally be performing so have some quick and easy one click access to those some of the more important ones that you'll see things like the save button though generally, i just hit control s these days quick access to the content browser if you need to open one as well as simulate and play which is something that we'll talk about a little bit later in a future video also, there's an important menu that drops down in here for quick settings which control various things that you can show and hide inside of your viewport and in the overall environment now moving to the left from here we have the modes panel this allows us to change the mode that the editor is currently in so by default this is in placement mode this allows us to place certain objects into the scene say for instance if we wanted to add a light to this scene i can switch to the lights category we could grab a point light and i'll just drag and drop that right into the scene it appears on the table and i can lift it up into the air and you can see that working and drag it left and right now there are other modes as well that we're not going to be able to get into right now we have paint mode, landscape mode, foliage mode and geometry editing mode which are all outside the scope of this video, but they're all different things that you can do within the editor for now we're going to keep things very simple and just focus on the placement mode straight down from there we have the content browser this is a penal that is so vitally important that it's getting its own video just a little bit later the purpose of the content browser however is to allow you access to any exterior generated content as well as any special content like materials or class blueprints that might have been created for example because i have loaded up the starter starter content excuse me you see there's a list of folders here so i could go under say props and there's a huge list of really cool looking props that i can just drag and drop in whenever, i want so here's the material preview mesh we can just drag drop that in it's a little big so let me jump over here to the details panel which i'll talk about momentarily and we'll just set the scale notice here to say point two by point two by point two there's a tiny little material previews here just for you to look at now that's the general idea the content browser you're gonna be doing a lot of dragging and dropping in here, as well as just double clicking to access certain types of assets so for example even this little mesh that we just drag and dropped into the scene i can double click this and open it up in a special editor so there are all kinds of editors within unreal, because you have several assets that require their own editors save for materials they have a material editor we have a particle system editor called cascade we have an animation editor called persona it just goes on and on, but i don't want you to get too overwhelmed quick at least this quickly let's think of it as just the content browser being where you're going to access all of the assets that you'll be putting into your game now jumping across the user interface we have the scene outliner this is a hierarchical list of all of the objects that exist in your level at this time and you can see there's already several in here that are named we have the chair the floor the statue we can click on any of these and they'll automatically select those objects if you take a look at the two chairs in my scene as i click on the first chair in the list, we get that one selected click on the other one we get the opposite when selected and really that's the big purpose of the scene outliners just a way to see all of the objects in your scene now, it has some other functionality as well, you can use it to parent objects together just as kind of a preview of what i mean by that if i grab the second chair here, and i drag it on top of the first notice, how the second chair is now indented underneath the first, and that means they are parented together so if i grab the chair at the top and i move it around both chairs come along for the ride, but if i grab just the one underneath then he could move into that's because he's a child and the one above is a parent now down underneath this we have the details panel the details panel is extremely important and useful this is where you're going to control all of the properties for any selected object in your scene so for instance i have the left most chair selected we have its transform information so it's location rotation and scale we have the static mesh that actually makes this up so this is the static mesh component we have the material that's been applied to it and we have an instant access to these things as well, so if i wanted to make a change to the material that was applied to any of these meshes say the table i can click on the table move over here to the details panel and you'll see the material that's been applied here in the materials category i can double click on that and we are now inside the material editor looking at all of the various nodes that make up this material graph i'll go ahead and close that for now so, that is a quick rundown of the ui that is immediately visible as soon as you open the editor as well as some hints that there's a lot more to the user interface that lies just underneath the surface so in really quick review we have the viewport which kind of takes up the central part of the interface we have the menu bar across the top the tool bar kind of centered and just underneath the menu bar we have the modes panel from the upper left corner the content browser lower left corner sean outliner up a right corner details panel lower right and also keep in mind that all of these parts of the interface are very editable so we can put our our mouse on the little divider lines in between each one and we can move these around to make the most of our screen space so that is a rundown of those interface options that is going to wrap up this video thanks a lot。

粉丝1718获赞3601
相关视频
 04:08查看AI文稿AI文稿
各位小伙伴大家好,今天开始我们一起学习优异舞,也就是虚幻引擎舞,本教程是根据油管上大神制作的教程改变而成, 虽然优异舞教程很多,但是大部分都是英文的,如果有中文的基本上也是机器翻译,根本没法使用,因此我改编死教程,希望可以帮助到和我一样英语不好又想学习优异舞的小伙伴。 首先简单介绍一下本教程,本教程的最终目的就是教会大家制作我们正看到的这样一个场景。 我们会从下载安装优异五开始,教大家如何在三 d 世界中进行导航移动,包括移动对象,如何创建材质并导入三 d 模型,如何雕刻风景并绘制树叶,如何下载免费免费的素材。最后会简要介绍如何 使用蓝图对游戏进行编程。下面我就开始带大家一起下载安装优异舞。首先我们先打开自己的搜索引擎,然后输入优异物官网, 点击搜索好我们看到的第一个虚幻引擎,最强大的实施三 d 创作平台,这个就是点击进入。好,我们现在看到的就是虚幻引擎五的官网,大家可以看一下,右上角有一个下载按钮,大家点击一下, 然后我们下载虚幻引擎五的话就在这里边下载。首先我们需要下载他的启动器,点击下载启动器啊,下载完之后我们找到这个启动器,双击进行安装就可以啊,当然我这边安装过了,所以 就不需要安装,大家没安装的就安装一下。安装完之后我们点击桌面上的快捷方式, 进来之后应该会提示大家首先进行登录,那我们可以根据自己的实际情况来进行登录,像我的话是用的 ipad 账号,大家可以自己注册一下。登录之后应该是这个界面,大家看左侧,我们点击这个虚幻引擎, 进来之后上边有新闻视力修换商城库,我们点击一下库,在引擎版本这选择五点零点一,点击安装 过程可能会有点慢,大家耐心等待就行。安装完成之后,你这个隐形版本下边就会出现五点零点一,然后我们点击启动旁边的下拉箭头, 点击创建快捷方式,这样你桌面上就会有一个 优异舞的快捷方式,我们平时进优异舞的时候直接点这个快捷方式就可以了,因为如果没有网的时候,这个启动器是打不开的,所以我们直接打开之后,我们大家可以看到左侧有最近打开的项目, 但是如果你是第一次进,有可能这里边没有,然后下边有游戏、影视、建筑、汽车,我们可以在这选择对应的模板来进行创建自己的项目。下面我们就先从创建一个空白的模板开始,我们选择游戏右侧选择空白,下边有项目位置,选择好位置, 他默认应该是 c 盘,我不建议大家保存在 c 盘,因为项目非常占用内存, 我建议大家可以保存在自己啊空间比较大的硬盘上面。大家看右侧项目默认设置里边蓝图和 c 加加,我们选择蓝图目标平台,选桌面就可以,质量预设 保持默认初学者内容包勾选上项目名称,自己可以命名一下 我的第一个项目,好了,大家点击创建就可以,进来之后就是这样一个界面,今天先讲这些,明天我们再继续,谢谢大家。
1.8万一醉挽清风一 05:38查看AI文稿AI文稿
greetings and welcome in this video we are going to take a look at some of the available view modes and show flags that are found within your viewport we won't be going over each and every single one of them because there's a whole lot of them and you probably won't need them all when you start out, but it's good that you know that they're here so that you can start experimenting and using them as you get more and more familiar with unreal editor so if you take a look in your viewport you'll see a little menu that starts off with the name lit and that's actually your view mode menu by default you get the lit mode which shows you the result of all of your materials and all of your lighting it's by far the prettiest way to look at your environment, but some of the other view modes that you may find yourself needing from time to time include unlit, which just shows shows you the color information from your materials and none of that lighting information as you can see here also jump down and take a look at wire frame as the name suggests this shows you all of the polygon edges of available in your scene keep in mind that on really dense scenes so if you have a whole lot of polygons this will start to get pretty busy moving down from here we have detail lighting this shows you just the lighting, but also the result of any normal maps that may be in your scene now right now i have pretty much objects that have no normal maps, but let's see if we can change that so i'm gonna jump into my materials folder and we've got some rock materials here let's just grab oh, i don't know let's grab the one at the bottom rock eight and drop that in now that's gonna take just a second to process and there we so there's no color information here, but we can see the result of the normal map to contrast that if i switch that against lit mode there you go you can start to see that color coming back into place now some of the other more important lighting modes that you're going to use would be things like the reflections which is going to show you the result of any reflections in your scene it's just kind of a nice way to diagnose what reflections there of course, there are some that we're not talking about things like light complexity and shader complexity we're not going to stress those at the moment now that's a good look at some of the view modes the purpose of the view modes is just a way to take a look at your scene from several different aspects particularly for diagnosing certain problems now moving down from here oh, i'm sorry and when i say certain problems i mean if you're just not getting the look that you want you can start analyzing from different angles so if you just want to see what lighting is doing that sort of thing i should also mention that we are making use of exposure by default in unreal engine for so down here at the bottom, you'll see exposure currently set to automatic and i guess a good way to show that off would be if i move the camera right in here to this kind of dark area underneath the table and we give the camera just a second to adjust when we fly back out it was probably really hard to see on the video but it's kind of like an eye adaptation so the scene will be as you go from a dark area to a light area the scene will be very very bright and then it'll kind of even back out, so it's kind of like active adjustment of your eye as you go from one lighting environment to the next, i mention it because if you're building your own environments it's particularly if you're building air that are dark and areas that are light it may be a good idea to temporarily turn that off or lock it at zero, so that you get a real sense of what that brightness is without things automatically adjusting, so here you can see things look pretty bright, but as soon as i turn exposure back onto automatic there's a very subtle dimming that happens i guess to really show it off, we could take our brightness and here's super bright so this is what the exposure would do if we were in a very dark area and if we're in a very bright area it can go all the way down to here as well and the idea is during gameplay you'll leave this at automatic and it'll automatically update as you move between dark and light areas now moving over from here, we have the show flags list now this allows us to show and hide a whole lot of things and for the most part this list is pretty self explanatory, so you can turn on and off things like anti aliasing or any atmospheres, any bsp brushes, etc, and so forth some common ones you may find yourself needing are like the grid, so we see the grid kind of receding out into the distance we can go into show and turn that off and hide that away, so it kind of looks like we're floating on a sea of emptiness in fact it's kind of scary so let's go ahead and turn that back on and then we can also show and hide a variety of other features so all of the different aspects of post processing, various lighting, component results etc so as you start flipping through these, you'll see a lot of these are on and off by default if you start playing with them to figure out what they do and you suddenly feel lost or you feel like there's something that you can't see anymore that you should be able to remember that at the very top you can click use defaults and that'll set everything back to the way it was instance if i let's see we turn off static meshes and we turn off the grid and we turn off any atmosphere and yeah i guess really that's enough because now our scene is completely black and is really scary we can go into show and click use defaults and that'll put everything back to those default settings so definitely keep an eye on that setting so that is a quick down and dirty look at the various view modes and show flags just to give you an idea of the existence of those modes and generally what they're here for same with the show flags, but that's going to wrap things up for this video thanks a lot。
1自在侯 04:18查看AI文稿AI文稿
项目,那第二个的话就是新建一个全新的一个项目,那我们首先先来讲打开,怎么打开啊? 然后如果说你的电脑里面有你之前做的一些项目的话,然后这个地方会有一些塑料图,你可以直接双击就可以打开了啊。那么如果说这个地方没有的话,可能因为有一些原因,比如说你的电脑是没有联网的, 或者说你没有下,有一次官方的一个平台的话,那这边可能没有了一个项目的一个数列图,那这个时候的话,你需要在这个越南里面点一下点开,对吧?然后你要找到你的那个项目的一个文件夹,比如说我这项目在文档里面,然后呃,就是 proxx, 对吧?然后我的这个打开的项目是这个, 对吧?这是我项目的一个名称,他是以文件夹形式存在的一个项目,然后直接双击,对吧?然后我们看 上面这文件夹,我们中啊,我们只要找到一个这个叫 upluck 的一个文件,对吧?那这个呢?就是我们项目的一个启动文件,我们只需要双击或者说选择他,然后直接打开就可以打开了啊,我们这边可以打开直接看看点一下, 有一次的项目打开的话,他需要一定的一个缓冲的一个时间,所以说我们需要耐心的等一下, 等它缓冲到百分之一百的时候,我们就可以打开了。 ok, 我们的项目打开了,对吧?就是打开了一个项目,然后的话我们还可以比如说 新建,我们来讲一下新建啊。呃,我们在文件这边我们可以不用把它关掉,重新再打开一下,我们可以直接在文件这个地方点击一下这个新建项目,然后点一下,然后我们会出来跟我们刚才看到一样的一个界面,对吧?然后这个就是新建项目的一个界面啊? 那我们看那新建项目的时候,下面有两个选项,一个叫蓝图,一个是佳佳,对吧?蓝图的话就是由于是他独有的一种成绩,就是基本上就是写好的, 写好的一个程序包,然后 c 加加的话就是完全是一个纯的一个代码的一个状态了,对吧?那这个的基本上是程序员来做的,如果说我们制作美术方面的一些的话,工作的话我们还是直接选择蓝图就 ok 了啊?那这边的话我们要选择蓝图, 然后蓝图下面的话我们看有很多选项,对不对?那这些选项是什么呢?就是他的一个游戏模板,对吧?比如说我们可以看这个, 这个的话玩过枪战的游戏的同学应该知道这是什么,第一人称的一个枪战,对吧?然后这是飞船的,然后是九宫格的,然后这是碰撞体的一个球与碰撞,对不对?然后这边还有各种各样的,比如说这边二 d 的,对吧?横版的, 然后这是第三人称,对吧?第三人称,然后就是上帝视角,对吧?上帝视角,然后也是飞船赛车的,然后这边就是威亚,这个有威亚头盔的一个图标,是威亚的一个项目,对不对? 当然这边的话你可以随意的去选择,随意的选择都没有关系,因为我们在后期的时候,我们可以在我们项目里面添加这些蓝图,都是可以的啊,都是非常方便的啊,如果你在新建的时候,你可以随便选一个,比如说我们选择一个, 这,对吧?然后选择好了之后的话,我们到下面来看,然后我们到这个地方为您的 项目选择存储的位置,对吧?然后位置的话这边就根据自己的一个存储的一个习惯来定,对不对?然后项目的一个名称要注意,正常我们做项目的话,我们这边命名啊,不能出现中文啊,不能出现中文,基本上我们是英文就 ok 了,对吧?比如说我们这边要项目测试 或者汉语拼音吗?对吧?如果英文不好的同学可以用汉语拼音,就一定这边是不能有中文的。为什么不能有中文呢?因为有中文的话,他后期打包的时候会出现一些啊,出现一些 bug 啊,或者说现在出现一些奇怪,奇奇怪怪的一些问题,所以这个时候要注意的。然后我们直接点创建项目就 ok 了啊。然后我们继续回到我们的那个 之前,打开了一个项目,我们来讲我们的那个视图的一个操作界面啊,我们在内容浏览器里面点一下,打开我们的这个关卡 双击一下啊,对,那这个就是我们项目的一个场景,对吧?一个关卡是一个比较卡通。
61丝路教育 15:02查看AI文稿AI文稿
大家好,在上一节当中,我们创建并编译了一个 fps 第一人称的一个实力。这一节呢,我们来分析一下这个第一人称实力他是如何实现的。首先我们来打开这个 fps 工程, 你可以双击这个 usa, 如果呢,你在上一次已经打开了这个工程,他第二次会默认打开。如果没有打开呢,我们可以通过这里的文件选择 open project, 然后来选择我的项目。下面有很多我们这个名称呢,叫 cfps, 我们看到这有两个 cfps, 我们不知道是哪一个,因为然后已经在很多个文件夹里面创建了这样一个名为 c fps 的工程,这样容易产生混乱。所以呢,我在这直接通过浏览点右下角这个浏览,然后去手动的找到我这个工程。在一盘下面卖优衣 four projects cfps, 然后双击这个 cfps, 点 u projects。 这样就啊准确无误的打开我们啊自己编译的这个工程 好啊。第二种方式呢,就是说我们可以来到麦优异次 projects 这个文牙下 找到啊这里的 srn 文件,双击之后通过 vs 打开,然后按下 f 五调试模式下来启动这个工程。不过那样呢,速度可能有些慢。好,现在我已经打开这个工程, 看到他有一个地图啊,左边呢,这边有这个内容浏览器,在 udk 当中啊,也就是啊,一样的是叫康庆的 brother。 嗯,在左边呢有一个目录数。第一个是 game 啊,下面有很多子目录。第一个是 animesens, 里面装着很多动画文件。在下面呢是一个声音文件 blueprints 就是蓝图脚本。在里面呢,他创建了一个 mac character, 就是我们第一人称角色的一个蓝图文件。然后这个是 projector, 就是我们按下 打出去的这样一个弹丸类啊,也是通过这个蓝图去实现他一部分功能。 cracked 角色下面放着很多文件。第一个是 hero fpp, 看到它里面这个括号里面写的是 scatter mash, 这是一个啊这个蒙皮网格,但是里面有的我这个第一人称下这个手臂,以及这个这把枪。 然后这还有一个蓝图动画,我们双击之后呢,会发现它里面有很多像这个 udk 一样,这个 kissmanton 这样的连线。那么这就是这个 blueprint 蓝图脚本。我们先不管他是干什么用的,是如何实现的。先来大体的浏览一下他的文件结构。然后这个呢是 scale 里头他括号里面呢只只有一 一个 skeleto, 而上面这个是 skeleton mash。 很明显上面这个是一个网格。下面这个呢是一个骨骼,它里面呢有着这个骨骼数。 然后最后一个是 projectile, 这也是一个静态模型, max 下面是没有,然后 maxis 下面有一个静态模型是就是这个场景当中的这个正方体。最后一个贴图,这是那个准星的贴图,我们可以双击浏览 好这里的文件结构呢,其实就对应着我们 my u e 四 projects 下面的 cfps, 找到 content, 下面这里的目录,跟这个 content brother 内容浏览器是一一对应的。 animation audio blueprint。 然后上面这个 game 呢,它是自动生成的一个,它的意思呢,其实就是指我们当前工程下面的名为 content 文件夹,下面这个 game 就是指这个地方, 他的目录是一一对应,然后我们找到比如说是 animeson 里面呢,现在这有七个文件, 看一下这里的 animation。 下面啊,依然是有七个文件,也是一一对应,其中有六个是以这个 animation sequence 格式,我们可以双击一个打开,看到他已经自动播放了。 这是一个开火的一个动画,他在不断的播放,下面我们可以暂停,可以重新播放。然后右边呢, 他还列出其他的一些动画可使用的动画,我们可以随便选中一个来浏览预览他的动画。这个是一个静止模式下他的动画。 还有一个跳药帐篷, end 是跳药结束,还有跳药循环,跳药开始。其实这三个 动画呢,就完整的去模拟出一个角色起跳,还有从空中这个还未着地的一个过程,以及最终着地的一个动画。最后一个是 就是跑动的一个循环播放的动画。其中有一个叫 fpp five montage, 这个 montage 翻译过来就是蒙太奇,我们知道在这个拍电影的时候啊,有经常会提到蒙太奇剪辑手法啊。类比到这个 动画当中呢,其实是一样的概念,我们可以把多个动画混合,或者说让这个动画有一个渐入淡出的这样一个播放效果,最终融合成一个 montage 啊,最终通过程序来播放这样一个多个动画文件混合起来的。一 下面我们再来看一下这个奥利奥,你可以直接双击 双击打开呢,可以调整它里面的属性。如果你要播放,可以直接在上面点右键 play 或者是 stop, 我们看到这个标签呢,你可以这样这个在整个屏幕上拖动啊,也可以跟上面这个标签呢组成一个标签组,这样呢就很方便的来回切换。 然后在下面就是蓝图,这里面呢他有两个蓝图文件,第一个是 micro actor, 我们双击之后呢,猛一看很像这个 udk 当中 选中一个啊 actor, 然后按下 f 四查看他的这个属性。其实在这面和那个是差不多的,你可以看到 他有一个麦十一 p, 这个就是我们的第一人称手臂这个模型。在这样我可以调整他的相对位置旋转,再往下有他的动画,使用的动画, 还有他的摄像机属性物理啊,碰撞,这个还有些这些啊,渲染啊,灯光等等,和 unik 当中是啊一一对应的。 但是在这他有一个区别。我们看到右面现在选中的是默认值。在右边呢还有一个组件和图表,我们点一下组件就进入到这个蓝图文件的组件窗口。看到 在这里面呢有一个摄像机,一个手臂模型,以及一个胶囊形状的碰撞体,还有一个箭头。 其实这一些呢都是一个啊一个一个的卡。 ponato 组建在左边,我们可以看到这个组建的这个列表, 我们看到他是一个从上到下的一个啊竖状结构,很明显这表明了他们之间呢是这个这个父子关系或者是负数关系。 首先这写着一个 rot, 这是所有啊这个组建的一个副组建 啊,也就是胶囊这个组建它是一个碰撞体。在程序当中我们会把这个胶囊的碰撞体啊去设置为当前我们这个角色的碰撞体, 然后下面一个是箭头组建这个我们在游戏当中是看不到的。再一个是 mess, 这个 mess 呢也是一个啊, scale to mess component, 只不过它现在是啊没有直,是个 noun。 在下面呢,其实我们可以啊这个低调,也就是它的细节。下面呢找到这个 scale mess, 可以给它副直, 你可以点一下这个箭头呢,它就会显示出当前可用的这个资源。然后再下一个是 first person cameroncomponent, 这是一个摄像机组件啊,有了这个摄像机组件呢,我们就可以在场景当中看到这个物体。 在这个摄像机组件下面呢,从数了一个 max ep, 它也是一个 scanese mace component 啊。在这呢,我给他设置了这个手臂网格, 我们可以看一下啊。在这慢使下面他已经只认了这个手臂网格。如果你在这时候呢,点击这个放大镜,可以直接跳转到内容浏览器当中的这个模型 啊,就是这个它的类型呢,是 scalets。 那么这边的啊 camera。 下面从数了一个手臂卖十一 p。 这样一个组建,他的意义呢,就是说当这个摄像机在转动的时候,我们的手臂模型是会跟着他 移动的。我们可以做一个实验,首先选中这个摄像机组件,可以在这个列表当中,也可以在场景当中选中,然后按这个通过这个做 目标性呢来移动摄像机啊,这有一个自动保存,我们把它取消掉,让移动的过程当中呢,它会连带着这个手臂一起移动。同样旋转也是我们可以按一下键盘上的一键啊,进入旋转模式来旋转它。 好,这样呢,就相当于我们在啊有实际的游戏当中,通过鼠标旋转我们的摄像机啊,进而这个手臂呢,就跟着摄像机旋转,始终是在我们眼前。 然后我们的这个摄像机呢,又是从属于这个胶囊碰撞体。也就是说当我们通过这个 character moment 这个 组建啊,来移动我们的这个碰我们的这个角色啊。同时这个胶囊碰撞体就会移动,进而胶囊碰撞体带动着这个摄像机移动, 摄像机又带动着我们的这个手臂模型移动。这样就展现出我们一个第一人称视角啊,前面有一个手臂这样一个啊,视角的模式。 好,再看一下右边这个图表,进入他的这个编辑模式,看到里面啊,基本是空的。在这呢分两个标签,一个是事件图表,一个是这个构件脚本啊。其实他两个 啊,就类比到我们的这个程序当中,一个构建脚本就相当于构造函数或者是比根 play。 事件就是程序刚刚开始处置化的这一瞬间,我们要做什么都可以在这边实现。然后右面事件图表呢,我们可以说可以在游戏运行的过程当中来去实现一些逻辑。 好,我们关闭这个 character。 再来看一下 这里的 projectile, 他的这个蓝图文件是如何实现的。还是先来到默认值, 看到这里面呢,能够修改他的物理属性,碰撞,渲染等等。还有这个比较重要的就是这里的 他的弹丸的弹性,可以设置他的摩擦力等等。 再来到他的组建模式看一下啊,他里面很简单,首先是有一个啊,这个球体的碰撞体可雷人,肯碰奶的。他是这个副组建,他下面附加了一个 steady mash, 就是一个球,我们可以通过这个放大镜来找到啊,这儿 steady mash 这样 同时呢,我们可以在这个组件下面呢去修改他的一些组件属性。你比如说我可以把这个啊这个球体碰撞体,他的半径调的大一些, 我们看到这样呢,有一个 shape radius, 把二十呢改成六十,这样就变大了。这样呢,我们这个球啊还没有碰到墙壁的时候,可能就会发生反弹,因为 他的这个碰撞全是根据这个球体来决定的。那改成十五啊,就跑到这个球体里面,我们看不到了。所以我们应该给他一个合适的值,还是二十。同样我们可以 选中这个 styleness 这个球体来修改一下他的这个比例。现在他是零点一,我们改成零点五都是可以的。 好,我们给他复原,可以点一下这边的一个黄色的箭头,上面显示 reset to default 恢复默认值,它的默认值呢是一,这有点大,给它改成零点一,零点一,零点一,这样就 ok 了。 那他的这个图表里面呢,也是空的,也没有实现他所有的逻辑呢,全是在呃 ci 家代码当中,我们关闭。
4自在侯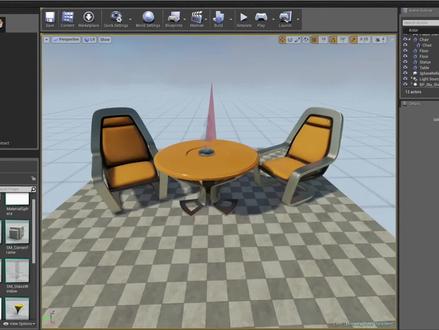 04:05
04:05 04:41查看AI文稿AI文稿
hello, 大家好,今天给大家讲一个呃,关于中文的文本渲染,我们平时就是想在 u s 里面用呃文本渲染器的时候, takes, takes the render, 在场景中使用文本渲染器给他拉大一点, 我们可以看到它是可以正常的渲染英文的,对吧? abcd, 反正都是可以,但是你要输中文的话,比如说啊,大雨,今天下大雨了,上海现在下大雨了啊,比如说你想输大雨,你会看到,哎,他没有办法正常的显示中文,那这是为什么呢?因为他这个字体, 那这个由于是自带的这个字体这个材质,他是不支持中文的,不支持中文,那么我们就需要自己去创建一个。 好,我们首先我们找到这个有词儿 interface 啊,把有词儿形成 face, 然后找到放弃,然后命个名额,随命命 c, 然后我们到这个界面,到这个界面以后,我们啊给这个 好,是这个布局啊,我们在地跳这边把这放着改,改成离线圈,改成奥斯拉,改成离线。 yes, 我们挑一个挑一个,挑个凯体,凯体粗,粗点斜起啊,粗点斜起, 嗯,四十八啊,四十八。 ok, 那这个时候我们需要 乱码,对吧?这个乱码没有关系啊,我们下面需要进行一些操作,首先给他的字典里面添加几个字,比如说今天上海下大雨 啊,这个字典 x oppo, 哦哦哦, option 里面啊,这个字典里面你必须要给他,给他这个字库里面 填上字,你才能用这个字库里面的字,不然也是没有办法用的。这是第一个设置,第二个设置是,呃, usdasfuel 的 l 法 啊,用场景透明度啊,那个场,呃,什么距离浴?距离浴透明度,给他勾上,给他勾上,这个是需要用到的啊,然后进行完这些操作以后啊,你们要记住,你们修改放,只要修改了都需要进行一步操作, 那就是点击这个 cess 后,下面有个啊这个选项,给他刷新一下,等于是再重新生成一遍, 这边差几边一定要给他,一定要给他添上,不然他就是乱码。 然后你可以发现他这个字他是斜着的,他是斜着的,那么他渲渲染到呃场景里面的话,他也是斜着的,为什么呢?因为他这个,嗯,放下你这个字体,你要是不想斜的话,你把这个前面这个艾特给去了, 把这艾特去了以后,然后我们再重新生成一遍。 ok, 然后他就变横了,然后他们 这个字体这方面就操作完了啊,现在我们需要给他呃添加一个材质啊,那这个材质材质怎么添加呢?我们通过来啊,我们直接用他呃系统这边默认的这个这个这个这个材质给他复制一下,然后复制到自己的文件夹里面, 说到自己文件夹里面,然后点击这个放置这个放置,然后给他改成自己的 c 放置,然后给他 apply, 啊,就可以看到我们的字体啊,已经已经是可以渲染到这个材质上面了。 保存一下,然后我们将这个 tax render 这个呃材质进行一下替换,不要重新命名。嗯,到 广西上, ok, 能给他直接移过来,然后这个字体也需要给他移过来, 你就可以看到我们的我们的这个中文,中文的文本啊,也可以成功的渲染到呃场景中去了, ok, 这个关于字体的那个文本渲染器,中文,中文渲染这个小教程就到这里就结束了。
49晶核教你学虚幻 12:05
12:05 01:30查看AI文稿AI文稿
虚幻四只能做游戏吗?虚幻四并不只能做游戏,他还被广泛用于虚拟现实、建筑设计、影视后期、汽车制造、城市规划、虚拟演播等等工作中。可以说,一切涉及到三维仿真表达、 虚拟环境模拟的行业和工作,都可以用到虚幻寺进行模型表达、场景构建、动态仿真。虚幻寺在这些工作中的优势主要体现在以下方面 一、开源策略。全球各地的注册用户都可以获得虚幻四的原代码,并根据自身需求进行改进和优化,这使得虚幻四的功能越发强大且灵活。二、渲染技术强大。 虚幻四拥有完善的物理引擎和光照系统,可以让画面质量达到三 a 游戏水准。三、可视化编程。一方面,虚幻四自带可视化 脚本系统蓝图,开发者可以使用蓝图快速实现所需的功能。另一方面,需换四的所见即所得,让开发者可以直接预览游戏效果,并进行实时调整和优化,提高了项目开发效率。 四、官方自然丰富。虚幻四拥有丰富且免费的资源库,开发者可以直接吊用,大大缩短了项目开发周期。而且虚幻四的官方插件非常丰富,开发者不用担心第三方插件的金融问题。五、 vr 技术支持 去换四位。 v 二游戏手柄、 v 二控制器等提供了良好的支持,开发者可以快速进行 v 二技术开发、原宇宙开发等工作。
 06:58查看AI文稿AI文稿
今天我们继续来看 iriso 的 u 一四的插件自动跟谁插件自动跟谁呢?是一个功能插件,我们现在到 u 一里面, 好,由于已经打开了,我这边用的是 ue 四点二七。上次呢给大家分享的是关于他的几何插件 rectangle, 在这边还有这个呢,也是 rectangle 的形状。这次呢给大家分享的是他的一个奥特 flow 插件, 这些还没有介绍的 box 啊,还有这个退伍什么的。之后会给大家介绍一下这些几何插件的使用。 outfollo 什么是什么插件呢?从他的字面上翻译呢,他就是自动跟随插件。我们先来看一个例子,我这边已经放了一个了,找到这个阿陀佛了,这个时候呢,假如说我把一百二十呢改成 十二看看,大家看一下这个百分号呢,就会自动的往前移动一样一定的位置啊,去贴紧这个二,他就会自动跟随。 那呢我这边呢是用文字举了个例子,实际上呢他还可以做其他的跟随,我现在设定的呢是这个百分号呢,跟随到这个文字的最后最右边,然后呢去紧贴他,去当一个后缀去使用,那这个地方呢,也是可以改的一副两个百分号。 那接下来我就给大家演示一下怎么去使用这个奥特佛罗插件,然后这个这个地方呢,我也把他这个跟随的时候的间距呢也给放出来了。 好,那我们就看一下啊,我这边新建一个 app, i'll to follow them down, 这是按摩一个打开它。 然后呢我们在做这个例子的时候呢,把我们的文字加进来, tax3d 加进来,他转一下位置,这是我们的文字,给他起个名字。 好,那我们再拽一个蚊子进来伸地, 这个呢就当成我们的后缀。这个时候呢我把这个 文字呢稍微挪动一下,大家看到了,我放了两个文字进来,一个呢,待会我做的时候呢,我就会把后面这个文字呢当成我们刚才那个后缀来用,这个呢就是文字的内容,那我们要怎么去弄呢?这个时候呢把奥特佛罗加进来,奥特佛罗, 奥特佛罗。好,奥特佛罗加进来之后呢,我们把这个设备克斯呢放到他那个下面去, 放到下面去之后我们就要到这个,这个里面还是抓个性 script, 然后呢把 autofolo 的这个拽下来,拽下来之后呢 set sauce, set a sauce component。 这个时候呢把我们要跟踪的是哪个字拽进来,我们要跟踪的就是 content, 把他拿进来放到这,我们再做一个连接,这个时候呢我们编一下到这个里面,可以看一下这个效果。 那我们现在呢去给他输入一个文字,比如说叫 text 一二三, 哎,可以看到再往后一点啊,其实这个 text 呢已经开始呃跟随了这个康腾的内容了,只是他在跟随的时候呢有有这样一个间距,我们要调整一下,为什么这个时候呢我们可以把它 外轴这个位置呢给他去掉,当时呢我们是通过移动他本身的这个位置 y 去调节他两个之间的距离的,那我们现在呢就可以通过 olofolo 来做了。 鳌头佛罗这边呢,你可以设置在哪个轴向上跟踪,我们现在呢使用的是外轴,那就在外轴上跟踪,然后两个之间的间距呢,就开这个地方去调整就行了。其实它使用起来比较简单,那我们就可以把它调节成, 比如说设置成百分号,那这个效果呢,现在就是我们刚才给大家演示的效果, 当你去修改这个数字的时候呢,你都可以看到后面那个百分号呢,会仅会 跟着我们数值的变化和变化百分之九十九。那其实呢在这个使用上呢,大家也可以有一些自己的发挥,我这里有一个例子,给大家打开看一下。看这边 现在呢我这边一个是放了个 tube, 就是他们那个 lison 呢,还有一个几何插件 tube, 还有一个 box 插件,我就用他两个插件来做了演示。那我奥德佛罗这边呢跟刚才的设置是一样的, 那我跟随的这边呢就是跟随的是他的一个 z 轴,那当我去调节这个 box 的 z 轴的收放的时候呢,大家可以看到我把它移开一点, 你看到 上面的这个片,他 就会跟着我这个 box 的大小而改变他的位 boxzz 的缩放来改变他的位置。 好,这个呢其实就是奥特佛罗的使用,奥特佛罗在使用的时候呢,只需要去设置他 跟随的是哪个物体,然后呢你就可以去啊进行一个跟随。另外呢其实在使用的时候呢,你要调节一下,就是这个地方你要在哪个轴向上进行跟踪,大概是一第一步呢就是设置轴向,第二步呢就是要确认一下就这个间距要不要调整一下,比如说这个地方 你把间距拉开了,那你之后在缩放的时候呢,他就会永远按照这样一个间距呢去设定 好 of follow 就介绍这里,其实呢 lv 首饰呢,还有很多的功能插件,我也会逐步的给大家介绍一下, 然后欢迎大家留言评论,谢谢。
22大卫Hao


猜你喜欢
- 3708宋恩郁
最新视频
- 1106@你的心理师