mixamo怎么导出动画到ue
当我们使用米线膜里的动作,想在优异里面套到我们自己模型上的时候,他会出现一些错误,他不让你建立资产。一般我们都是在外面建立好骨骼,然后拽到优异里面,这都没有问题,都能拽起来。 接下来我把从米下模下载的动作拽下来,他就不让我拽。不管是用他自己的模型也好,还是我把我的模型上传上去,绑定好了之后生成的这些动作拽下来,他都不给我拽,都不给我生成资产。我的解决方法是所有的模型和动作全都在米下模里去做。 第一步,点击上传模型,把你准备好的没有骨骼的模型弄到上面去,他识别好了模型之后,你就可以点击下一步,帮他规定一些关键点,什么下巴壳子、手腕子、胳膊肘子、波棱盖, 还有根关节。这个模型如果有一些瑕疵或者隐患的话,你拽进米箱膜里,他是不认的。最开始你看我这个模型,他有个抖, 这个斗篷最开始是两面的,所以他两面的面就离得特别近,这就是一个隐患,容易穿面。然后我在玛雅里把这一层的面给他全部删掉,只留一面 再倒进来,他就认了,大概三十秒他就能绑定完成。绑定完之后,他让你先看一下效果,如果没有问题的话,就下一步就可以选动作了,你在左边选好动作,在右边就可以预览,然后确定好一些动作,你就可以下载。当然首先我们先关掉动作,然后先下载一个模型,关掉动作,点击下载,那就是下载模型,否则就是下载动作, 咱们就正常默认下载就行,然后就可以浏览自己喜欢的动作或者搜索也行,挑好了之后预览觉得没有问题就可以下载。 skin 那边选择 without skin。 我不知道为啥,可能为了好,算吧,大家都这么做。那咱也这么做。进入到优异点开内容浏览器,先把模型拽到内容浏览器里面,这样的话我们场景里就有一套骨骼了。然 然后再随意把你的一个或者多个动作拽到内容浏览器里面,这个时候他会自动选择场景里的这个骨骼,然后点击导入,他就成了双击这个动画序列。我们查看一下动作应用上了是吧?究竟为什么外面绑定的骨骼不行,我费劲扒拉绑完了你到这你说我不好使? 那可能是骨骼命名啊,排序啊,骨骼数量都不一样,你毕竟动作是米夹馍来的,然后你的骨骼又是别的地方来的,他俩如果要是对不上眼的话,那可能就不兼容呗。

粉丝5424获赞7.3万
相关视频
 01:151163zimon3d
 01:48查看AI文稿AI文稿
需要动画的小伙伴的人数真的是非常多哎,那栗子讲今天就继续给大家介绍另一款无脑的动作绑定软件, 他嘞其实是个网页,不需要魔法也可以打开哦,使用方式嘞也是非常的简单,在这里点击导入角色模型,导入 tpos 的 fbx 或者 obg 格式,那文件拖到这个位置就可以了, 等它搂定完成后,出现这个画面,就可以点击下一步,把这些小圆圈按照右侧指示拖到相应的位置上, 下面这里呢是镜像和骨架的选择,点击下一步,我们耐心等待一下,可以看到人物已经能动了,那就继续 点击下一步,这时候可以看到我们的人物就出现在视窗当中了,左侧这边呢就是他的模型裤,点击一下就可以套用到右边的模型上, 这里还有一些动画的参数可以调整,那我们确定好之后,就可以点击当漏的把带动画的模型下载下来, 这些参数用默认的就可以了,再点击一下下载,下载完成之后呢,就可以打开我们的麦克斯,把模型导入进来,拖动下方的这个时间轴,就可以看到我们的人物动起来了。在网页的这个位置点击角色, 下面就有很多很多的角色可供选择,都是不需要浅潜地,那很多小伙伴就会跑来问,这两款软件比起来哪个更好呢?让我们看看评论区大家都是怎么选的。
1995栗子酱爱做游戏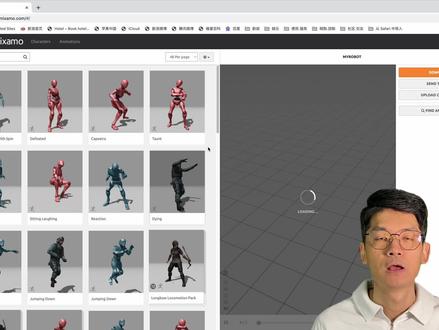 10:03查看AI文稿AI文稿
mix 某的话是 adobe 旗下的一款可以产生 fbx 格式的这个三 d 动作模板, 并且的话对于 blend 有很好的这个支持,通过 mixmo 呢,可以自动的将三 d 的这个模型呢进行骨骼绑定,并且的话配合 miximo 上的各种各样的一些动作模板呢,可以迅速的生成专业的三 d 动作。 今天的视频呢,就来教大家如何操作。大家好,我是西红柿武士。使用 mix 膜之前的话,先建议大家下载并安装 mix 手插件,那首先的话从官网下载这个压缩包啊,然后点击 addit preference, 然后选择 idon, 然后然后选择 install 安装,那安装好之后的话就是直接呃 就是点开,并且的话在搜索栏当中呢输入 mixmo, 然后确保呢前面的这个勾选框勾选啊,以使这个插件生效。 那接着呢就需要打开一个新的文件,导入三 d 模型,首先的话需要清楚之前的一些这个动作板定,然后的话在 option 模式下呢选择三 d 模型,并且选择 export, 选择 fbx 格式,然后选择 select object 啊,并且的话选出输出路径啊,以及的话做一个这个文件名 啊,然后的话就可以点击输出三 d 格式的这个三 d 模型的 fbx 格式文件了。那接下来的话需要打开 某的这个官网,第一次使用的客户的话需要用你的邮箱呢注册一个账户,那注册后的话可以直接登录, 因为我之前的话使用过这个账户,所以说登录之后的话是我上次上载这个三 d 模型的这样子的一个界面,但如果你第一次登录的话,他会给你一个默认的三 d 模型, 然后接着点击啊右上角的这个 upload character, 就是上载三 d 模式。三 d 模型我们可以把刚才制作好的这个 fbx 格式的这个三 d 模型呢,点击选择后,然后进行下载, 那稍许等待之后的话,三 d 模型就会显示在这个窗口当中,那你可以使用页面左下角的这些工具呢,调整三 d 模型正面的面对你,并且的话保证要么 是 p 字型,要么是 a 字型,就像窗口中显示的一样,然后点击下一步, 选择左边的彩色圆圈呢,依次在下颚,手腕,肘部以及的话膝盖和骨沟处呢进行这个标识, 然后点击下一步,大约等待三到四分钟之后的话,那你的三 d 模型呢,就自动在后台 呃进行这种啊自动的骨骼板地呢,那此时的话骨骼使用的是一个默认的这个动作, 当然你可以在搜寻一下网站,然后选择你自己想要的一个动作模板,并且的话在窗口当中的话就可以显示你的这个三 d 模型,配合动作模板以后的一些这个呃动作效果。 那接下来的话就是要下载绑定好的动作模型呢,到本地点击下载会出现一个对话框,你可以根据需要选择一些设置,但最简单的就是在 skin 皮肤这一项的话,呃,如果你需要使用三 d 模型的这个网格,那可以选择 with skin, 也就是说带皮肤,但是如果说你下载多个动作模板的话,只需要下载一个带有皮肤呃的模板就行了,其他的选择 we love skin, 这样可以节省时间和这个尺寸啊,因为我之前已经下载了包含皮肤的,所以说这次我选择不包含皮肤的下载,那注意的话就是下载呢是无法呃这个命名,并且的话它是下载到指定的这样子一个默认下载地址,那下一步的话就是导入 呃,骨骼绑定好的这个三 d 模型啊,点击 file 啊。首先的话下载的是绑定骨骼,但是并没有绑定任何动作的这样子的一个模型,那我把它取名为贝斯 啊。接着导入两个动作模板,分别取名各自的这样几个动作的名字啊,以示区别。 那大家可以看到其中有一个的话,动作模板还带有这个皮肤,那我们可以选择隐藏或者直接将它删除,因为实际上你只需要一个带有皮肤的这样子的一个三级模型就行了 啊,这时候的话按下空格呃,大家可以看到中间的模型呢,因为还没有绑定任何的动作呃,所以说话他是不会动的,但是旁边两个的话是动作模板,那我们现在需要 做的呢,就是把中间的这个三 d 模型和两边的这两个动作模板呢,进行绑定之后,并且把它串起来,形成一个连贯的动作,接下来我们就看怎么做 啊,点击 n 键,调出右边的这个属性菜单,然后接着的话需要增加两个工作窗口, 那第一个的话选择 non linear animation, 也就是说非线性动画编辑器。那还有一个是这个 dog shit, 并且选择 action editor, 也就是说动作编辑器。 嗯,这时候的话选择三 d 模型的这个骨架,然后点击右边菜单当中的这个 create control rig 那插件呢,就会在选定的三 d 模型上自动生成一个 控制骨架,这个控制骨架呢可以用来手动的进行操控模型,嗯,然后我们选择三 d 模型切换到 pos 模式下,并且点击左右边菜单当中的这个 sous selection, 呃上边的这个红吸管,然后点击左边的这个动作呃模板啊,接着点击 apply animation to control rick, 也就是呃应用这个动作模板呢到这个控制骨架上。 好,这时候按一下空格啊,就可以看到三菱模型的话,已经开始模仿左边的这个动作模板啊。接着别忘了给这个就是动作呢取一个名字,并且的话点击啊右边的这个盾牌,这样的话可 在这个内存当中呢锁定这样子的一个动作绑定就不会再呃重新这个登录之后的话,这个进行删除了啊。然后的话我们再重复同样的工作,把这个三 d 模型呢和右边的这个动作模板也进行绑定 啊。但是这时候啊发现了一个问题,就是三 d 模型呢,他只会绑定一个动作模板,而且的话一次呢只能响应一个,那如果说我需要三 d 模型连贯性的呃这个把两个动作模板这个做起来怎么办呢? 接下来我们看怎么做。然后首先的话我们先隐藏两个动作模板呃,当然你也可以直接删除,因为这里这个呃已经和三 d 模型绑定了,实际上他们的使命已经这个呃做完了。 然后选择三 d 模型进入 pose 啊模式。在 action id 的也就是动作编辑当中呢,选择一个动作,并且点击 push down 这个按钮啊,接下您可以看到在这个菊环调边上的一个按钮呢,也是同样可以把这个动作呢导入到飞线性动画 编辑器当中啊。接着呢我们选择另外一个动作啊,同样的按这个按钮导入了 nlo 啊, nla 编辑器啊。但是呢问题又来了,第一个动作结束后呢,第二个动作并没有马上的这个呃连接上,那我们来做一下这个操作 啊,首先的话还是按这个 n 键调出右边的这个菜单,然后选择 strip 啊,也就是整个动画的这样子的一个条,并且的话 在 actual relation 这个选项上的话,呃,把这个选项调整为 nothing 斜下画。他的意思呢是这个第一个动作做完之后,他的前边或者是后边的话,不产生自动的这样子一种延续,那这样的话就那第二个动作的话,有机会呢啊,重叠第一个动作,然后接下去做 哦,但是的话,这时候还有一个问题,就是在衔接处的这两个动作的话啊,非常的突兀,然后因此的话我们还需要再接着做一个动作,就是 啊选择第一个动作,并且在这个菜单当中呢,勾选这个 otopland in and out, 也就是说自动混合。这样再来看一下那两个动作的话,就自然的这个呃就是连接在一起了。 那最后一部分啊,就是将这两个这个合并的动作呢,作为一个动作模板输出啊,我们可以点击这个 back, 你没选,也就是说考烘烤这个动画,哎,出现了一个这个错误,那这是因为,呃就是需要先点击一个新的动作之后,再次的点击这个烘烤动画的按钮,这时候就呃可以了,但是发现了布兰德又自动的生成一个新的动作 啊,虽说话则也许是一个 bug, 但无论如何这个我们的目的已经达到,也就是说两个动作呢,他合并在一起做一个动作的话,整合的这个输出 啊。好了,今天的视频就到这,如果你呃对您的学习有帮助啊,请您关注和点赞,并且如果有问题的话,欢迎在评论区进行评论,谢谢收看,我们下次再见!
1399西红柿武士 11:49查看AI文稿AI文稿
okay, so what's going on jay from jay's films here and today we're gonna be talking about some free animations that you can use within real engine to five now a lot of people have been asking about this video and i'm sorry it's late but basically how do you use miximo with the new unreal engine five so i've showed y'all how to kind of do it manually in my course but what i'm gonna do right now is show you a plug in that you can buy that can make this process a whole lot easier so i sold you all the free version now i'm gonna show you the paid version on how to get this done now if you're very new with in real engine five and you're looking for some animations there is a website called miximo which was owned or it is owned by adobe and it's right here now as far as i know this is still free so you can just sign up and what i'll do is just teach you how to use these animations with a new version official version of u e five using a plug in that you can download all right so we'll do first is actually browse some characters because you can actually use the characters as well and what i'll do is i'll just use this one right here you can select whichever you want but for sega this tutorial right here i'm going to use this character and we will go ahead and download this as an fbx and the t pose is okay and i'm going to save this to my desktop right here okay, so the reason why we're downloading a character here even though we're not going to use it is because we have to use this character to import the animations here later, so what i did was i went ahead and just downloaded that character and put it right here which is good and then what we'll do next is actually download an animation right there's a lot of animations here for free in meximo so let's do i'm just gonna go to the next page here and we'll just do the walkwood rifle that's something that i really use a lot and what i'll do is i'll leave everything about to fall and just download it right and i'm gonna change this to sixty and we don't have to technically download this with a skin so i'm just going to go ahead and say without skin and we're gonna download it as a binary all right so we have the character and we have the animations and now all we have to do is go to the epic marketplace because i said we're gonna be using a plug in so what you're gonna do is type in miximo here and i actually used to use the first version of this a singing sound on both of them and i am not affiliated with these people whatsoever um and i used to use this but now they came out with an updated version for religion five and that's basically what i'm gonna show you right now so if you purchase that i think it's like thirty four dollars you just have to install it in your engine this one is five point o so you can see if you need the four point two seven then check out the other one so install it here already have installed and what i'll do is i'll go ahead and create a new project and i'm already in here we will create a game and let's do a third person because this comes with some pre made assets that we're going to use right and i will just title this miximo tut and we'll create it okay so we have this third person open now and i'm going to edit plug ins because we actually have to enable that plug in in here, so i'll click this and we will restart okay, so once the project is open again i'll close this now and i'll go ahead and just kind of let go right here and let me go ahead and change the default level i'm sure y'all are tied with that so we'll go ahead and go to this new one which is an open world look how massive this is i'll click on update here what we'll do is i'll create a new folder now and i'll just tie all this mix and the first thing we need to do is actually drag and drop the character first, i'm not going to choose any skeleton right now, it is a skeletal mesh and i will just import that by not choosing a skeleton there it's going to create its own skeleton which is what we want we wanted to create an actual mixermo skeleton here we'll go ahead and close this out and now we're going to see that there is a character and there is a skeleton so if i can double click the skeleton you're going to see that it's good if you want to see the name of the bones you can go to character bones and oh hierarchy, so that's perfect right and i can just turn that off so i don't need it right now that actually looks pretty good in unreal, it looks a lot better than it did on that browser so close is out and again we opened the third person template because if you go to the characters of the third person blueprint you're gonna see a mannequin uef four folder and a mannequins if i look at the mesh this is the ue five mannequin, but in that same folder you will also see the ue four mannequin so you're probably seeing where this is going all right, so basically what we're going to do is use that plug in to connect the ue for mannequin to the meximo skeleton and then we will connect then the ue formatican to the ue five skeleton now another cool thing about the ue five skeleton is it actually shares the same exact, rig or skeleton as the meta humans as of right now there is still developing a straight to meta human retargetor, but for now we can just use the ue five because technical this is the same thing so whenever that's out i will go ahead and update this video tutorial, so that will take it straight to a ue five meta human so you can see the post is similar to a meta human and the bow names are similar to a meta human which is cool in the way okay, so let's go back to the tutorial now and i'm going to my mix folder because what we'll do is actually drag and drop that animation in there now the walk with rifle and what this is going to do is automatically pick that skeleton for this character because they came from miximo both of them so go ahead and make sure animation length is checked off exported time is okay, let's go ahead and import all this is going to be well still component shaders, but it's okay, but if i double click this now this is gonna apply that character animation to our mesh that we got from miximo here okay, so to use the plug in all we have to do is look at that skeleton for that miximo, we're going to right click it and we're gonna click this retarget miximo skeleton, this is the plugin that we just purchased so we target and now we're going to see that there's an sk mannequin that is compatible with this program later on down the road hopefully, we'll have the ue five mannequin right here and maybe a meta human but for now we'll just do two transfers now i know this used to be really easy but again by business plugin it's a lot easier than from now creating from scratch, so we will select this now and what that's going to do is actually automatically create an ikrig in an ik retarget, so if i click on this ikey retarget you are going to now see that we are now retargeting the mixed simulanimation on the left that will make this bigger for you on the left two rue four mannequin on the right and all of this chain down here i'll already set up and if i click on the acid browser, i am going to double click this and now you're going to see that jewie formatican in unreal is automatically retargeted to that miximo character right, so that's pretty awesome because if you have a lot of ue for mannequin characters that you want to use in unreal engine five and you want to use the miximal animations now you can do that by simply just right clicking and now it's target if you want to use this with the new ue five skeleton like i said right now there's no direct way of doing this i will go ahead and then export this selected animations so we're gonna have the i k reagan asset source target, so i will go ahead and export this and for the sake of making everything good to go i'm gonna name this ue four retargeted you can name it whatever you want to and press ok, okay so what i'm going to demonstrate now is obviously this mannequin we're not going to use for a movie or so we actually need some skeletal mesh? so what i'll do is how do you retarget them this animation from miximo to a character that you get from the epic marketplace which honestly majority of them are going to have unrelanged for mannequin so i'm gonna go to my library now and i'm gonna scroll down i'm just gonna grab maybe two so i'll go ahead and check this and go to characters i'll grab the cyber punk girl add her to my project go see if i can add maybe the superhero gameplay one go ahead and click on add so we have two different characters which both of them are rigged to ue for mannequins right so the beauty of this is that as long as the characters all share the same skeleton hierarchy and name if i now go to this target preview mesh and i can actually select the cyberpunk girl now and i can just retarget those animations straight to the skeletal mesh that we just added to snow so if i go to walk with rifle and i export these animations and i'll just leave it here as okay, i'll minimize this and i'll double click this right here you are now going to see that miximo animation on this character and again this is probably one of the benefits of having this i k retargeting stuff because if your characters all share the same skeletons and uv formaticans same posts you can use stop plug in to just keep retargeting to different skeletal meshes now let me go ahead and demonstrate that one more time sorry, so i'll go to my miximo retargetor right here and again we used this arapeutic girl let's add that other character which is the superhero skin one that's already there i'm gonna click that animation and now since that's also using ue formatican skeleton and and bone names i can now retarget that there as well, i'll just drag and drop our characters here drag and drop our character here just reset this you're going to see that both of them have that animation that we got from miximo, so what i'm going to do in the next video is how you can retarget these to a meta human now i'm going to separate this video so whenever people are looking for it it's gonna be a little bit easier to find。
27火星炒家 32:09查看AI文稿AI文稿
if you need characters and animations that are available for free for only ninety five miximeter com is what you're looking for so here i am on the miximo website on, which we are going to download a character as well as some animations that we will be importing into a non religion five project so since miximo is pretty easy to use i won't be explaining to you how it works in details however, i'm going to show you the character and the animations that you need to download to follow this tutorial in the best possible conditions so here as soon as you're on the mixamo website you'll need to download the white butt characters here you go to characters and select the white butt you can click on it and click on use this character so here as soon as the character is loaded you can click on download and here you can leave the parameters as is so fbx, minori and tipos you can click on download and mix some o will create an fbx file that will be downloaded as soon as it's ready okay, so now that the character has been downloaded we can search for animations for him by going here on find animations or clicking over there on animations the first animation i'm going to search for is the happy work animation so i'm going to go in the search bar here and type happy work and then i'm going to select the happy work animation here you can leave all the parameters as is over here and click on download and here can leave everything as is except for the skin option you can click on it and select without skin this will generate a file that contains only the animation and not the character since we already downloaded the character earlier so here can click on download this will generate another fbx file that will be downloaded as soon as it's ready finally the last animation that we are going to download is the third hip hop dance animation so here in the search bar i'm going to type third hip hop dance and click enter and i'm going to select the animation that starts with the character having the legs crossed so this one you can see here the legs crossed on the first frame here and you can click on download leave the without skin option and click on download again and we will get the our last fbx file okay, so in the next part of this tutorial i'm going to show you the best way not only to impart characters and animations from mixamo to unreligent five, but also the best way of retargeting animations from a character to another one so that you can use all the miximal animations on your own character so, and to do so first i'm going to show you the problem that we've get with mixamo and characters animations when we import them as is in an unreal engine five project here i have imported my happy work animation directly into my unreal engine five project and as you can see we have a problem since the character is moving from left to right during his animation which makes him teleport every time the animation restarts to fix this problem we can ask unreal to lock the character in place by going in the asset details panel on the left side of the screen and searching for the enable route motion option here you will see that as soon as i enable this option the character will stay in place, but this time we have another problem if you pay close attention you will see that the hips of the character do not move anymore why is that it's because when you enable the root motion option a religion search for the highest bone in the skeleton tree and locks it in place this time it's the hips so it's natural that the character do not move his hips anymore, so to make things simple the there is missing a major bone, which is the root bone and which is placed at the feet of the character if he has a root bone when we enable root motion the root bone will stay in place and will keep the natural motion of the hips during the animation to correct this problem we're going to add the root bone to our character and animations from mixamo com by using blender so please don't panic if you've never used blender, you will see that my method is pretty easy to use since you'll only have to make around six clicks and click on a single key on your keyboard so how is it possible and simple i prepare the special version of blender for you that you can download by clicking on the link in the video description below and for those of you who would like to know more about the special version? it's a portable version of blender two point eighty one on, which i've added the miximal converter plugin from n zoo, which is available for free on github com i modified the source code of the plugin a bit, so that the default parameters that i need for my method are activated by default once you've downloaded the zip file that is available by clicking on the link in the video description below you will need to unzip it and you will get this blender mix some of folder in which you have a shortcut lunch blender that will allow you to lunch blender without going in the installation folder and you will have two folder animes in and animes out so the first thing that i'm going to do is go and get my three fighters from mixamo com the happy work animation, the tip of dance animation and the ybot character i'm going to press ctrl c on my keyboard to copy these files and go into my animals in folder and press on ctrl v to paste them here so once it's done i'm going to double click on my launch blender shortcut to blender and as soon as blender is opened you click here go to edit and then preferences and in the new window that opens you just go to add ons and here you have the animation that mixed up a converter you have to disable it and then re enable it so that it takes into account the modifications that i've done to the so here you just close the preferences and you can click on the end button on your keyboard this will open the end panel and then you can select the mixer more plug in here and all you just need to do is click on batch convert blender will work in a bit and you will know when it's done because as soon as i click here in the interface you can see that it becomes white okay, so for me it took around two minutes to process and now that blender is responding again you can go to your blender mix some move folder and you can see here that in the onions out folder we have the files that have been converted successfully now that the files have been converted i'm going to show you how to import them into an unreal engine five project so here i've created a g for third percent template and i've created into my content folder a miximo folder so first i'm going to show you how to import the character weibot so i'm going to go into my blender miximo folder then into the animals out folder and i'm going to get the weibot that fbx file that i'm going to drag into my miximo folder in my unreal engine five project so here you will have a new window that pops up and then you can make sure that skeletal mesh is enabled import mesh is enabled and import animations is disabled once it's done you can click on import and this will import our character here so here as you can see the character has been successfully imported into my unrelenge and five project now i'm going to import my animations by going to my anime's outfolder and selecting my happy work and third hip hop dance files that i'm going to import into my mixer move folder here you have a new window that pops up and here you will uncheck import mesh since we have already imported our character and make sure that the y butt skeleton is selected you can then click on import all and you will see that our animations have been successfully imported so here if i open my happy work animation you will see that it's working correctly and if i go to my asset details panel and select the enable root motion that i activate you will see that the character stays in place while having his hips that have natural movements so here if i go to the country you can see that it's because now our character has a root bun now that you know how to import characters and animations from miximal to unreal engine five i'm going to show you how to retarget these animations so that you can use them on different characters such as many to default unreal engine five character so first of all we are going to create an ike rig asset by right clicking here going to animation and selecting ike rig here i'm really going to ask us to pick a skeletal mesh, i'm going to select our y butt and i'm going to rename this new asset into ik underscore y butt i'm going to open this asset and here for those of you who don't know what an ike rig is ike rigs are a specific type of assets that allow us to set up characters for animation retargeting when having the possibility to procedurally adjust animations thanks to what we call goals and solvers okay so since we are going to use every element from the user interface i won't be explaining it to you and first we are going to define the retarget root, which is generally the pelvis of the character so here we have the pelvis i'm going to right click on it and click on set retarget root then we are going to create the retarget change which to make things simple correspond to identifying the different parts of the character body, so i'm going to say for example that this bone this bone and this bone represent the right arm of the character later in the tutorial one we are going to define the same chains on the under engine five character the engine will be able to copy movements from a chain to the other one easily so if i say that this is the right arm of the why but character and in the default on ranged five character i'm going to say the same thing under anged five will know that okay the the arm is moving this way so on the other character i will move the arm the same way okay, so before creating my first chain i'm going to select the ikea retargeting tab that i'm going to move up so that you can see what is happening right here so first, i'm going to select the root bone, i'm going to right click on it and click on new retarget chain from selected bones and it will ask me to give it a name so i'm going to leave it as is root then i'm going to select the spang, one, span two and span three right click and then newer target change from selected bone so here the naming convention that we are going to use is keeping everything lower case and removing any number however, when making the right arm for example, i'm going to add the suffix underscore r so here i click on okay and if you want to go even faster you can go to edit preferences, edito preferences and then you can type new chain and you can bind the new retarget chain from selected bone to the c key on your keyboard for chain c for chain and then you can select the neck zero one press c on your keyboard and you can rename the next zero one to nick then i'm going to select the head press c i'm going to leave the name as is and you can see here that on the right side of the screen the i carry targeting tab that we populate the tab with all the chains that we've created we have the name of the chain the start bone and the end bone so i want to be showing you the whole process i'm going to make take a jump in time and show you the final result so that you can cook in everything i've done here okay, so here i've created all my bones chains and you can put the video on both to see if you have the same chains as me so i've created chains for the legs for every finger of both hands for the arms as well as the so make sure that you have the same name as me as well as the same start bone and the same end bone this will be important for the next part of this tutorial okay, so now that we've created the ike rig for the ybot character we are going to do the same for the unreal engine five characters so here i'm going to press ctrl and space on my keyboard to open the content browser i'm going to right click go to animation and select icaric this time i'm going to select the skm many simple this one you can rename the new asset to aka underscore money and you can open it so here i'm going to set the pelvis as the retarget wood set retarget right here and then i'm going to create all the chains so just like the y button going to make a jump in time and we can see each other on the other side okay, so here i created all my chains you can put the video on pose to check if you have the same chain names stat bones and end bones as me and before moving on to the next part of this tutorial i would like to show you something that i think is really cool with the new retargeting process of unreal engine five so here if i select the spine chain of my unreal engine five character you can see that it has five bone spine one two spine five and if i go to the and select the spine chain you can see that it only has three bone spine one two spine three what is cool with this retard getting a process in early ninety five is that only ninety nine five doesn't care if you have three or five bones in a chain all it needs to know is do you have the same name so here we have the spine and here we have this bang thanks to that unreal engine five is able to replicate the animation of a chain to another one more easily okay so now that both of our character have an ike rig, we can create another type of asset that will allow us to retarget animations from a rig to another one and to do so we are going to right click here go to animation and select ike retarget here andread and gene ask us to select the ikeary big from the source character the character from which we are going to deprecate to retarget the animation so here i'm going to select the ybot and i'm going to rename this new asset to r t g underscore ybot underscore two underscore many so here i can open it and you can see that we have our ybot that appears in the viewport so first we are going to add our target character so here i'm going to go to target i carry asset over here i'm going to select our ik under score money you can see that our character from one hundred five appears in the viewport and here what you can do is you can risk the character here here target actor scan over here i can put two for example this is useful for characters that don't have the same proportion for example if you have a giant character you can make it smaller so that you can fit in the u box and then you can use target actor offset to move the character away from the other one so that they don't collapse with each other so now that everything is done you can go to chain mapping here the chain mapping tab and verify that every chain from the weibot character here spain correspond to the correct chain in the uh unreal engine five character so here we have spine spine neck neck everything is okay since we've put all the same names from an icary to another one okay, so now we can see if our animation retargeting works correctly so here i can go to the asset browser tab and then i can double click on the happy work animation you will see that we have a problem here we can see that the arms of the orangean file character go straight into his body why is that because here if i originalize everything you can see that both the character do not have the same pose so the ybot is in a what we call a t pose and the under engine five character is in an a pose and what happens is that when we play animations from a t pose the character goes from here to there and place its animations and if you take the unrelenting five character it goes from here to inside the body and play the animation so to correct this problem we can modify the pose the base pose of the unrelenge five character and to modify the pose first, i'm going to create a new one for the underage in five character by going here to new pose and then underlood will ask me to give its names i'm going to name it let's say why because it's the pose of the way but character and then i'm going to click on edit pose okay, so now you can see that the bones are a bit big, so you can go to bone draw size here and put it to a value of let's say one point five for example and all you have to do now is to select each bone and reposition it so that it can be more ah like the wayward character and to be even more precise i'm going to show you a tip you can go here to target actor of set put it to zero so that both the character overlap each other and here you can go to character bones and click on all hierarchy to see the hierarchy of bones from the weibot then you can click here on perspective put it on right so that you can see the skeleton the skeletons more easily and then you can click here to add offset inward space and click here to be more precise when rotating the bones so here i can take for example the arm, but i can get the arm here and then i can reposition it so that it can be just like the weibod character i can take this one then i can change the point of view by going to the top and the more you are closed to the pose of the why but the more your targeting will be precise so you can do it by yourself i will leave it to you and i'm going to do it myself and we are going to do a jump in time okay so here i'm done i think that both the character have an almost identical pose and i can separate them by clicking here on target actor offset and putting a value of let's say for example two hundred so before checking if everything works correctly i'm just is going to select the chain mapping tab here i'm going to select the root and then here i'm going to put the translation mode to globally scaled this will ensure that the root motion is working correctly when we are target the animations so now if i click on edit pose you can see the animation please correctly on both of the characters okay here that's cool that works correctly but unfortunately the pose doesn't correct everything so as you can see here if i launch the third hip hop dance animation you will see that you have another problem so here if i go to the first frame of the animation you can see that the legs the right leg of the origin five character goes into the other one so we can correct that and be more precise when we're targeting by using what we call solvers so first we are going to create a solver for the ikeyboard so here i open the ikeyboard asset and then you are going to make the same thing as me and i'm going to explain to you later how it works so first i'm going here on the left side of screen and select add new server then i'm going to click on full body ike and while selecting the footbody ak i'm going to go to the pelvis right click and select set root bone on selected solver then i'm going to go here on the left hand right click select new ik goal and to go even faster i'm going to go to the edit editor preferences and i'm going to type ik goal new ik goal i'm going to bind it to the g key on my keyboard so i'm going back to my y, but i k y but here i'm going to select take the hand r and press g on a keyboard to add an ak goal then i'm going to select the bowl r and press g on a keyball then the board l and press g on a keyboard so once it's done you can go here on the right side of the screen i'm going to put myself in the middle of the screen here you're going to select the arm l and put the goal hand l on it here you can put hand l on here on it you can see here that we have the i k goals and then you can select the arm r select the hand r goal and then the leg r select the ball r goal leg l and select the ball l goal he recreated our first solver which is the full body ike solver and how it works is the it creates goals that are placed on specific chain for example here we have the left hand goal that is placed on the arm left chain and when you move the goal the chain will try to reach the goal and adapt the body bows, so that the chain can reach the specific goal so here we can see that the arm try to reach the goal when we move it and we can take for example the goal from the left leg here and we can put it up so that you can see that the leg will follow the goal wherever it goes if you take the goal that is placed on the left foot of the character and put it right up you will see that the character will have a weird pose and will look like a magic stick creature so this is because we didn't set up the football the ike solver correctly and we are going to do that by using what we call bone settings so the first setting we are going to use is a setting that will allow us to to prevent the pelvis from rotating too much so here i'm going to select the footbody i k solver then i'm going to right click on the pelvis and select add settings to selected bone so here if you select the sitting the bone setting you can see that we have a lot of parameters and just so you know the stiffness allows us to control how much the bone can be affected by goals the limits can be used to limit or completely lock the rotation of bone axis along chains and preferred angles can be used to prioritize joints rotating along a specific axis to reach the goals so here what i'm going to do is that i'm going to go to the rotation stiffness here, and i'm going to put a value of one so that the pelvis is not influenced by the goal's position so here you can see that the pelvis took a natural position here if i put zero you can see that it's rotating too much and if i put one you can see that it's correctly oriented okay it's better but now i'm going to add settings to spine bones and before going any further i'm going to go to my editor preferences and type bone setting and i'm going to bind the s key to the add settings to selected bone so that i can go faster here i'm going back to my i k y, but asset i'm going to select the spine zero one press s on my keyboard it doesn't work because i didn't select the full body ike solver so here i can select the spine press s and then on the settings i'm going to put the rotation fit stiffness to a value of zero point eight five then i'm going to select the spine to press s on my keyboard select the spine settings and put zero point nine five then i'm going to select the spine three press s select the settings and put the value of zero point nine five in the rotation stiffness so now you can see that the character has a better pose another thing that is not easy to demonstrate is that the clavicles are not supposed to rotate them so i think you know that if you have a body, so you can select the clavicle press s on your keyboard select the clavicle sittings and put a rotation stiffness of one, and you will see that the clavicle will straighten itself so here i can select the clavicular r press s on my keyboard select the settings and put the value of one in the rotation stiffness to create the clavicular rotation now onto the legs of the character if you take the left fit goal and move it back you can see that the knee we have a weird rotation to correct that we are going to use what we call preferred angles so i'm going to select the calf l bone this one and here i'm going to press s select the settings and in the part about use preferred angles here you can enable deception and here you will need to specify what angle is supposed to have the the calf is supposed to have so here you can select the calf l and zoom it and you can see that it's the x axis i don't know if you will see on youtube but the x axis is the one responsible for having this real rotation so i'm going to select the settings and put here in the x axis the value of ninety you can see that the knee will correct its so if you don't know what axis is supposed to be modify here you can try each one for example here if i put ninety in the y axis it's not corrected i can put ninety in the z axis z axis it's not corrected and you can put ninety in the x axis and you can see that it works correctly so now i'm going to add the same settings to decalf r i'm going to select decalf r press s select the settings enable use preferred angles and put the value of ninety into the x axis finally the last settings that we are going to add to our skeleton are the settings that will allow us to correct the orientation of the fit that you can see right here so i'm going to select the foot l press s on my keyboard select the settings then here i'm going to use the the limits which allow us to limit the rotation of a bowl on specific axis so here i'm going to select the x axis and click on the limited option in the limits, i'm going to put a value of minus at in the mean x and max x i'm going to put a value of fifty you can see here that the feet orientation is corrected when we put these values so now i'm going to do the same with the foot r i'm going to select the foot r at the setting and here i'm going to select the limits and put limited on x minus, a t on minus x and max x i'm going to put fifty and here if i take the goal and move it up you can see that the fit has a natural orientation so here you can go even father and be more precise by adding more settings to the character, but this will be enough for this tutorial okay so now that the full body ik solver is completely set up for the miximal character i'm going to do the same for the earl range in five character by going to the ik money asset so here i'm going to add the new solver football jik and while the football jk solver is selected i'm going to right click on the pelvis and set roll bone on selected solver then i'm going to add the ik goal on the hand l by pressing g then on the hand r by pressing g then on the bowl r and bowl l here on the right side of the screen, i'm going to put myself in the middle of the screen for the arm l i'm going to add the hand l gold and for the arm r i'm going to add the hand r gold leg r going to add boil our goal and leg l i'll add boil l gold now i'm going to add the settings to the skeleton of the under engine five character but since you know how it works i'm just going to show you this table that i've prepared for you which are the settings that i'm going to add to the bones of the under engine five character you can put the video on pose and then meet you right after that so now that the settings have been added greatly to our character you can see that if i select the goal that is placed on the left foot of the character and move it up and down the character keeps an almost natural pose so that's it for the full body ike solver of the unreary engine five character and now we are going to move on to to the next part of the tutorial in which we're going to adjust the retargeting of the animations okay so here i'm in the ike retarget asset and if i select that hip hop dance i'll put it on the on pose and put it on the first frame we are going to correct the leg that is entering the other one so to do so we are going to go to the chain mapping here and if you select for example a chain that has an ak go let's say the right leg for example here leg are you can see here that we have options for adjusting the animation you can you have fk adjustments chain mapping and what we are going to focus on is the i k adjustments so here the i k adjustments you have a lot of parameters and i'm going to explain to you each of them so here the blend to source at zero the goal is placed as at the retarget location, and that one the goal is placed at the location of the source chains and bones so here if i move it you can see that it will take the position of the source chain then the blender source weight does the same, but on each axis and the static of set has a static global of set to the goal assigned to this chain so for example here if i increase the x of set you can see that the leg will go farther along the x axis and finally the extension brings the gold closer or further from the origin of the chain which is the pelvis so here i'm going to select the leg air and go to a static offset and put a value of five on x and evalu of five on y so here you can see that if i play the animation the leg doesn't enter the other one here the adjustments that we've made don't make a lot of sense since both the character share the same proportion, but let's have a look at still from paragon you can see here that still has longer arms than the y, butt which makes his hand go below the floor so we are going to correct this with our parameters i'm going to select first the leg and then here i'm going to increase the extension on the leg l here for example i'm going to put one point two for example, one point three and then i'm going to select the leg r and put an extension value of one point three so that it lays on the ground here and here i'm going to select the arm r of the character and decrease the extension, i'm going to put let's say for example point, eight point, six point, seven point, six here you can see that the adjustments that we are making make a lot of sense compared to the case where we only re target these animations on two characters that share the same proportions okay back to our characters so now that everything is set up correctly we can export a new animation sequence for the unreal engine five character so here i'm going to select the hip hop dance double click on it and then since every adjustments have been made to the ik goals we can just export click on export selected animations this will ask us where we want to save the new animation sequence i'm going to leave it as is click on okay and you will see that we will have our new animation asset so i'm going back to my i carry target sir because i want to export and happy work animation i'm going to debate click on it and remove the adjustments that we've made to the leg for the that hip hop dance so i'm going here to the chain mapping select the leg r and remove the static offset then i'm going back to my asset browser select the happy work export selected animation and click on okay and now i can place both my animation assets in the world here and as you can see everything is working perfectly so as you saw in this tutorial the process is a bit digius but thanks to that you just have to create a single iq rig asset for your character and then you can retarget animations two characters of various proportions various skeletons as long as you have the same chain names so that's it for me if you want to learn more about an engine five you can click on the video that will appear on the top right corner of the screen have a good day bye you can see that the bones are draw road unreal engine does an unreal engine five doesn't works correctly correctly fine bone so that it can be more better part of the tutorial thrill for。
4云桥网络 16:09查看AI文稿AI文稿
各位同学大家好,欢迎观看我的教学,今天给大家来讲解一个比较简单的啊,也是比较好玩的一个角色的小工具啊。呃,叫做 make semer 啊,意思就是混音。 呃,它是一个在线的一个角色动画的一个服务工具,呃,它里边提供了很多的这个一些人物的角色模型 啊,也有这个相关的这个动作库去进行这样的一个使用。嗯,这个其实被对于我们平常的这个动作的这个学习,包括一些参考来讲呢,非常有用, 而且它的使用呢也非常方便。那么除了你去用它的这些里边的一些定制的一些角色以外呢,实际上呢,我们还可以上传自己的一些模型,就是你自己比如说在玛雅里边做了一些相应的模型呢,你也可以去通过这个网站,然后进行一个上传,然后 去嗯使用它里边的一些相应的动作。呃,最重要的是它这个所有的东西呢,基本上都是免费的啊,我们只需要在这个网站里边你去给它进行一个正常的一个注册就可以了,然后就可以使用它里边的相应的功能了。 呃,那么今天呢,我们这个课程就是给大家来讲一下关于这个工具的一个使用啊。再一个就是我们如何去利用咱们的这个自定义的一些角色去配合他这个 make semer 的这个工具啊,进行这样的一个一个操作。 好了,那么首先呢,我们来先从这个网站上来给大家来讲一下啊,这个网站实际上你打开以后呢就这样的一个状态啊,呃,比较简单,它里面也没有什么过多的内容, 然后呢这块呢大家可能需要去注册一下就可以了。呃,因为这个现在目前,呃这个已经是被阿刀比收购了吗?所以说大家可以去呃直接去注册一个账号,然后呢这里边你点进来以后,他会有两个啊,有两个内容,一个是人物,一个是动画。 你在这你可以直接点击浏览,浏览角色也可以在这点击啊,都是一样的啊,点开以后呢,它里面就有相应的这个角色,你可以找一个。呃,比如说你,你比较啊,你比如这里边某一个角色,你点击一下他在这个地方就会生成这个角色, 你比如点击这个,那同样啊他也会生成。就这里边大家可以根据自己的这个啊情况,你去选择一个相应的一个角色就可以了。他这边人物还挺多的啊,每一页大概有四十四十八个,然后他这个就有三个啊,有三页啊,所以说这角色还是比较丰富的。 然后呢这个呢是他的一个动作啊,你点击这个动画以后呢,他这边就有相应的一些,呃,不同的这个动作库,你比如说我们点击某一个动作,然后呢这个人物呢就会被适配到这个动作上啊,大家可以看一下。当然在这里边还有一个操作啊,就是你在这个网页当中呢,你点住这个,就在这个屏幕 区域啊,你点住鼠标的左键,可以进行这样的一个啊,旋转的这样的一个观看,然后呢滚轮键可以放大和缩小,然后点住这个中键啊,可以进行这样的一个平移,然后点住右键上下,你也可以进行一个放大和缩小的这样一个操作啊,所以说总体来讲呢 还是比较简单的啊,他这边动作也很多,呃,这个也是每页有大概四十八个动作,然后呢一共五十多页啊,所以说这个动作还是很丰富的,大家可以根据自己的这个情况去, 你去看一下他整个的这个动作的一个状态,你其实像这样的一些东西。嗯,咱们平时去作为一个,比如说一个参考,或者说你自己去调动的时候,你去你去观察他这个其实都是 很有很有用的一个学习资料啊。然后包括这里边我们可以啊点击这个走路的这个啊,整个的这个状态啊, 比如说我们,哎随便点击一个啊,我们点击这个这个看着这个动作, 他这个就稍微就是大家在嗯,你用这个的时候,你可以用这个谷歌的这个浏览器啊,然后你去给他进行一个网页翻译啊,这样会比较好一些,大家在使用起来呢也比较方便。 然后呢这个你看我们把他这个角色你,你把这个动作加载进来以后啊,他这边实际上你还可以去调整一些他的这个级别啊,你比如说 啊,你还可以把他这个幅度给给他去增增大一些,或者说是这个角色的手臂的什么间距啊等,你可以通过这些东西,你可以去给他进行一个调整啊,让他整个这个动作的幅度可能更夸张一些。然后你调整好了以后呢,我们直接可以点击这个下载啊,点一下,他这会就问你啊,你下载什 什么格式啊?这块我们一般呢就是这种 f b x 这种格式,然后呢这边呢就是他问你是有材质吗?那我们基本上就把材质也给他下下来,然后包括每秒是三十针还是还是二十四针啊?这个是我们那个 f p s 啊,这个大家可以自己去调整,一般我们就是三十或者说是二十四就就够了啊。 然后这边呢基本上也不用去做什么东西啊,直接点击下载,稍等一会呢,他就会直接把这个模型就下载下来了 哦,我们下载好了以后呢,大家可以看它就是一个这种 f b x 的这种文件啊, 实际上就跟我们在玛雅里边导出的这个文件是一样的一个性质啊。然后呢我们直接打开咱们的这个软件啊,你可以将这个文件直接给他啊,拖拽进来或者给他导进来都是可以的啊, 稍等一下啊,包括它的这个材质啊,大家可以看到啊,相应的这个它的一些这个发线呀,包括它的一些颜色呀,一些反反射呀等等这些这些材质都是啊已经给我们就呃下好了,然后整个的这个角色大家可以看一下 啊,你可以点击这个播放啊,他就可以根据刚才我们这个动作库里边的这个动作啊,非常方便啊,整个的这个也非常简单啊。当然如果说,呃,你要是去他这个人物,实际上现在目前就是整个他是 就整个我们这个动作啊,他都是有这种关键真的,然后呢,如果你想去给他把这个整个的这个动作给他进行,给他就是清掉的话,你直接去选择咱们的这个模型,然后呢把他的这个历史给他删除掉啊,清除一下历史的动作就没有了。就有 是我们比如说你在做这个动作的时候,你需要保持一些这个固定的一些姿势,然后你可以去给他调一个姿势,然后清除一下历史就可以了。如果不清楚的话,咱们现在这个等于就是一个有有动作的啊,有动画的这么一个状态。然后呢相应的这个材质和颜色呢,你可以在这个材质编辑器里边啊, 你可以自己去找一下,然后现在呢把这个材质给他贴上啊,就是这一块呢,就是啊怎么去使用他的这个网站上中提供的这样的一些模型,实际上这些模型大家可以看,你 也可以有一种就是学习,对吧?这个点进来以后,你看人家的这个模型是怎么做的,然后上面的一些布线呀,包括一些低模的这种啊,这种线的这种分布是怎么去分布的?其实也是一个比较好的一个学习的一个资料啊,包括它里边的这个骨骼啊,包括它整个的这个骨骼的这种装备的这种啊,这种方式啊, 这是咱们的第一个。然后呢第二种就是比如说我们自己有一些这种模型啊,比如说我们打开稍等一下, 你比如说我们自己有一些这种啊,提前做好的一些自定义的一些一些模型。那么首先我们在导出去之后,大家注意一下这个模型基本上你需要给他做一个合并,也就是说咱们这个模型实际上是由不同的这个,嗯 这个部分吗组合在一起的,那么这会我们在导出去之前把它先合并一下,然后你像这些手臂的这些地方啊,里边这些空的地方呢,我们尽量的把它就删掉就可以了,你只是把这个衣服的部分留出来就可以了。然后像这个腿部的这些地方啊, 里边实际上本来开始在做的时候,他里面也是有这个身体部分的,但是我们做这种动作的话,是让你把他直接删除就可以了,只留这个外面的这个衣服啊,这样的一个包裹就够了。 然后呢,嗯,我们把这个模型你直接可以选中,然后点击这个导出啊,导出当前选择也给他导出一个,嗯, f b x 文件,或者导出一个 o b j 就可以了啊,不管是 f b i、 o b g 都是可以的啊,导导一 o b j, 然后在这呢,比如说我们打一个啊人物啊,然后呢 就导出到当前的这个文件夹当中啊,导出好,然后呢在咱们的这个这个 maximer 的这个啊网页当中呢,我们在这点击这个上传角色啊,点一下, 然后他就问你啊,说你是你上传的这个类型是什么样类型?我们是 o b j 嘛?咱们直接点点击,然后找到我们相应的这个人物的这个模型,这个咱们导出这个 o b j 啊,他一般会导出两个文件,一个是这种 m t l 的啊,一个是这种 o b j 的,就他你每次导 o b j, 他都会会输出这么一个 文件,我们不要去选这个啊,选这个后后缀是 o b g 的这个文件,然后打开,打开啊,稍等一下,它会有一个加载 好,这个导进来以后,大家可以看到啊,他就这样的一个状态,然后呢这边有一些你可以去翻转你的这个,是吧这个角色,然后这样的一些小的工具,然后呢导进来以后呢,我们点击下一步啊, 然后这一块他就让你去装备啊,这个装备实际上跟大家在那个玛雅当中的那种装备的那种理解其实差别很大的啊,这个非常简单,你只需要按照相应的这个位置啊,把他这个圈给他放到这个相应的位置上就可以。这边有一个势力啊,你比如说像下边这个位置,点击 你就放在这,他会有一个,他会稍微有一点点那种自动吸附的一个感觉啊,然后你就把它放到这个下颚下巴的这个地方,然后 手腕啊,手腕这个部分,你看放到这啊,基本上你就放到你这个需要弯曲的这个部分,然后这个也是一个镜像的一个方式,只用调一边就可以了,然后这个是肘部啊,点击然后放在这, ok, 然后这个是膝盖 好了,然后这个是中间的啊,就是啊他就可以自动吸附到咱们这个中间的这个区域啊啊,基本上就按照这个视力上的这个这个状态就可以了,然后底下呢他会有一些这个 就是你使用了什么标准骨架呀,什么三个指,三个手指呀,什么呃两个手指呀等等这样的一些东西啊,这个大家可以根据自己的或者没有手指啊,就直接是一个手掌的一个一个方式啊,可以给大家可以根据自己的一个呃一个方式,如果说你这个手指你也不需要去给他做什么太多的动作啊,你就可以去给他进行这样一个修改。你比如这号没 用两个手指,或者说你用这种标准啊,标准就是五个手指都有的,但有时我们这个呃,就是你这个手部的这个地方比较复杂的话,有时会出现一些错误啊,所以说如果你对这个动画的这个要求没有那么高的话,实际上你用啊两个手指或者一个手指去给他进行这样一个控制,或者没有手指 其实就可以了啊,这个大家根据自己的一个情况去去调整啊,我这就有一个标准骨架,然后点击下一步,那么他这个就会给你进行一个装备啊,这个大家需要耐心的等一会啊,一般可能就是一分多钟吧,就可以,就会整个就可以装备好了,我们稍等一下 好了,那么这个整个呃装备好了以后,他就这样的一个状态啊,就是有会给你加一个简单的一个小动作啊,这样左顾右右盼的这样的一个感觉,然后你点击这个下一步他就会把你的 这个角色啊就定位到这个地方了,当然现在这个是,嗯没有材质的啊,这个没关系,我们你可以把这个角色最后导到这个玛雅里边再去给他上材质啊,也是可以的,所以说这会我们只需要他有一个动作就可以了。然后呢这里边呢我们来看一下啊,比如说,呃,咱们找一下, 你可以随便点一个啊,可以看一下这个啊,整个的这个感觉,是吧?当然你看这个手部啊,身上就刚才我们这个是整个手指的,所以说这个手部可能稍微有一点点问题啊, 那包括这一个点进来啊,啊踢腿的,比如就这个动作,是吧?然后呢这块你还可以去调整一些他的这个啊,手臂间的这个距离啊,稍微再开一点啊,动作幅度再大一些啊,包括他的这一块的这个幅度啊,可以调整一下,对吧? 啊?打完之后大家也要注意,就是你的那个角色啊,如果你倒进来以后,你会发现这个角色是腾空的,就没有占到这个,呃,这个就是我们这个 模型上啊,就没有站到这个地面上,那么你在这个文案里边你要注意一下你的角色有没有站到这个地平线上啊,就这块大家要注意一下,就呃不要穿到这个地里边啊,就地平面里头,否则的话你在这个呃这个这个工具当中你也会发现他也是穿进去的,他这块的这个地平跟我们这个软件里面地平是一致的 啊,所以说这会大家注意一下啊,比如说我们这个动作,你做好以后啊,你直接点击下载啊,然后这块也是一样啊,呃,有皮肤,然后三十秒啊,每每秒只数三十是吧?点击下载就可以了, 稍等一下, 好了,我们这个下载好以后呢,点开这个相应的这个下 文件啊,这就是刚才我们的这个动作啊,你调整好的这个状态,然后呢我们打开这个软件,你可以直接啊把它拽进来, 也可以导入啊,也可以直接导入,都是可以的啊,然后这个是帧速率稍微有点不同啊,我们那个是三十的啊,所以说我们在这给他调整一个三十帧啊,然后我们先来看一下这个动作啊, 当然这个帧数上有一点点太太多了啊,我们这个帧数实际上只到四十帧啊,所以说我们把这给他调到零到四十, 一个踢腿的一个动作,是吧?然后呢他的这个相应的骨骼,我们可以看看一下啊,也能够看到啊,你可以通过这块的这个显示控制呢, 把咱们的这个关节给他先隐藏掉啊,只留下这个身体的这个部分,然后关于这个材质的部分呢?呃,你如果就说你现在咱们这个人物的模型不是整个是进行了一个群组吗?就等于是结合了一下, 你可以直接给他啊,分开啊,分开以后呢,实际上他并不影响咱们的这个整个的动作啊,你这个动作依然还是存在的啊,并不影响这个动作。然后呢我们选择咱们的这个,呃,就是你,你如果知道你的这个材质的这个不同的这个位置啊,你可以直接从这去进行这样的一个加载啊,都是可以的。 然后呢也可以怎么样呢?我们把咱们相应的刚才的那个人物啊,我们给它导进来,比如说导入 啊,我们导入进来以后呢,把这个模型给他稍微的往后放一些 啊,这就两个人物嘛,然后把这个人物给他也是一样啊,给他解组 啊,然后我们选择他的某一个啊,你比如说啊这个身上这个小皮衣啊,选择他,然后看一下他是哪一个啊?右键 选择我们这个相应的这个,因为这个用的是阿诺德的一个材质啊,我们可以看他这是阿诺德的表面材质第十九个, 那我们就直接在这选择咱们的这个衣服,然后右键,然后选择现有的材质啊,这里边啊,这块因为屏幕的关系啊,大家可能看不到右键,然后现有材质,我们找到这个第十九个,然后点击 这个颜色就自动给他了,然后包括这个脸部的这个材质右键,然后先找到他,看他是第几个啊,表面才是第八个选择 啊,就用这样的一个方式,其实比较简单啊,右键然后呢指定现有的材质第八个, ok 啊,以此类推啊,我们其他的这些材质都是通过这样的一个方式,你给他找到他是第几个材质,然后呢去给他进行这样的一个相应的给予就可以,这是十二个选择 右键啊,这个又看不到了啊,右键现有材质第十二个, 就把这材料一个给他,赋赋予一句他就可以了,然后我们整个的这个动作呢,其实也是啊,就保留下来,就是我们有时在做一些这种相应的动作的时候呢,咱们就可以采用这样的一些方式 啊,那么这个呢,就是咱们今天这节课啊,给大家讲的一个啊,这个工具的一个使用啊,使用的一个小方法啊,非常简单,然后呢大家可以 下去呢去练习一下啊,其实还是很有意思的。好了,那我们今天这节课呢,就给大家讲到这啊,感谢大家的一个观看,希望我的课程呢对大家的这个学习呢能够起到一点帮助作用。好了,我们下节课再见,谢谢大家。
62JHTV 07:05
07:05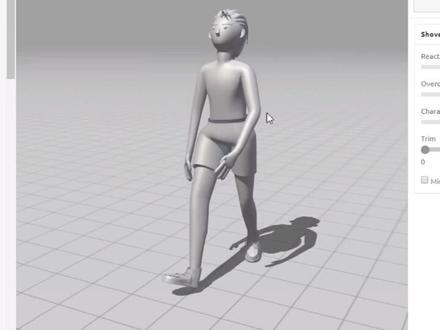 00:48查看AI文稿AI文稿
今天给大家分享一个网站快速的绑定角色骨骼的一个网站米三宝,那什么使用呢?首先来看啊,现在 cd 当中呢,把我们的这个少年这个模型啊去导出为 obg 格式啊, 然后在这个网站的最右侧的第三行这个按钮啊,我们点击他一次第三个,然后呢我们就可以导入,然后点击这个英文去导入我们的模型,然后打开我们模型就可以了,这个时候呢他会自动的去载入这个模型,载入之后呢,这是我们需要给他去绑定这个节点骨骼啊,然后轴节点还有他的跨关节都给他绑定上去,然后点击下一步, 这个时候他会进行一个骨骼的一个计算与绑定,然后呢绑定好之后呢可以会显示这个网站上是有很多的动作库的,我们只一点一个动作可以快速的载入进来。 动作载入之后呢,我们可以点击后右面的一个当漏的去保存这个动作,然后呢一般保存成 fbx 啊。
3290一凡C4D课堂


