diretta asio设置

粉丝6.1万获赞29.4万
相关视频
 02:3216爱抽雪茄的钱队长
 08:13查看AI文稿AI文稿
大家好,欢迎收看阿颖的音频科普,今天我们就来说一下 icon 的声卡通道的工作原理说。 说到这个的话,其实艾肯的声卡驱动的通道工作原理是很强大的,如果大家搞懂了他们之间的关系还有功能,那么你就可以对电脑上的任何软件只要发出任何的声音都可以玩, 所以我们就开始讲了。第一点,我们要理解什么是 asio 驱动,还有 wdn 驱动,这两种驱动都是给一些音频声音通道的处理的驱动来的,而 asio 驱动的话,它的好处就是延长 是低,但他的快速就是占用电脑资源高,但那现在的电脑的话配置越来越高了,这个的话已经越 越来越没有压力了。想当初我们为了给一首音乐做后期的话,要专门配一台电脑专门来搞,而 wdn 驱动的好处和快处就刚好相反了,他占用电脑资源很低,但他会有延迟,所以我们大部分的音频软件的话,都是使用 asio 来处理 音频的,虽然他占用电脑的资源比较多,但他处理音频的话延迟很低,所以处理起来就没有那么多的麻烦了。那为什么还要需要 wdm 驱动呢? 就是因为我们平时很多的软件都需要发出声音,既然发出声音就需要用到声音驱动了,那么我们用 wdm 驱动的话,声音处理起来就不会太占用你电脑的资源。所以大家可以发现电脑的大部分软件都是用 wdm 驱动的, 例如酷狗、迅雷,看看、 qq、 yy 等等等等的软件啊,甚至我们的网页都需要用到 wdm 驱动的, 所以大家要搞清楚这两个驱动键,然后艾肯的声卡它是拥有 asl 驱动的通道,也有 wdm 驱动的通道,而且他们之间也有联系的关系,所以使用起来就会很方便很方便,可以让你想要的新号来回的走走, 走到你想要的地方去,这个也是我们这个视频想要大家的东西,那么我们看一下 asl 有什么通道啊?看什么通道的话,大家也可以在一些录音软件,我们通常都说 daw 软件,或者直接在驱动 的 misa 里面都可以看得到所有的通道的排列,左手边这些全部都是输入的通道,而下面一排就是一些输出通道了。 那为什么艾肯的密撒要这样的排列呢?其实艾肯用的是一种矩阵的排列方法,那矩阵是什么意思呢?矩阵的话,在数学里面矩阵就是一种按照长方阵列排列的复数或时速的集合,用人类的语言就是把一堆数字排成几行几列。 那么在音频界的话,以前我们可以在一些调音台上也可以看到一些矩阵的方式,也是把通道排成一行一行了,但你用调音台的话就会很笨重,我们在电脑上的驱动就可以直接来操作我们想要的输入输出到哪些地方了。矩阵的原理其实就是左手边这里的输入 打横过来就对应着下面的每一个输出了,你想这个输入去到哪个输出的话,就把相应的位置把它点亮就可以了,就是这么 简单了。那么怎么控制它去到哪里,这方法我们就已经掌握了,我们只剩下把每个通道的作用都理解之后,那么我们就真的可以为所欲为了。那么我们继续说 asl 的通道有哪些通道吧。首先输入的话有硬件输入, 居里输入,还有回路通道,硬件输入会根据你的声卡有多少的硬件输入,在这里就会显示有多少的硬件输入的。那么硬件输入有哪些呢?通常就是你的麦克风输入,还有线性输入,还有乐器输入,还有数字输入,还有手机输入等等啊, 而在 a s i o 里面的话,他就会用 h w in 来显示了, h w 就是哈为的简写了,哈为其实就是硬件的意思了,那就硬件输入了,那么通常 hw in 就是声卡的一号麦, hw in 二就是二号麦了。因为麦克风的输入都是单身到的,所以大家要搞清楚自己的声卡对应的每一个输入是哪一个,然后我们看一下区里输入 还有回路输入,这些的通道在所有的声卡都是一样的,使用的原理也是一样的,这个要结合 wdm 通道来使用,所以等一下我们再介绍它的功能。然后下面的输出也是有硬件输出, 虚拟输出还有回路通道,那硬件输出的话也是一样,要看你的声卡有多少的硬件输出,这里面才会显示有多少的硬件输出了。 那硬件输出通常有什么呢?有耳机输出,有线性输出,有数字输出等等啊,那通常 icon 的声卡一号耳机输出跟 线性一二的输出是一起的,所以的话 hwl 一二就是一号耳机还有线性输出一二了。然后之后的硬件输出就要看你声卡的实际有多少个硬件输出,这里就会显示有多少的硬件输出了,然后虚拟输出 还有回路通道也是结合 wdn 通道来使用的,所以也是等一下再说。然后我们介绍一下 wdn 通道有什么 w、 d、 m 的,所有通道都可以在我们的系统声音里面可以看一下,而录制这一边就是输入通道了,而播放的这一边就是输出的通道了,而这里他们都有硬件的通道,也有虚拟的通道,而硬 的通道都是用 hw 开头来看的,所以就可以看得到这些就是硬件输入, 这些就是硬件输出了,而其他都是虚拟通道来的。 ok, 所有通道都介绍完了,那么我们就可以说一下哪种通 通道是怎样使用吧。我们先说一下硬件通道怎么使用,我们又回到 asl 上,其实大家既然理解这些意思的话,我们使用起来就会很简单了,硬件通道的话很简单,硬件输入你想他输出到哪个通道,你就只要在这里把它点亮相应的通道就可以了, 例如我想让他去到耳机输出还有虚拟通道一二的话,所以我们就可以点亮 h 这边 有奥一加二,还有 vcl 一加二啊,那为什么要点亮两个灯啊?因为我们的麦克风是单身到输入,我们输出通常都要立体声来监听的,所以为了耳机的 左右耳朵都有信号,所以我们都是左右耳朵都点亮就可以了,那如果你想只有一个耳朵监听的话,你只要点亮一个就可以了,这个就是硬件输入的使用了,那 asl 的通道也可以在 一些 daw 软件上使用的,我们也一样在通道的输入选择好想要的输入,然后输出选好我们想要的输出就可以了。假如我想一号麦克风输出到给耳机,电梯还有 虚拟通道一二的话,创建输入输出的方法就要根据不同的 daw 软件的使用方法来使用了。用 qs 为例, 我们去到连接这里创建一个单身道的输入,一号麦克风 hw 印一输出,这里我们要创建两个立体声输出了,一个是属于耳机输出, 就是 hw 二一二,一个是 vc 二一降二了,然后我们创建一条音频通道,音频通道的输入我们就选择好我们创建的输入通道,输出的话我们可以选择耳机输出就是 hw 二一二啦。那怎么可以让他同时又输出到居里输出啊,我们只需要在这 调通道的发送那里也同时发送到虚拟通道就可以了。 vc 二一二了,这样的话我们就可以用一 个音频通道输出到两个输出了,当然用这个方法想输出到多少个输出都可以的,就要看你自己的操作了。 low dm 的硬件通道怎么使用呢?那么我们下次再见吧,拜拜。
309icon艾肯专卖店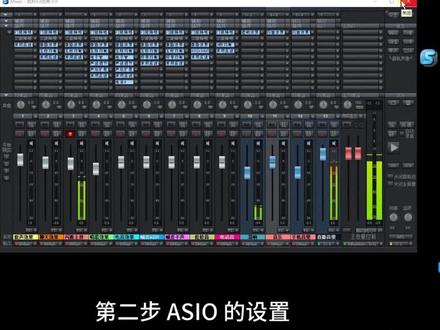 00:41查看AI文稿AI文稿
第二步 asio 的设置。首先在录音机架的右上角选择设置, 打开后进入选择系统选项,在这里选择 asl, 然后是这里 asl 设备,要选 buckhorn usb audio, 这个是跳铃声卡的 asl, 选择完毕,然后点击确定就可以了。这就完成了声卡 asl 的设置。
24跑到飞起 07:15查看AI文稿AI文稿
if you don't have an audio interface or maybe you do have one and it doesn't have an azio driver but you want to lower your latency in this video i'm going to show you how azio for all can help i'm going to go through the installation and then i'll get into the setup and how to change the azio for all settings in your daw, i'm zayne welcome to audio tech tv where it's my goal to help you conquer the tech so you can unleash your creativity and i do this by providing easy to follow audio tech tips tutorials and reviews now let's jump in all right so obviously the first thing you want to do is download azio for all so go to azio for all org and download the language that you prefer now notice the latest version is only available in english, but you should be alright with these other versions if you need those and also to note when i click on this nothing happens so what i've had to do is right click and then open link in new tab and then that brings the download window up and then you can download it and then once it's downloaded launch the installer and you'll have to accept the terms and you'll see that there's a couple of options here and the first one is for rewire support if you need that then check that off and the second one it says that it's useless over in the brackets there, so i'm not going to click that i don't need either of these things so i'm going to leave them both unchecked and then click next you can choose where you want to install it to i'm fine with the default location and click install it's now installed so now let's go into your daw alright, so for this i'm just going to use fl studio but the basics are going to be pretty much the same for every daw, you just want to go into your audio settings for whatever daw, you use and you may have to change the driver type to asio, if it's not already there or if it's like fl studio you could just click on device and then under asio, you want to click on azo for all and if your daw has a separate thing for driver type and device you want to click azio for driver type and then in the device you want asio for all and once you've done that you'll be able to access the control panel here and your dom might call it just simply control panel or aziocontrol panel it will be something along those lines so you click on that and this will look the same in every dog because this is the azo for all control panel now if you're just using your built in sound card and you don't have a usb audio interface you're probably not going to have its many selections in here, so don't worry about that what you want to do is find your built in soundcard if it's not selected already it probably will be if that's all you're using, but you want to click on this button here make sure it's lit up like this and now we want to click on this wrench right here and then you can see there's a plus sign beside it we'll click on that and make sure that the output is for the real tech hd audio output that's my built in soundcard and then the input for mine is the stereo input that's actually going to record whatever is coming through my computer, but i could change it to the mic in the front or the mic in the rear or the line input whatever, i want i'm actually going to switch it to the mic in the front and you can see we can have multiple things, but i'm going to take this off and just have these two things so it's going to output to my built in soundcard speakers so if you were on a laptop, it would be your laptop speakers or your headphones and on a desktop it's going to be either your headphones or if you have any speakers connected to it and then for the input i'm using the mic in the front panel and that's pretty much it for now so the way i have it set up right here like i said is just for using your built in in soundcard, but if you have an audio interface and you want to set this up kind of different you want the input on your audio interface, but you want the output on your built in soundcard soup you want to connect your microphone to your audio interface, but you still want to hear the headphones connected to your laptop or your computer or you want the output to go through your laptop speakers then we would disable the mic input here and we'll still keep the output on the speakers, but now we'll go to my audio interface which is the audient id forty four i'll click on that and i want to disable the output i want input one in two enabled so you can see that's all i have enabled for that is the input and then for here i have the output so now i could connect a microphone or a guitar to my audio interface and then the audio is going to output to my computer speakers whatever, they are or the headphone jack whatever, i have connected for that or if you just wanted to use it as the driver for your audio interface again you would set it up the same way we set up the built in soundcard now, i'm going to turn off the id forty four input and i'm just going to set it up with the output here and the mic at the front and this is a great setup if you're going to be connecting a mixer to your computer without an audio interface and i have a video on that in case you want to check it out i'll link to it down in the description but you'll see over here and down here we have some other options and to start with i would just leave leave these at the default settings the one thing you may want to change eventually is this buffer size here so you would just close this down open up a project see how the latency is when you're recording or whatever it is you're doing and if the latency is too much you'll want to reduce the size of the buffer and this is going to lower the latency, but not all sound cards and computers are going to be able to handle the lowest buffer settings so you want to play around with this to see what works best for your computer so if you do end up lowering it and then you start hearing some clicks and pops and maybe even some audio dropouts then you're going to want to increase that buffer size again but if you lower it you're not experiencing any issues then you're good with that lower setting so just play around with it on your computer again try it at the default settings and see how it works if it works great that way then you're fine just leave it like that now if you want to check out that video about connecting your mixer to your computer without an audio interface click up here or click down here to see what youtube recommends if you like this video please give it a thumbs up also subscribe to the channel for more videos like this thank you so much for watching for audiotect tv i'm zane keep creating and we'll talk soon。
309艺佰联腾 01:53
01:53


