怎么折眼镜蛇用星空纸折

粉丝3054获赞1.6万
相关视频
 02:50
02:50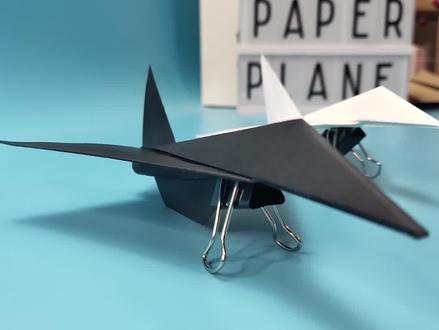 02:49
02:49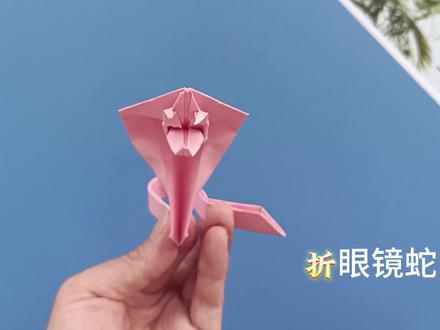 04:20查看AI文稿AI文稿
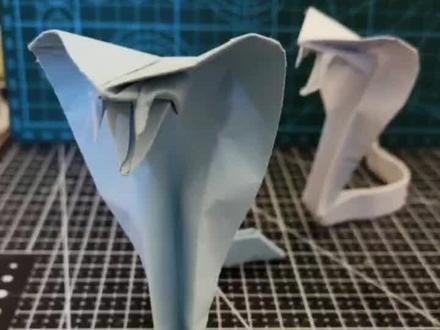
这是一条恐怖的眼镜蛇,下面我把折法分享给大家,欢迎点赞收藏。这是一张 a 四纸,先把它对折对分,才开取其中半张。
607正速手工 03:24查看AI文稿AI文稿
大家好,这一期折仿真纸飞机眼镜蛇,机身线条漂亮,而且有非常酷的机翼。求大家帮忙点赞留言关注哦,谢谢了!
1236宏乐玩具优选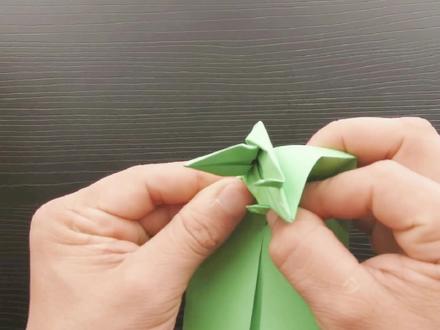 03:50
03:50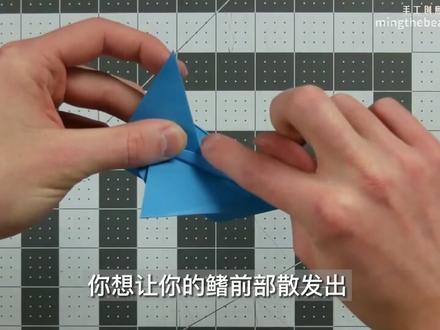 13:47查看AI文稿AI文稿
now as you can see cobra is just an astounding paper airplane with really cool wings and this dynamic tail fin and it even has thrusters in the back that just top off the design and really really make it shine now you might be surprised this plane is not that hard to fold it's still an advanced model but compared to other paper jets like this this one is a walk in the park so if you're thinking you want to try a paper jet design out and see if you're capable of folding it this is the perfect one to start with so with that in mind let's see the plane in flight and then i'll teach you how to fold it all you will need in order to folk cobra is a square sheet of paper mine is eight and a half by eight and a half inches and i recommend that you don't go too much larger than that and then also be sure to use pretty thick paper this is twenty four pounds and you could go even thicker than that if you want and with that we'll begin by folding this corner to this corner okay and with the left edge here as my folded edge i'm going to fold this top right edge to that edge and i want to work into that top point very carefully, so i don't tear it or miss align it and then i'll crease all the way here put the paper over and do the same thing on the other side okay and once i do that i'm going to flip this over and fold my top point down so my crease goes from there to there like so i'm making sure to land my point on the center crease and now i can open that up and fold my point to the crease i just made like so fold down and then i will open up these layers on the other side and fold this edge into the center crease and i'll do the same thing on the other side okay and now i'm going to flip it over once again and fold this edge into the center, but but you want to make sure that the layers behind release like so so that you're not folding the layers behind you're just folding on one layer here and i'll show you that is this layer right here that you are creasing on and once you do one side do the other side to match so bend it just until those snap out from behind like so and your plane should look like this so now i will flip this to the right and fold this edge into the center and then swing that back to the left and do the same thing with this plat okay and now i'm going to fold this top point down to where these diagonal creases intersect in the middle and this is very thick here so you're kind of just gonna roll it with your thumb and then really just apply the crease right at the center that's the only place you really need it and this is going to serve as a reference point for our next fold where i'm folding from this point here to this point right down here now i'm folding on both of these layers and you're really going to have to hold them close to one another to keep them aligned as you do this step or you'll end up misplacing your crease on the top layer after you've made that check the crease on the top layer and you can see mine's misaligned a little bit so i'm actually just going to bend this here and adjust my crease just slightly by pushing that and folding it right into the corner this isn't crucial, but i prefer total accuracy if i can achieve it so i'm gonna go ahead and do that okay and now i'll do the same thing on the other side again i'm gripping both of these layers together folding from this point here to that point right there i like where my crease landed on that top layer this time so that's good and now i'm actually going to perform a swivel fold here on the left side so basically i'm pulling this open i'm just grabbing right here and pulling this open and i want to flatten this like so and so that the new edge my crease is starting at this point here and my new edge i want this corner to land right on this diagonal crease and then with it like this i can close this up and begin to collapse the layer like so and once you do one side like that do the other so i'm pulling this open trying to land this corner right here creasing like so closing this up and collapsing the paper okay now flip this over and work on these wings really quickly i'm going to unfold that flat and then fold this edge to that edge right there and then fold it back in this is just reinforcing leading edge of the wing do the same thing on the other side and there you go we can flip it back over now and i want to fold again from this point to this corner you'll notice this crease is not aligned so you do need to make a new crease for your top layer as you do this do the same on this side try very hard to keep this layer pinned to this layer here as you do that nice and controlled okay and your plane should look like this now you'll notice we have a major transition from very thick layers all the way down to one layer and basically i want to bend the plane and i'm going to just kind of push down on the center crease as i swing these layers, the wings inward and i'm going to make sure that it's folding right at that point which it really should have a tendency to do that and i'm just going to kind of close this up and i want to create a new edge on this top edge right here that tapers down right to where this edge here meets the back edge of the paper so you can see this line is going right to that point so your plane should look like this and now we can fold the wing up like so along that edge right there fold this layer up as well along the same edge flip it over do the same on the other side and now we're going to fold our fin and basically to do that i'm just allowing this to open slightly and then again pushing on this central section and reversing it like so, and i can kind of pull you'll see that point in the middle i can kind of pull that forward or push it backward to make this fold and this is really just a judgment fold but there are a couple references that will help you ballpark it you can see the angle of my fins a little bit weird here but basically i want to put the front edge of my fin where it's intersecting the top edge of my jet right where this diagonal creases and you may not be able to see it on my plane, but you should be able to see it on yours there's a little diagonal crease there you want the front of your fin to kind of emanate out of that crease and then on the bottom you want this edge that you're going to form to be parallel to this edge here so obviously i need to move my point forward a little bit and now you can see how far forward it is now when i close that up and flatten this again it's just judgment fold so if it's not perfect it's fine, but i can flatten that and you'll see this edge here is a proxy parallel to that edge and this fin starts right at that point and that is great anything close to that is great so now all that's left to do is lock my plane and then fold the thrusters so to lock the plane together i'm going to fold both of these back layers together up all the way into the jet and really i just want to make a little tack here in the back that is going to be the reference point for my next fold because i want to actually start my crease there actually just fold about a third of this so that now when i fold it in one more time that goes all the way up into the top edge of the jet right there i can lock it a little more tightly than i have here there we go so that's nice and securely locked and now it's time to fold the thrusters so in order to do that i like to fold this flap up this is what i'm going to fold my thruster out of i'm going to make a crease by folding this edge here to this edge here, but i'm not going the full length of this here i'm not creasing all the way i'm just starting that little crease now i'm going to take this corner and i want to wrap it so it goes all the way up into the plane there, so i'm folding it in like so and making sure it's wrapping all the way up to this okay and you can see i've kind of got a pinch, i want to preserve of the fact that the back edge here is round and i can shape that nicely into a thruster but i also want to make sure that it doesn't come unfolded so i'm going to hold it like this and crease it just back to about there really nice and firmly and not go past that that gives me the ability to give it a nice round shape now i can go ahead and do the same thing on the other side so i'm actually going to let that release flip my plane over again angle that up start just a little crease right here at the beginning making sure it goes right to that point and then wrap this in like, so wrap the other side in again and now i can and make sure my crease on this side and my crease on this side go equally far back just by doing it like that and then i can shape my thrusters however, i like and this is a finished cobra so thank you so much for watching this video, i hope you had success and folding it and good luck flying your plane。
716手工创意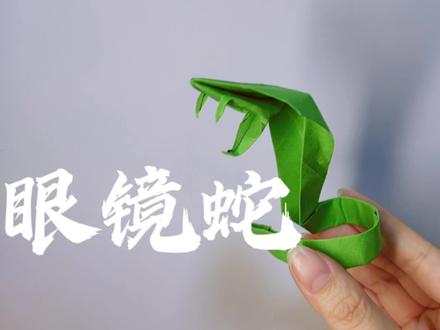 03:57查看AI文稿AI文稿
哈喽,同学们好,我是胖墩,我们今天来折一个眼镜蛇, 将 a 四纸对半,踩开,上下对折,打开,沿中线对折, 其中一边两个角沿中线对折, 打开,沿折横向里面翻折,将折子向下翻折,放到背面,沿折横对折。 喂,视频都看到这里了,点赞加关注啊!沿两个折痕的终点对折, 沿折横线里面翻折,将折纸翻到一边,上下两边沿中线对折, 打开,沿折痕折出小三角,另一边重复刚才的步骤, 两个脚向中间对折, 下面的角向上面翻折,折出一点弧度上面将两边的折子先从外面拉出 线线面折出小三角, 翻到背面,用视频琐事折出两个鞋边 上面的边沿,刚才的折痕对折, 下面的纸沿中线对折, 沿刚才的折痕向里面翻折,整理一下形状, 任意长度将折纸折出直角打开,沿折痕向上面翻折,尾部的折纸 两边沿中间对折两次, 将折纸对折, 将折纸绕手指转两圈,整理一下形状, 一个眼镜蛇就做好啦!今天的视频到这里就结束了,喜欢的点个赞加关注吧,有疑问的欢迎在评论区留言,拜拜!
312🌸胖墩手作 04:30查看AI文稿AI文稿
毒蛇外观,一头部一般为三角形,头大颈细,二尾短且突然变细。三,体表色彩鲜艳。 依次指尝一尝,对齐 打开,一分为二,尝一尝,对齐 对齐,折痕 对齐,折痕 对齐,折痕对齐,折痕 边对其折痕 边对齐。折痕打开,按折痕向内挤压,打开连折痕,向内挤压,向下展平, 把面烟对起此线 边再次对齐此线 翻面,此两条线对齐。 反面按折痕翻面,此线对齐,上线进行折叠, 同样此线对齐,上线进行折叠。 词典对齐,交叉点进行折叠, 压到交叉斜,同样词典对其中一点 好翻面。翻折,边对齐此边, 同样边对齐此边按折痕向下好翻折。同样 展开向上翻折点对齐终点, 同样点对齐终点。 下颚,下嘴唇,掏出牙齿, 哎呀牙齿 反面对齐,中线 同样对齐。中线 翻面,手抵住这里,向上向上,同时向下对折, 折成一个小指甲,展开,按折痕反向折, 围绕旋转 画上眼睛,好完成。
707慧玩手工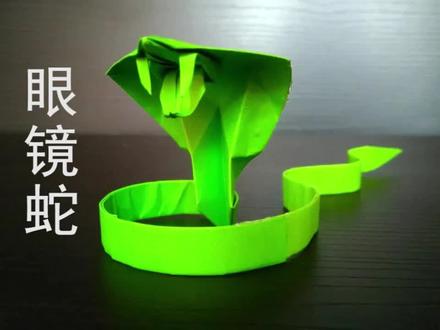 04:55查看AI文稿AI文稿
今天教大家折眼镜蛇。 a 四纸剪一半对折。打开 两条边,折了中线,上面的角折到中线。 把脚折在里面。把脚折下来, 翻过来,折出两条对角线。 那么幼稚。 对折折出中间的折痕。 把两个角折在里面, 把脚折过来,把上下两个角对折 人的折痕压下来。 把两边的角折到中线, 上面的角折下来,再向上弯一点,就是折的舌头。 把旁边的两个角拉出来, 向下折,就是折了牙齿。 翻到后面,再折两条对角线。 把脚折到中心点,压出折痕,到这个点的距离。 另一边折法一样。 把两边对折的中线压到折痕那里。 生日。 把前面头的部分向下压, 圆的前面折出了折痕。 把后面部分对折向上折。打开翻折 尾巴,可以卷一卷, 发现尾巴有点短。 把前面剪下来的一半纸对折三次。打开 上面的角,折了中线,再对折, 和前面的尾巴粘在一起。 眼镜蛇就做好了。喜欢记得点赞、关注、转发哟!
3879西西爱做作手工 02:12
02:12 03:04查看AI文稿AI文稿
大家好,我是妮娜小姐姐,最近给大家展示十二生肖动物的折法,今天给大家演示的是眼镜蛇的折法,这条眼镜蛇折纸最逼真的地方在于它的舌头和锋利的尖牙,我们一起来折吧! oh boy!
373Nina小姐姐爱手工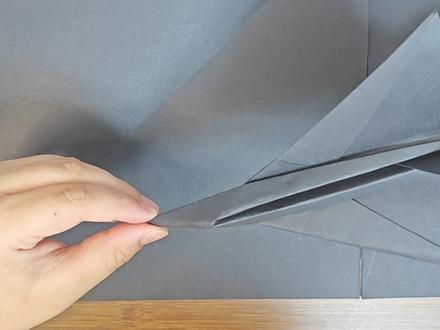 05:11
05:11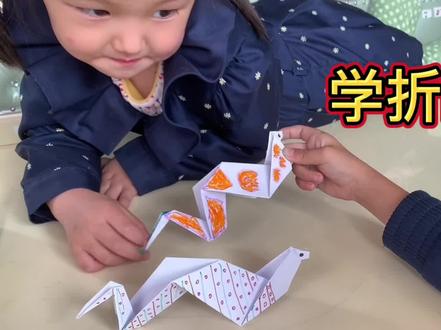 02:12查看AI文稿AI文稿
我们今天折眼睛,手跟着我跟着我做。好。对,就像哥哥这样对齐哈,现在把它打开,好像这样,像这样折,折成折,就像你折飞机那样。对,就是这样, 要对,好糖也没得,就是这样折。对对对,就是这样,好,两边都可以折过来, 像妈妈这样。折成这样。折好了吗?对,就是这样, 妹妹走过来像我这样吗?对,这样吗? 我看看,走过来 翻过来折。对对对,是的,折下来还没有做好,这样就是这样,妹妹就是这样折的, 还没折完,现在开始画眼睛,先把眼睛画上, 要画生气,两边都要画画生气。 好啦对啦,这眼睛长这样, 这是黄瓜。嗯,好。你咋不做那个纸板做成的那个发动楼梯,我们下次做那个,要是在这个蛇上面装一些, 一口发过去就可以。可以啊,他就可以自己走路。这是我们做的三条蛇,我们比比谁先谁厉害一些吧。耶,我的厉害,因为我吐出了性子,会不会做了?会了,下次自己做哈。
114kf


猜你喜欢
最新视频
- 91.8万小熊熊手工