主机填料函拆解注意事项

粉丝3163获赞7230
相关视频
 01:19查看AI文稿AI文稿
before starting the overhaul tape a new o ring to the piston rod above the stuffing box housing insert lifting eye bolts and lift the stuffing box to a comfortable working height mount the work table around the piston rod remove and discard the o ring loosen and remove the assembly fingling bolts and the fitted bolts remove the stuffing box halves do not use a chisel to separate the halves as this will damage the contact faces。
34我的寅擎 01:13查看AI文稿AI文稿
啊,大家好,我是航海训,今天我们来讲一下体积的铁道环。你们看铁道环这边 第一道这边是 topscrabring, 是上部的罗风,然后二三道是他的气风,叫 siri, 然后下面四道是一样的,又是他的罗风 sacrabing。 然后我们平时检查时候要测量测量这个大口的间隙, 开口间隙,呃,把三个间隙定到一块。然后我们进行用油标卡,水晶及测量。海来这边,然后与说明书的要求进行比较,每一道都都是这样测量的。 然后还要测量一个间隙的是是这边的顶端的间隙这块那个塞尺塞尺塞这边测量这个 限行,与说明书上的进行比较,比较出来时如果超出极限就要进行更换。 然后这边螺丝上指的扭距也要跟四分之四的要求进行比较,比如说我们这个上级的扭距是八十六米,叫做扭力扳手去进行上顶,这就是我们的腹肌跳海。
570航海摄YIN 01:02
01:02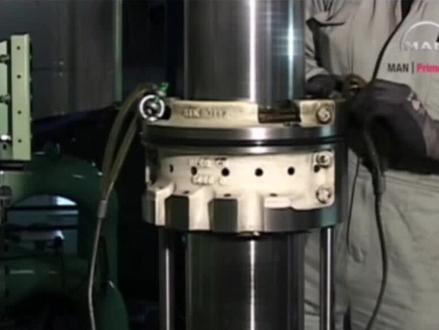 09:18查看AI文稿AI文稿
mount two eyebolts in the stuffing box flange and hook on two tackles lift the stuffing box a little up the piston rod and remove the distance pieces from the piston rod foot mount the work table round the piston rod at a suitable working height remove the tackles land the stuffing box on the work table remove the o ring of the stuffing box if the o ring is intact and is to be used again move it up the piston rod and secure it in this position with tape remove the bolts from the stuffing box assembly 制造人机性质 pull away the one half of the stuffing box and remove it using a feeler gauge measure the vertical clearance of the rings see the instruction book data sheet one oh two two remove the remaining half of the stuffing box and press all sealing rings and scraper rings down against the work table measure the clearance between the ring segments to determine whether a replacement is necessary see data sheet one oh two two dismantle and stack the rings in the same order as when fitted in the stuffing box 哼哼 这个 carefully clean all the ring segments and the stuffing box housing lubricate the piston rod with molobdinum di sulfide what it was meant to be doing oh sorry to go my little place the lowermost scraper ring segments on the work table place the spring round the segments and hook the spring ends together repeat this procedure for the remaining scraper rings on top of the scraper rings assemble the two ceiling ring units each consisting of a four part and an eight part ring use the half stuffing box on the work table to adjust the height of all the assembled ring units on the piston rod until the ring units are opposite the corresponding grooves in the stuffing box housing subsequently push the half stuffing box into contact with the piston rod round the ring units check the ring clearance again place the other half of the stuffing box housing on the work table and push it into the place around the rings 哎别提了。 mount the six bolts tighten the bolts according to data sheet one oh two two mount the o ring in the stuffing box groove mount eye bolts and wire ropes 呀呀呀呀呀呀呀呀呀呀呀呀呀呀呀呀呀呀呀呀呀呀呀呀呀呀呀呀呀呀呀呀呀呀呀呀呀呀呀呀呀呀呀呀呀呀呀呀呀呀呀呀呀呀呀呀呀呀呀呀呀呀呀呀呀呀呀呀呀呀呀呀呀呀呀呀呀呀呀呀呀呀呀呀呀呀呀呀呀呀呀呀呀呀呀呀呀呀呀呀呀呀呀呀呀呀呀呀呀呀呀呀呀呀呀呀呀呀呀呀呀呀呀呀呀呀呀呀呀呀呀呀呀呀呀呀呀呀呀呀呀呀呀! lift the stuffing box a little remove the working table from the piston rod mount the distance pieces in the piston rod foot and lower the stuffing box until it rests against the distance pieces。
210威海泛洋 05:33查看AI文稿AI文稿
为保证作业进度,应提前准备好作业工具。 开始拆点前应做好标记,避免装配时出现错误。 松开前置填料压盖螺栓,并将螺栓全部取下。 取下田料压盖之后从田料盒中将田料及波形弹簧 依次取出。 将第一层填料盒取下,并将第二层填料及波形弹簧取出。 将第三层填料盒上方压盖固定螺栓松开。取下固定螺栓及填料压盖。 按照顺序将第三层至第七层甜料及甜料和。 使用柴油对各层田料和及田料进行清洗, 检查田料弹簧弹性是否良好,田料外表面有无伤痕。 检查填料和 如存在缺陷,使用砂纸对密封面进行处理和二次检查,确保密封良好。 按照拆卸的反顺序安装填料盒及填料。 使用塞尺对各层填料轴向间隙进行检查,确保轴向间隙的大小在零点零五到零点二毫米之间。 对第三层填料盒上方压盖的气路、水路和油路进行检查,确保畅通。 安装第三层填料盒上方压盖及固定螺栓,并将螺栓紧固牢固。 再次对水路进行检查, 将第一、二层前置田料进行安装。 最后安装前置填料压盖及固定螺栓,并将螺栓对角紧固牢固。
102河北小乙 12:28查看AI文稿AI文稿
overhauling the stuffing box on forty two to ninety eight mc engines dismount the cylinder cover c instruction book volume two procedure nine o one loosen the stuffing box and piston rod foot mound distance pieces to protect the stuffing box。 the telescopic pipe is fitted either to the guide shoe or to the cross head pin if the telescopic pipe is fitted to the cross head pin, it must be disconnected and suspended before removing the piston and piston rod insure that where ridges are smoothed out and that any carbon deposits are removed also make sure that the piston cleaning ring if installed is removed from the top of the cylinder liner mount the lifting tool and lift the piston with piston rod and stuffing box out of the engine place protective covers over the cross head and in the bottom of the cylinder unit remove the cover from the cutout in the gallery floor plate and land the piston on the support tool before starting the overhaul tape a new o ring to the piston rod above the stuffing box housing insert lifting eye bolts and lift the stuffing box to a comfortable working height mount the work table around the piston rod remove and discard the o ring loosen and remove the assembling bolts and the fitted bolts remove the stuffing box halves do not use a chisel to separate the halves as this will damage the contact faces press all sealing rings and scraper rings down towards the work table push the segments together, so that the total ring end clearance can be measured at one point measure and record the clearances and compare them with the wear limits given an instruction book the hooking tool remove the springs and segments and keep them together in the same position, as when they are fitted in the stuffing box clean and inspect any segments, which are be used to gain the stuffing box is so designed that it has the same time between overhauls as the piston the lamellas are normally due for replacement at each overhaul while the ceiling rings normally only need to be replaced at every other overhaul after cleaning insert all sigments in their respective grooves in the housing and measure the vertical clearance with a fila gauge see instruction book volume two procedure nine o two check the calibration of the springs c instruction book volume, two procedure nine o two check the surface condition and the diameter of the piston rod record the results for example on this inspection report, which is available from manbnw diesel lubricate the piston rod with molobudenum di sulfide check that the lamellas can be moved remove any burrs, which may have been caused during the measuring of the ring and clearance from the ends of the segments assemble all ring units making sure that the markings on the various segments match each other to facilitate the mounting of the springs cross your arms before connecting the hooking tools remove any burst from the ends of the segments make sure that the guide pin between the ceiling ring and the cover ring engages correctly lift all the rings up the piston rod and use a stuffing box halves to adjust the rings, so that they fit properly in the grooves ensure that the ring end clearance is evenly distributed all the way round apply lubricating oil to the segments and to the housing press the stuffing box halves into place around the segments adjust the torx banner to the value given in the instruction book finally tighten the nuts to the required torque and mound the o ring in the groove in the housing make sure that the guide pins on the distance pieces engage correctly with a stuffing box making sure the cylinder line is clean mount the piston with piston rod and stuffing box as described in the instruction book reinstall the cover on the gallery floor plate remove the protective cover in the bottom of the cylinder unit carefully clean oil and sludge from the stuffing box flange to ensure the correct contact between the stuffing box and the flange remove the protective cover from the cross head as late as possible finally secure the piston rod foot stuffing box and telescopic pipe and mount the cinder cover。
 00:34
00:34 01:22查看AI文稿AI文稿
just like the prodigal said i returned and it wants to happen to me i got the skill so don't get your bill cause when i shoot the gift, i shoot the bill can we get down i can't get down just sit and jump around jump around! jump around! jump up! jump up and get down。
105航海小磊哥 01:11查看AI文稿AI文稿
making sure the cylinder liner is clean mount the piston with piston rod and stuffing box as described in the instruction book reinstall the cover on the gallery floor plate remove the protective cover in the bottom of the cylinder unit carefully clean oil and sludge from the stuffing box flange to ensure the correct contact between the stuffing box and the flange remove the protective cover from the crosshead as late as possible finally secure the piston rod foot stuffing box and telescopic pipe and mount the cinder cover。
47我的寅擎 04:52查看AI文稿AI文稿
颜料、老化、磨损都对起密封效果和使用寿命影响很大。 正确更换离心泵的密封填料是检修工和私泵工的一项基本技能,今天我们就来学习一下五步法更换离心泵密封填料。 第一步,拆除旧填料。操作前应停泵,悬挂检修作业标志牌,排净泵内液体,关闭水方水安全交出设备。 操作人员、劳保穿戴整齐。拆除田料压盖及连州气呼套,使用专用钩子清理出旧的田料,保证旧田 拆除干净。第二步,清理清理粘连在田料含轴套上的结疤、碎屑、污垢、毛刺,并检查轴的窜动以及轴套的磨损情况。 第三步,安装新填料。这一步是整个更换过程的关键,根据轴套于填料函的尺寸,新填料规格应比填料函间隙大一号, 使用铁管将其滚压觅食,这样不仅可以得到合适的安装尺寸,还对甜料进行了与压缩,可以有效的增强其抗泄漏能力,改善密封效果。 密封甜料要单圈下料,使用锋利的小刀言语,轴向成四十五度角的方向切断,切口平齐,并涂抹上润滑纸,以防松散。 切割好的田料一圈一圈的安装在田料含内,田料切口要垂直于轴向,相邻田料的切口错开一百八十度, 并使用工具将每一圈填料压实压平,保证其与填料含内壁贴合密实。最后一圈填料应与填料含端面平齐或略超出一至二毫米。为保证密封填 调料更换质量,安装新填料的每个环节都要清洁作业,防止填料、填料含混入沙土。第四步,调整 填料安装结束,回装填料压盖。在拧紧压盖螺栓时,应采用对称拧紧法, 同时盘动转子,感受甜料的压紧程度,进而细微的调整甜料压盖的松紧度,保证压紧深度不小于五毫米,且松紧适宜,转子转动灵活。 第五步,试运行恢复连轴器护套,打开水封阀,开泵运行。观察 甜料处泄漏量和甜料含外壳温度的变化。一般来说,泄漏量在每分钟二十滴以内,甜料含外壳温生变化平缓,即表示甜料更换成功。 如果泄漏量偏大,说明填料压盖偏松,需停泵调紧填料压盖。如果填料含外壳温度急剧上升,则说明填料压盖偏紧,那么就要停泵调松填料压盖, 调整至填料密封正常。清理作业现场,并做好更换记录。回顾一下五步法更换离心泵密封填料的基本步骤,一、插, 拆除旧填料。二、清,清理填料含轴套,并检查轴套的跳动和串动。三、装,安装新的填料四条,调整填料压盖的松紧度。 五、运行开泵运行,观察泄漏量及田料含温度变化,并完成最终的调整。 一拆二清,三装四条。五、运行五步法更换离心泵密封填料,你学会了吗?
193泵阀之家 12:14查看AI文稿AI文稿
overhauling the stuffing box on 42 to 98 mc engines 啊啊 dismount the cylinder cover see instruction book volume two procedure 901 loosen the stuffing box and piston rod foot mount distance pieces to protect the stuffing box。 the telescopic pipe is fitted either to the guide shoe or to the cross head pin if the telescopic pipe is fitted to the cross head pin, it must be disconnected and suspended before removing the piston and piston rod ensure that wear ridges are smoothed out and that any carbon deposits are removed also make sure that the piston cleaning ring if installed is removed from the top of the cylinder liner mount the lifting tool and lift the piston with piston rod and stuffing box out of the engine place protective covers of over the cross head and then the bottom of the cylinder unit remove the cover from the cut out in the gallery floor plate and land the piston on the support tool before starting the overhaul tape a new o ring to the piston rod above the stuffing box housing insert lifting eye bolts and lift the stuffing box to a comfortable working height mount the work table around the piston rod remove and discard the o ring loosen and remove the assembling bolts and the fitted bolts remove the stuffing box halves do not use a chisel to separate the halves as this will damage the contact faces press all ceiling rings and scraper rings down towards the work table push the segments together, so that the total ring in clearance can be measured at one point measure and record the clearances and compare them with the wear limits given an instruction book connect the hooking tool remove the springs and segments and keep them together in the same position as when they are fitted in the stuffing box clean and inspect any segments, which had to be used again the stuffing box is so designed that it has the same time between overhauls as the piston the lamillas and normally do for a placement at each overhaul while the ceiling rings normally only need to be replaced at every other overhaul after cleaning insert all sigments in their respective grooves in the housing and measure the vertical clearance with a feeler gauge the instruction book volume two procedure nine o two check the calibration of the springs see instruction book of volume 2 procedure 900 two check the surface condition and the diameter of the piston rod record the results for example on this inspection report, which is available from man b and w diesel lubricate the piston rod with malabadenum di sulfide check that the lamillas can be moved remove any burrs, which may have been caused during the measuring of the ring end clearance from the ends of the segments assemble all ring units, making sure that the markings on the various segments match each other to facilitate the mounting of the springs cross your arms before connecting the hooking tools remove any burst from the ends of the segments make sure that the guide pin between the ceiling ring and the cover ring engages correctly lift all the rings up the piston rod and use the stuffing box halves to adjust the rings, so that they fit properly in the grooves ensure that the ring end clearance is evenly distributed all the way around apply lubricating oil to the segments and to the housing press the stuffing box halves into place around the segments adjust the talk spanner to the value given in the instruction book finally tighten the nuts to the required torque and mount the o ring in the groove in the housing make sure that the guide pins on the distance pieces engage correctly with a stuffing box making sure the cylinder liner is clean mount the piston with piston rod and stuffing box。 as described in the instruction book reinstall the cover on the gallery floor plate remove the protective cover in the bottom of the cylinder unit carefully clean oil and sludge from the stuffing box flange to ensure the correct contact between the stuffing box and the flange remove the protective cover from the crosshead as late as possible finally secure the piston rod foot stuffing box and telescopic pipe and mount the cinder cover。
 09:05查看AI文稿AI文稿
remove the door to the crank case turn the cross head down far enough to give access to the piston rod stuffing box and the screws for the piston rod release the stuffing box by removing the innermost screws for stuffing box flange remove the screws from the piston rod mount the two distance pieces on the piston rod foot to protect the lower scrapering and to guide the stuffing box dismount the cylinder cover c procedure nine, one one or c video number thirty cylinder cover overhaul make a scratch mark in liner and piston and cleaning ring to ensure the correct mounting remove the piston cleaning ring carefully remove any wear ridges at the top of the cylinder liner c procedure nine o three one turn the cross head towards top dead center while checking that the stuffing box lands correctly on the distance pieces turn to top dead center the top of the piston is now free of the cylinder liner clean the lifting groove of the piston crown mount, the lifting tool in such a manner that the two fixed claws of the tool fit into the lifting groove of the piston fit, the third adjustable claw and tighten it up against the stop of the tool seat data one o two one lift the piston out of the cylinder liner lower the piston rod foot and stuffing box through the opening in the platform place, the two halves of the support around the piston rod and secure the two halves with screws land the piston on the support remove the lifting tool from the piston crown place, a cover over the opening for the piston rod stuffing box in the bottom of the cylinder liner c procedure nine o three one before dismantling the piston rings measure the free ring gap of all the piston rings take off the piston rings by means of the ring expander clean and inspect the rings and measure the radial width of the rings note down the results see the instruction book volume one chapter seven o seven clean the piston crown check the ring grooves the maximum vertical height in a worn ring groove must not exceed the value stated in the data sheet check the burn away by means of the template for maximum permissible burn away value seed data sheet one o two one mount the piston rings with the top bark upwards and the ring gap staggered a hundred and eighty degrees。
25海上小咖 04:17
04:17


猜你喜欢
- 17.3万人民日报