racechip安装教程
plastic engine cover will be two grommets on either corner to simply pull up to remove if you have an a and b connection on your harness connection a will be down here on the turbo inlet pipe right behind the radiator and the fans you can see the top of it right there in your b connection will be nice and easy to get to right here front and center on the motor and for the c connection you'll connect right here to the camshaft position sensor now to highlight how to connect the a sensor it's going to be the turbo boost pressure sensor to remove the oem boost pressure sensor there'll be one small red locking tab you can use a small flat head screwdriver or your thumb to grab that little locking tab after you've pulled that locking tab and it clicks you'll push down and pull back on the sensor to remove it you'll see it looks like a d will then take the race ship connection and take the female end of the race strip a connection and insert it into the male end of the oem harness insert until it clicks and then lock the red locking tab next up, we'll connect the race chip mail harness to the oem connector that we just removed and you're gonna want to push on until it snaps after the a connection has been securely connected we'll move on to the b connection and the b connection will be right here in the front of the motor on the manifold pressure sensor to remove your pull back on the gray locking tab until it clicks press down and gently pull back make sure you're pulling on the plug and not the wires you don't want to yank those out we'll take that oem male connection to the race chip female connection very important here the locking tab will go to the smooth side of the race ship harness not the side with actual mounting unit on it so smooth side into the locking tab wait till it clicks then lock it with the gray locking tab same application applies to the oem sensor go directly in with the locking tab facing up wait til it clicks and snap to lock and for the c connection we're gonna remove the camshaft sensor back here in the back then you're gonna pull back on the great locking tab until it clicks and then press down and pull back bring over the top of the solar rail, so it's easier to actually access take the female end of the race chip wiring harness again smooth side is the same side the gray locking tab will go on push until it clicks and lock down with the gray locking tab and for the male end of the race ship connection right back onto that same oem sensor push on till it clicks press the gray locking tab until it's on there and you can always give it a little check to make sure it's on there snug with the wire connections all made and secure next up is to zip tie the excess line that's very important that when you're zip tying if you're zip tying ending around ending electrical to not do it too tight you don't want to pinch any of the electrical wires it also applies to fluid lines as well and when you route the cable you want to make sure you're avoiding the hot or moving parts nothing burns or melts now trim the excess ends of the zip ties off of each zip tie next up is to mount the race chip in place it's very important when you're mounting the raceship to avoid any of the hot or moving parts as well as anywhere that can get moisture to it so you don't want to mount it down low in the engine you want to mount it up high nice out of the way for this application or you're going right next to the battery since the battery wants to avoid the same hot moving parts as well as the moisture so to do so we're first going to remove the d activation plug now you need to hang on to this if you want to revert the car back to stock or remove the race ship for any reason you'll put this in the place of the race chip so to remove the deactivation plug simply pull the fci plug to the left remove the deactivation plug and insert the race ship directly back into place it's very important when you first first insult the race chip that no leds show on the gts and that no green light shows on the s or rs this means you are getting power to the car and you may have a check engine light to mount the race chip we're gonna use the two longer supplied zip ties we're gonna mount under our mounting tabs here the really nice thing about these is you can actually go horizontal or vertical or even diagonal if you wanted to i'm gonna mount it right here on front of the battery on the two negative ground cables feed these two behind and pull tight until you're happy with relationship last, but certainly not least we're going to put the engine cover back on same way removed it find those four rubber garments in either corner gently press down。

粉丝2412获赞1.1万
相关视频
 01:27查看AI文稿AI文稿
下面教大家来如何安装苹果手机的那个 app, 打开 app store, 然后搜索 wish chip 关键字,选择第一个 apps 下载。 第一步,关闭手机的蓝牙, 点击添加产品,输入电脑编号, 在连接蓝牙之前,车辆必须在通电或者是着车状态, 然后会看到匹配码,匹配码就是电脑序列号后六位。 进入这个界面后,你会看到有三个模式,每个模式都有对应他的那个档位,选择好模式之后,点击右下角微调,然后你会进入到这个页面, 可以每条外挂电脑的档位,这个就是我们苹果手机的安装使用流程。
106MLCP 01:31查看AI文稿AI文稿
我们的外挂已经安装完毕了,我手上是瑞斯气普的一个说明书,我从来没见到过外挂有这么详尽的说明书啊,上面连你外挂具体安装在什么位置,扎带怎么扎,以及每个传感器的接法都有,真的就不怕施工店家水平不行,再搞不清楚传感器的位置。德国品质不光体现在产品本身,他连安装以及你施工质量都 会有一个标准,这让我们想起什么?让我想起了 kw 的安装说明书,非常响劲,不像我们财产甚至国产的避震就是一片 a 物质。我刚才用我旁边放着的这台电脑读了一下数据流啊,果然 外挂他是欺骗传感器,所以从数据流上面是读不出来任何读数的,一个不一样的情况,完全是一样的。所以这也是外挂危险的地方,因为 ecu 是不知道你车子的具体情况的,他是在欺骗传感器,因此呢,有一些关键性数据他无法调节,甚至啊连锁节气门这种自保都可能会受影响,这也是外挂危险的地方。我就是 想通过这个数据的给大家来看一下,就是他的一个目标,涡轮,涡轮压力跟实际涡轮压力是没有任何变化的,你是看不出来的,你不知道他实际上是打了多少涡轮压。 然后我相信大家最关心的其实是他的一个马力提升的一个数值,我们刚才原厂拉下来是两百八十二匹,三百五十九牛米,我们装完外挂之后再重新用马力基获得的数据是三百零二匹三百九十牛米,整整提升了二十匹三十牛米, 那这个提升我觉得还是相当可观的,因为我们四驱嘛,它的传统效率是比较差的,所以推算到机头,机头提升的会更明显更多。那今天这个外挂分享到这里就结束了,如果小伙伴们有外挂的需求的话,欢迎后台联系我们,或者上淘宝搜加速度 spide up, 我们下期再分享其他的案例。
 02:48查看AI文稿AI文稿
然后呢,这辆 a 四五今天改装的是这一个 rist 七普,德国的正统外挂,这个外挂是一个老品牌,如果有兴趣的话也可以后台私信我们问你这个车型的 啊。瑞斯七普他是有三个级别的,这个是最高级别的 gts, 官方说是能最大达到百分之三十的提成,所以今天我们上马力级来看一下到底能提升多少,当然他也有不同的提升段位啊,有一到六级可以调整,然后还有一种版本是支持蓝牙跟手机 app 调试的,他下面还有两个版本,一个是 s 版本,一个是 s 版本 啊,具体的我就不多介绍了,我们加速度淘宝店会上架,有需要关注的请上我们加速度的淘宝店,大家记住啊,上新店来看一下产品的一个介绍,那么我们现在先来原厂拉一下这个车他的轮上马力是多少, 然后我们再装上这个瑞士奇普的这个 gts 外挂,来看一下他的一个马力对比多少,然后我们再尝试性的这个外挂设 做一些变动,来看一下对于马力有没有影响啊,这个就是 ecu 了,干嘛不刷个直刷呢?直刷提升多大呀?今天分享率有点强啊,所以我顺便再给大家做一个分享,就是刚才说过了一个外挂跟直刷的一些质保政策的一些不同, 那有很多人就会问了,外挂更好吗?还是直刷有更多优势?那么直刷跟外挂在这里其实就是一个相反的,为什么这么说呢?如果你用的外挂可能不会影响你的质保政策,但是其实外挂相对于直刷来说它是更危险的,因为外挂是欺骗发动机传感器,它的一个数值有一点啊,就是它的空燃笔是没法修正的,薄油薄油薄油 合器过期,然后马力很大的话,这个发动机其实是一个很危险的一个状态。直刷其实主要啊,就是不但可以做大马力,最重要的它不是欺骗传感器的发动机随时随地知道你发动机内部燃烧情况的一个真实工况,所以它可以实时的做一些 调整。最重要最重要的就是所有的赛车电脑调教都有一点限制的,就是来麦达,就是我们一般用的调节软件里边的 afr 雷马达其实就是混合器啊,混合器内燃机所有的工况其实就是靠空气跟燃油嘛做燃烧,当然这只是指一个点啊,如果再展开的话,那这个视频就没完了,抖音嘛,短屏快,不能太长,所以我们就不继续展开了。但是大家要知道,直刷是可以修改一些关键数据,最重要的关键数据就是雷马达,那么外挂是调不了的, 所以外挂相对来说是危险的,当然有一个好处呢,就是 y 出现了危险,对吧?你索赔无用,但是谁想让自己的发动机坏掉呢?你想要一个大修的发动机吗?反正我不想。那我们现在开始吧,我来拉一下原厂的马力是多少? 我们刚才拉了三把,误差都在百分之一以内,还是那句话,这台马力记得一致性还是非常好的,我们拉起来是轮上马力两百八十四匹,扭矩三百六十二牛米。 好,以这个为基准,我们马上来安排安装瑞士气普的这个外挂,然后这个外挂刚才看了一下说明书呢,安装很复杂,因为 a 四五他的近期温度传感器在他的一个中冷位置,那一定要拆保险杠上公会才能拆,所以我们得把车开下马力金再重新去,他总共有三个传感器,那我们现在开始施工。
 00:18
00:18 05:18查看AI文稿AI文稿
on today's installation video, i'll be showing you how to install a race chip on the chevrolet one point five turbo four cylinder before installing the race chip please wait into their engine is cool enough to work on put your parking brake or emergency brake on if your vehicles equipped to the alarm system, please disable it pop the hood roll up the windows close the doors and press the lock button on your key fob and move that key fob thirty feet away, you're gonna wait about ten minutes after for all the electricity to clear from underneath the hood now for this installation our a connections go to our turbo boost pressure sensor down the bomb in the inner cooler our b connections go to our manifold absolute pressure sensor in the back of the motor and our d connections go to our mass airflow sensor right here on the air filter now we're going to use a nine thirty second socket to remove the plastic pan underneath the motor there's about twenty total screws then we can see our a connection going to our turbo boost pressure sensor it's right at the end of the inner cooler on the driver side you can see it here to unplug the oem sensor plug we're going to pull back on the white locking tab and press down you can see the white locking tab also has some red markings on it here which is easy to identify we're then going to take the female end of the race chip wiring harness that i've already fed down from above and plug that directly into the oem sensor plug the smooth side of the race chip wiring harness is going to plug into the locking tab side of the oem sensor plug like this here then we're gonna take our race chip mail connection and plug it directly into the oem sense that you can see sitting right up there now we'll cut to our b connection going onto our manifold absolute pressure sensor we're gonna pull back on the white locking tab and then press down or you can use a small pick or flathead screwdriver to help remove the sensor plug then i'm going to take our race ship wiring harness we'll take the female end and plug it directly into the mail end of the oem sensor plug locking in place with the white locking tab and then we'll take the mail end of the race ship wiring harness and plug it directly into the oem sensor and locking it in place with the locking tab the last connection we're going to make is our d connection going to our mass airflow sensor to do this we're going to pull back and then press down on the red locking tab take the female end of the race ship harness and lock it in place in the oem sensor plug then we'll take our mail end of our connection plug it directly into the oem sensor and lock it in place with the red locking tab now with all of our connections securely made that we're going to go ahead and install the race ship to do so we're gonna remove the deactivation plug by pulling on the fci plug now we want to hang on to the deactivation plug if you ever need to take the car in for any warranty your service work, you can remove the raceship and put the deactivation plug in place of the unit we suggest putting this in your glove box or center console now, we're going to install the raceship itself if you have a gts, it's important we get no led light up on the screen, or if you have the rs or s you get no green led to illuminate we don't want any power going to the device the first time we install the unit now we're gonna install our four mounting tabs they're really nice thing about these mounting tabs if you ever need to remove the race chip and put the deactivation plug in place, you don't actually have to cut the zip ties instead you can press down on the four corners of the mounting tabs and actually unplug the race chip from the zip ties and leave them securely in place now you're gonna use the longer of the two supplied zip ties to mount the raceship in place, you can actually go vertically or horizontally with the zip ties but for this application, we're gonna mount the two zip ties horizontally now when mounting the race ship, it's really important that we stay away from any hot or moving parts and we put the unit someplace it's hard for moisture to get so for this application, we found a great spot right here in the front of the car you can see a lot of the oem electronics right here so this is a good spot and there's not gonna be very much moisture getting to this location now we'll zip tie everything in place and making sure we're not zip tie too tight to pinch off any of the electrical lines then we're going to use the smaller of the supplied zip ties to mount the race chip wiring harness away from hot and moving parts just like the race chip unit and for an zip tide to any electrical or fluid lines, we don't want a zip tied too tight now we're going to trim the excess ends off all the zip ties to give everything a nice oem look start in the default setting the race ship for the first time you test drive the car if everything works great, you can then move the race chip to the next level up be aware that the car needs some time to adapt before releasing the full performance upgrade now get out drive and enjoy your race chip。
 06:32查看AI文稿AI文稿
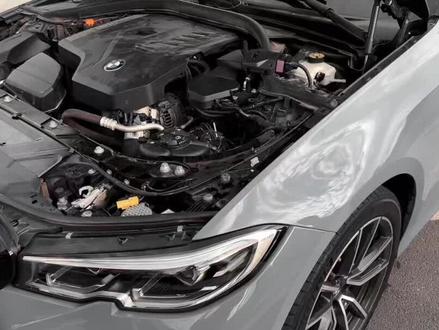
on today's installation video, we'll be showing you how to install a race chip on the brand new porsche 3 liter v6 before installing the race chip, please wait until your engine is cool enough to work on put your parking brake or emergency brake on if your vehicles equipped with an alarm system, please disable it pop the hood roll up the windows close the doors and press the lock button on your key fob and move that key fob 30 feet away, you're gonna wait about 10 minutes after for all the electricity to clear from underneath the hood first step on the install to remove our plastic engine cover to do so there's gonna be two metal locking tabs on either side we're gonna reach them with our finger hold down and away you see the locking tab right there there will be another one matching the same thing on the other side and just pulling away towards outside of the car that we can gently lift up and remove the plastic engine cover for this application our a connections gonna go to our turbo boost pressure sensor which can be located underneath this panel and our b's gonna go to our manifold pressure sensor, which is right here on the driver side on the motor now to remove this plastic panel there's going to be a few green locking tabs along the outside so those two white locking tabs on the inside we're going to use a body removal tool you can pick this up at a local auto store or you can use a small a lot head screwdriver going to be very gentle and let the tool do all the work we don't want to pry we don't want to break any plastic locking tabs so again just gently work our way around on the outside then we'll go towards the inside and get these white locking tabs as well again letting the tool do all the work and then we can move that see the locking tabs here now are going to take our a connection and fish it along the turbo inlet pipe to get the connections over towards our oem sensor plugs being very gentle we don't want to pull the wires from the backside of the plug it all we got them through like that our oem sensor plug is going to have a gray locking tab we're going to pull back on that first and i'm going to push down to unplug the oem sensor so i'm gonna reach my hand down in there go ahead and do that pulling back on the locking tab and pressing down and then gently pulling back you can see the oem sensor plug right there i'm gonna take the female end of the reship wiring harness now the flat side of the reship female end is gonna plug into the locking tab side of the oem sensor plug that in press into locks and then lock it in place the gray locking tab and then we'll take the race ship mail in and plug it directly into that oem sensor again lock it in place the gray locking tab next up is our b connection going to our manifold pressure sensor which is gonna be right here on the driver's side of the motor so we're gonna go ahead and pull up on the gray locking tab and then push down and pull away to unplug the oem sensor plug take the female into the ratiotip wine harness plug that in and make sure it clicks unlocks with the gray locking tab and take the mail end of the ratio porring harness and plug that directly into the oem sensor with our wiring connections securely made next step is to install the actual race ship itself so the first thing we're going to do is install our four mounting tabs the really nice thing about these mounting tabs is you can actually use the longer supplied zip ties to mount vertically or horizontally and if you ever need to remove the race ship for any warranty or service work, so having to cut the zip ties instead you can press down on the four locking tabs and the four corners to remove the race chip but leave the locking tabs and zip ties in place now we're ready to install the race ship so to do so we're gonna pull on our fci plug and unplug the deactivation plug now we want to hang on to the deactivation plug do not throw this away if you ever need to revert the carback to stock for any reason, you'll want to put the deactivation plug in place of the race chip we suggest bring that in your glove box or maybe your center console with the deactivation plug out of the way we're going to go ahead and install our race chip and lock it in place with our fci plug it's really important the first time we install the unit if you have the gts, you have no leds light up or if you have the rs or s you want no green led illuminating we don't want any power going to the unit the very first time we install the device using two longer of the supplied zip ties we're going to go ahead and mount the race ship in place mounting the race ship we want to stay away from hot and moving parts and we also want to put it into place it's difficult for moisture to get to so for this application, we found right next to the ecu to be an excellent spot next up is to zip tie the wiring harness away from any hot or moving parts they're going to zip tie to any electrical or fluid lines like we are here we don't want to zip tie too tight to pinch off the electrical lines or fluid and one of our final steps here is to trim the excess ends off the zip ties here everything a nice oem look now we're going to reinstall the side panel first thing we'll do is get our locking tabs the front line and then slowly work her way back starting with the outside and then working back to the inside last, but certainly not least is to your reinstall our plastic engine cover now we're going to do the opposite of what we did to install it we're going to pull our locking tabs all the way down and out and then just push them directly back on and lock them in place so we got from our grommet snapped and we'll just push our locking tabs directly on until they snap start in the default setting of the race ship for the first time you test drive the car if everything works great, you can then move the race ship to the next level up be aware that the car needs some time to adapt before releasing the full performance upgrade now get out drive and enjoy your race chip。
 03:34查看AI文稿AI文稿
哈喽哈喽,大家好,我是天文。经过前段时间的宝马集团的发布。呃,二零二零年七月份以后的宝马 ecu 已经加密了。呃,现在无法提入程序。 好,你打开窗盖主页的气孔,主要是接两个信号,一个是 a 涡轮增压传感器, 然后 b 晋级极管压力传感器,所以不需要任何的专业工具。安装的时候只要五分钟。 a 现在拔下来对插。 ok, 你看到对插之后,我们要把这个对好就可以了。然后这边 千万要这样,这样是正确对查。 ok, 好,这个 a 已经接好了,那我开始接 b。 一把下来,我们 ab 已对插好。之后,那我们最后一步就是插上他的 插上容器的主板。主板插好之后,我们开始找位置稍微固定一下主板。那现在我们开始打开车门进店。 好,由机子的安装。我们到此结束。那我们现在就开始启动车辆,然后开始去试驾。 ok, 我们来小段加速。都是封闭道路测试啊,来开始 哦。哎,这感觉很棒哦。 刚才的一个试驾已经 完毕。等一下我们讲解一下拆装。如何拆装。 ok, 那我们现在拆装 a 字器。我们现在拔下他的插头。这是地 还原车。 ok 了。那基本上就现在就是原车的数据了。最后一步,我们检查一下 人气部有没有拆完,然后轮胎有没有还原。然后我们就开始盖上一缸盖。 ok, 已经完成了。那我们看看那 vt 的拆装已经完成。 ok, 那本期的 vt 七五讲解到此结束。
 00:18
00:18 01:26查看AI文稿AI文稿
这台捷豹 xf l 今天到店施工, r 一 s 中尾段阀门排气以及锐气筒外挂电脑,让我们一起来看看整个施工过程和最后的施工效果。 排气已经拆下来了,这套 r 一 s 是中尾段双阀门排气,这是和原厂排气的一个比对。很快 r 一 s 排气已经安装到位。 r 一 s 排气为车主提供了这套首饰识别控制系统, 黄色自动模式,绿色阀门开启,红色阀门关闭,现在是阀门开启状态,踩油门 好,关门关开好。我们来看一下瑞士西部的外挂电脑, 厂家已经内置了七套程序来供车主选择,我们可以自行选择出最适合我们驾驶风格的每套程序。这里还暗藏了一个小机关,谁知道这是做什么用的?
1398戴较瘦的改装力量 02:00查看AI文稿AI文稿
最近我的抖音在评论区或者私信收到很多车主关于外挂电脑的一些疑问,下面我来一一给大家解释。第一个常问的问题,车主都会问我们测试出来的结果是发动机的输出还是轮上的输出?首先我们这台马力机是来自于新西兰的戴诺 pack 品牌, 是要把原厂的轮毂拆下来,然后装拼上去才能做测试的。然后我们通常会设定一个 tcf 值是一点一五,为什么要设定这个值呢?因为我打个比方,像这一台车,这里发动机然后输出来的数据会经过波箱,波箱然后再经过传动轴,然后再到轮胎 用这个数据基本上是按照百分之十五来推演出来的,所以我们是要用 tcf 一点一五来反推出发动机的输出。第二个问题,外国电脑对车有没有影响?有没有损害? 其实对于发动机来说是没有任何损害的,因为我们在做这个外挂电脑的程序开发之前,我们都会在满意上面测试,是经过了好几版的测试之后才最终推出市场,所以车主们你们可以安心的使用。 第三个问题,外挂电脑和缩写 e 接的区别。缩写 e 接大家都知道是通过把原厂 ecu 的动力文件进行修改,包括喷燃笔、点火、喷油、涡轮请求压力值等来提升他的原车动力数据。而外挂电脑他是通过欺骗原厂的 ecu 来提升动力数据。 但是外挂电脑有两个好处,第一,他不会影响你原车的质保,第二,哪怕你原车有 ota 远程升级,他也不会改变动力升级这个效果。还有一些稀奇古怪的问题,我就不在这里一一列举了。我做外挂这么多年,换了那 那么多钱,养了这么多人,投入了那么多设备,不就是为了服务好你们吗?现在我再重新告诉大家我们外挂电脑的政策,七天无理由退换货,两年发动机质保。最后还是那句话,想要知道您车的动力能提升多少,在评论区留下你的车型跟排量,我来告诉你。
 00:40
00:40


