neptune 校稿怎么reply

粉丝9068获赞1.9万
相关视频
 15:02查看AI文稿AI文稿
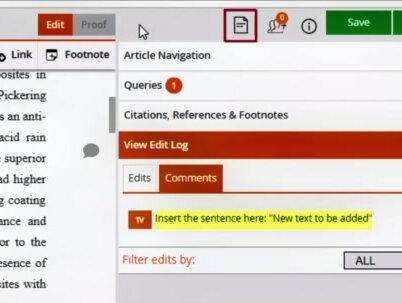
proof central a quick walkthrough welcome to this video tutorial about proof central elsevir's primary proofing tool in this video i will quickly walk through proof central features and functionalities and give you as an author a glance of how proof central works after you have received an email from else of your staff and clicked on the web link that is in the body of the text you will be guided to the landing page you see here this page holds basic information about your article such as the article title, the name of the corresponding author, the journal title, the article reference identifier used for internal reference within l severe and lastly the date when your proof became available apart from this information there are some general instructions and best practices that will help you to go through the proofing process smoothly click the green proceed button and the approval be opened in a new tab this way the landing page will remain available to you and will allow you to navigate between your proof and the landing page so you can refer to the best practices for your proof at any time after you've clicked proceed you will enter the proofing environment the first time you access the proof screen a virtual tour guide is displayed that briefly walks you through all the features the proof central provides similarly to what we aim to do with this video so for now we will skip the tour this is your article page here you can find the article you submitted presented by the proof central tool allowing you to make direct edits in the screen you can add and remove text and your changes are being marked not happy with your change you can easily undo your edit simply click on the edit and then click the undo arrow in case a copy editor has reviewed your article you can also see these edits displayed and even undo them if you feel the edit is incorrect when you click on a figure or graph it will open the image in a high resolution view mode providing you with a full quality view of the image and allowing you to zoom in and out the same as possible if you want to make an edit to your image, but for this you need to click the annotate image box in order to go into annotation mode and apply an annotation to your image if the entire image is incorrect you can also re upload a different image to replace the current image making edits to interest in a table is also very easy simply click inside the cell and remove or add data in the table cell you can also edit the text above or below the table directly you can even change the table format by clicking on the pencil icon this will allow you to insert or retract rows or columns and also gives you the option to merge and split cells and to adjust the text alignment in a table cell keep in mind though the layout is indicated by proof central in this html edit view is not how it will appear in the final version to get an idea of what it will look like you can click the proof view at the top of the article page, but we will come to that in a minute it is also possible to edit your equations when you click on the equation a math editor will open and proof central will allow you to edit the equation using a math editor tool or using law tech coding this includes inline equations as well if your equation was submitted as an image you are only able to make annotations to the equation similar to how you annotate regular figures proof central also makes it possible to change the author list including the affiliations and the associated footnotes to do so click on the pencil icon to open the edit screen in the right pane here you can add remove or edit author names the author's associated affiliations and footnotes changes made to the offer group will always be reviewed by the journal editor to make sure no invalid correction is being made by the corresponding author as an author you are also given the possibility to make changes to your reference list, but we will come back to that once we go into the citation's references and footnote section when you need to add a special character to your text you can do that simply by typing in the correct ascii or unicode for the character or click on the special character box at the top of the article page here you will find a preset list of standard special characters to choose from, but you can also pick more uncommon ones from the extended unicode list if you want to make a comment about something in your text for the editor or master copier to review then you can do so by clicking on the line where you want to place your comment? then click on the comment box at the top of the screen and enter your comment you can even attach a file to support your comment when you enter your comment a small speech balloon will appear on the location where you place the comment the actual comment will then be mentioned in the edit log, but we'll get to that later next to the comments box you will find the link box sometimes you might want to change or remove the url mentioned in your article or even add a new one in order to add a new url select the text you want to link and then click on the link box to open the link menu where you can enter the url? you can also edit or remove the url again by clicking on the linked text which brings you back to the linked menu proof central also allows you to add an article footnote or edit existing listing ones again place the cursor in the text where you want to add an article footnote? then click the footnotes link and the footnote menu opens up allowing you to place footnote text you can also edit or remove this length using the citations, references and footnote section we'll come to that in a minute the paint on the right hand side can be used for navigating through your article in the article navigation area you can navigate through your article on a section or figures and tablespaces next corrections in the text copy editors can also indicate queries they have for you as the author in most cases these queries require your confirmation on key parts of the article or on internal interpretations made by the copy editor in the queries section you can reply to these queries and the master copier will make sure that your input on these queries will be followed for the final version of the article remember i mentioned you can edit references and footnotes, citations references and footnotes is the section where you can make this happen looking on the reference in the references section of your article that you want to make a change on will bring you to this area automatically and showcase the reference to you here you can edit or even delete the reference, but you are also given the possibility to go to the citation of this reference in the article directly it works similarly for footnotes where you simply click on the designated footnote at the bottom of your article to go to the citation's references and footnote section apart from editing or deleting a reference proof central also allows you to insert a new reference you can add the reference as free text or let proof central generate the reference for you by adding all the reference details if you want to change the location of your reference citation you can also do this to do this click on the citation of the reference in your article here you will be given the option to delete the reference if you then want to add a new location where the reference should be cited simply place the cursor on the location you want to site select the checkbox of the citation and click site references the newly added citation location can be viewed when you expand the citation so you can easily navigate through your reference citations pro central will not allow you to submit your article without having all of your elements cited to accommodate this you can click on show unsighted all the unsighted references will be indicated allowing you to cite these references at the correct location in your article you can do the same thing for citing figures, tables, equations and footnotes off the edits made by you or other actors in the proof environment such as potential copy editors, co authors, journal editors or managers are logged in the view edit log tab every change made is marked with initials of the person who made the edit clicking on the edits will also help you navigate to this edit directly the same also applies for any comments that were made in the article e extra content tab displays the content that will be added to your article as an extra online content in this area you generally find highlights, graphical abstracts or other e only content you can provide your edits in the same way as you provide corrections to the text or images in the article page, the supplementary tab shows the epinnesses to your article you can download a supplementary file for your review if any corrections are needed or if the file needs to be replaced you can place a comment which also gives the possibility to upload a new file once your article has been corrected to your satisfaction you can preview your corrected article in the page central environment by clicking the proof tab in this proof few your article will be rendered in the journal layout displaying the corrections that you have made this preview is however, just an indication and shouldn't be considered an exact match with the final version of your article as typesetters will still need to do some layout corrections it is also possible to download this version of your article for your own administration by clicking the pdf button for a number of journals the page central service is not available instead proof central provides the author with the opportunity to download the original pdf and also to switch from the html editing mode to a pdf annotation mode by clicking on the viewproof button on the first page a link to the pdf annotation road can be found in this mode authors can download the pdf make annotations to the pdf using pdf annotation software and then upload this annotated pdf back to prove central next to the proof view you can also download a session report which is a pdf that displays the html view of your article including the corrections that have been made you can use this report as a reference to see all the corrections that have been made in your article listed in its actual article context one of the newest features in pro central is the collaboration feature as corresponding author you can now provide access to your article proof for additional co authors to also make edits to the proof clicking on the invite co author icon will bring you to this sub menu where you can enter the necessary details of one or more co authors including the proofing duration period and a personal message the menu also shows you whether your co authors have provided their input and how much time they still have left to make corrections proof central doesn't allow multiple editors in the proofing environment so when a co author wants to access an environment that is currently in use by you or a different co author that co author that tries to access the proofing environment will see a message in the screen that someone else is in the proofing environment, this co author can then ask to receive an email once the proofing environment is available for use you can save your article anytime you like by clicking the save button but proof central also automatically saves your changes in the background just to make sure you never lose any progress once you are happy with all the changes you have made you have answered all of queries and there are no more unsighted elements you can submit your proof by clicking the submit button your corrections will be incorporated in the final version in a few moments you should receive a confirmation email from proof central confirming the submission of your corrected proof if you are looking for more in depth instructions on how to use proof central you can make use of the help menu in the top of the screen or check our channel for other instruction videos if you still have a question, you can always contact our support team through the general help option at the bottom of the general instructions web page thank you for watching this proof central walkthrough。
79浅飞 04:28查看AI文稿AI文稿
相信很多人都有过因为错别字,错用标点或者错用语法等问题,被自己的领导和老师狠狠的批评过, 因为这些问题啊,属于大家所公认的一些低级错误,所以我们往往在递交一些重要的资料之前,肯定会做一个动作,那就是教稿。 而因为文字内容都是自己所去写的,所以自己在教稿的过程当中很难发现自己的问题。 这个时候我们一般会去求助自己的同事或者同学,帮助我们进行一个教稿,而作为人类的角度来说,他也很有可能在教稿的过程当中存在疏怄, 不可能帮你实现一个百分之百的准确教练。那么有没有一种可能就是在免费而且不求人的情况下,高效的 帮我们实现高准全率的教稿呢?当然有,今天同样本着将白嫖到底的一个原则,把这样一个小程序推送给大家。 因为我们大篇幅的文字基本上都是在电脑上进行编辑的,所以我们只需要登录微信的电脑版,然后找到小程序的按钮。 因为我之前使用过,所以有最近使用的小程序就是这个讯飞教队,如果您没有使用过的话,需要点击搜索按钮,然后输入讯飞教队进行搜索,然后认准这样一个小机器人的图标。这个时候我们打开来看一下, 小程序的界面非常的简单,最下方只有一个文字教对和一个使用说明,中间只有一个教验文字的按钮,上面分文本教对和公众号教对, 那么公众号叫对,因为咱们应用的比较少啊,所以咱们今天只做一个文本叫对的说明,初次打开里面会有一个范文来演示,标红的是为搜索出的有问题的字体,那么我们只需要把它进行一个清空, 然后这个时候再打开自己所要教练的文档, ctrl a 进行一个全选,然后再 ctrl c 进行复制,然后打开小程序, ctrl v 进行一个粘贴, 这个时候我们要教验的文稿就已经全部粘贴到了这个小程序当中,这个时候再点击教验文字, 稍事等待,我们会看到下方有拼写纠错共九项,语法纠错 一项,标点纠错十八项,我们点击拼写错误,会发现非常详细的标注啊, 位置第二行第七十五个字的变成这个的图也的我们来看一下啊,第二行第七十五个字,因为他会直接给你标注行数,我们第二行 第七十五个字,白舍尔德应当变成土也德, 其他的也是一样,都是根据他的行数,然后直接去找对应的文字就可以标注非常详细。咱们再来看一下语法纠错,同样也是第多少行,第多少个字有一个什么样的错误,应当 改成什么,包括标点纠错,我们来看同样也是指出了原有的标点应当改为什么样的一个状况啊, 这也是非常的简单好用的。那么这个时候我们只需要结合这样一个内容,在你的原有稿件上去进行一个修改,或者是直接在这进行一个相应的修改就可以改完再把你改完的文件 全都复制粘贴回你的文档当中就可以了,这是咱们这个小程序的一个用法啊,非常的简单,而且是全免费。好吧,这个小程序非常的好用,赶紧用起来吧,让你成为你的圈子当中文字工作做的最靓的仔吧! 当然在这还要提醒一下大家,这个小程序只能够帮助我们从形式上做好,做到完美而内容 深刻有意义,更多的需要我们自己去加强学习和调研,增强自身的一个底蕴,所以大家一定还是要加强的日常的学习和自身的一个累积。好了,本期内容就分享到这,他们下期再见, see you。
556从不充会员的咸老师 01:14
01:14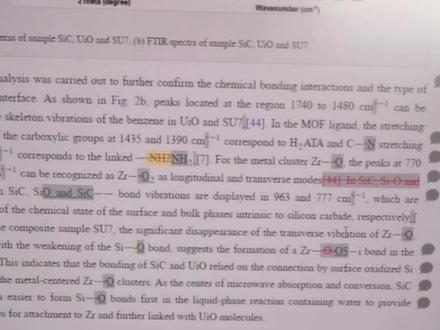 00:13查看AI文稿AI文稿
有时候真的想吐槽一下 svr 叫稿吗?他把我所有的化学键,单键双键全部都改成图片格式了,输出的 pdf 中这个还是乱的,在叫稿的时候想改回来还改不回来,还要一个一个一个做标记,真的烦死了。
463哥小D 00:54查看AI文稿AI文稿
论文投错了期刊可以推稿吗?呃,撤稿是完全可以的,但是需要关注文章处于哪个状态。如果文章已经通过了所有审稿环节,甚至已经开始排版准备健康了,又或者已经健康了,就无法撤稿了。 有的嘻哈只要文章进入校长阶段,就不允许超高了。所以只要文章没有处于这几种状态,基本都是可以撤回的。 如果文章已经进入期刊审稿的环节,就需要作者想暂时说明一下撤保的原因,必要时可能需要作者出具一份撤保申请,申请时要注意语气和礼貌,并感谢对方付出的时间、精力,并且说明撤保的原因即可。 找原因,合情合理,期刊都会继续理解并准许车稿。车稿这种行为总体来说是比较敏感并且不受欢迎的一种行为,容易给作者和期刊带来一些不必要的麻烦。如果是作者选看不合适带来的退稿就更加应该避免出现。所以选看需要谨慎。关注我带你去深究,不走弯路。
 00:20查看AI文稿AI文稿
这个是床单椅啊?这哪是床单椅?这哪是床单椅?错误,太尴尬了。这有错误?哈哈哈,你要找事情,哈哈哈哈。床单椅,真的,这是床单椅,再这样下去你就被全国科技馆拉入黑名单了。
2.5万南阳网 03:31查看AI文稿AI文稿
大家好,现在分享的是 sci 教稿指南,本次分享将从以下三个方面进行讲解,第一,什么是教稿?第二,如何教稿?第三,教稿时候注意事项。 首先我们来了解一下什么是教稿。 si 论文最终是发表出来,文章要坚定,完美无瑕,那是稿件,那经过特定的文字编辑或者排版之后,难免会有一些危险的失误, 所以在最终出版前,期刊会发来教稿文件,让作者进行最后的确认。教稿一共有两类,线下教稿或者是在线教稿。 首先我们来了解一下线条教稿。以同注入文件为例,在作者拿到教稿文件之后呢,需要核对两个信息,第一,核对名 字拼写有没有,有没有错误。第二,核对单位信息有没有错误。在这里特别要提醒通讯作者要单独核对一下他的信息,包括联系方式。 在作者核对信息之后,如果发现有需要修正的部分呢?那么就要在教稿文件中进行修改。 在教稿文件中需要补充三个地方,第一,需要补充录用的期刊。第二,需要补充录用的题目。第三,需要在下述文本框中把需要修改的部分进行编辑。 左侧这一列是错误的信息,右侧这一列是修改后正确的信息。在这里要特别提醒大家,对于需要修改的部分,需要你在左侧这一列用红色的地方标记出来,然后 后在右侧修改,之后用红色底色以及黄色标亮以来提醒细刊。这里列举出来了三个常见的错误,第一个, 科室、科室或是单位的错误。第二个,名字拼写大小写的错误。第三个,对于通讯的标识或者说共同作者的标识的一个缺失的一个错误。 接下来我们来了解一下什么是在线教稿。在线教稿跟线下教稿其实是类似的,在作者拿到教稿文件之后呢,需要进入在线教稿链接, 然后这个就是进入到在线教稿的页页面。作者拿到在线教稿之后呢,需要也核对三个信息,第一需要核对姓名,第二 需要核对单位,第三需要核对通讯作者的邮箱,如果有需要修改的,不妨直接在线修改就可以了。 最后为大家分享两点在教稿时候需要注意的问题。第一个,教稿的时候只能针对客户信息做微小的修改,例如简单的拼写错误, 例如需要删解作者或添加作者等等,期刊是不允许的。第二个,教稿一般是有时间限制的,一般期刊是给的时间是在四十八小时之内。 以下下述邮件为例,期刊明确明确标数了,需要在四十八小时内之内提交,所以在作者拿到教稿邮件之后,请务必及时的校对 并提交。本次分享到这里就结束了,谢谢大家。
47李晓凡 01:46查看AI文稿AI文稿
大家好,有这样一款软件,它能为你的文章查缺补漏,查询此店,还能将你的文章改写、翻译,古文转换。这么神奇的软件,想不想了解一下呢?就是这款蜜塔写作猫载着 器搜索,不用下载就可以使用。看看具体操作的步骤,点击上传文档,或者点击新建文档,再向文档内容复制粘贴上去。 因为我已经有历史记录,所以我就直接点击他。左上角的工具是修改文章的排版,右上角的工具是修改文章的内容,因为我的文档已经排版好了,所以我直接讲右上角的修改内容。全文改写旁 旁边有一个小开关,将它打开,文章就会在原文下方处出现一篇被被改动的文章, 改过的内容会标记出来。除了全文改写,点击他还会有全文翻译和古文改写的选项。点击文章教育,不合适的字词或标点符号都会被画上横线, 并且在文章的右侧还会给出修改的意见。有时还会有高级提示,不过只不过要知道高级提示里究竟提示什么,还需要充值。如果你想查字典的拼音、注视等,就点击查询。词典里面不仅有词语的解释, 还有国语词典文网络解释。今天的内容就这些,喜欢的小伙伴们动动手指点击关注吧!
32智兔剪辑


