粒子下雨动态壁纸怎么做的

粉丝1574获赞1.6万
相关视频
 05:40查看AI文稿AI文稿
好,首先来创建一个合成啊,幺二八零七二零, 这里的话有一个素材啊,以素材来创建一个合成啊。呃,然后回到刚才的那个合成,把刚才的那个素材把它脱下来, 这个合成啊,嗯,这里的话再去新建一个存折层,给他添加帕提克罗丽,那这一次我们用的是老版本的帕提克罗丽,然后刚才的那个素材可以把它关了,关了之后呢粒子这里面发射器啊改成一个框,发射器尺寸改一下,外轴的话为零, x 轴给它拉大一点,然后这轴的话也一起给它拉大一点啊,这里的速度的话就不需要了,速度随机的话也可以,不用,其他的都不用管它。这里的话把它往上拉啊,拉到上面去一点,这里有个点啊,可以拖动这个点。 好,然后这个例子的话在上方他并不会下来,对不对?因为他速度是为零的,那么这里的话我们来到最底下,这里有个物理, 物理呢,把他的这个重力给他提高啊,给他来一个一千二播放一下,这个时候可以看到这个粒子就往下掉啊,对不对? 然后去新建一个存热层啊,这个的话给他命名为地面啊,给他打开上方开关,按下 r 键,给他一个负九十,给他放下去一点啊,放下去一点,然后可以把他的眼睛给他关了啊,放到最底下,然后回到例子这里边, 在物理这里面把这个空气啊改成一个反弹,改成反弹之后呢,这下面反弹,这里面指定我们刚才这个地面,然后下面碰到事件,那这个的话去把它改成一个销毁,那么你可以先提前检查一下,看一下他有没有正常的进行一个碰撞,可以看到他正常的碰撞啊,对不对?那这里的话把他的这个反弹啊 改成一个销毁啊,这样子的话他碰到这个地面之后他就会直接消失啊,对不对?上方啊,这里面有一个辅助系统把它打开,打开了以后呢发射这个位置上改成一个反弹事件,生命值我们可以给他提高一点啊,比如说给他一个一秒钟左右啊类型,这里面把它改成什么呢?改成一个 这个纹理多边形啊,然后这个纹理这里面把它改一下,改成我们刚才的那个贴图,把他的这个羽化给他关了啊,尺寸给他开高一些,打开这个透明显示,我们来看一下当前的话呢,我们是没有看到我们这个纹理,对不对?我们需要还进一步的去进行设置 时间采样,改成一个从开始播放一次啊,现在的话依然是没有,我们需要在这个上方啊,在上方主粒子这个位置上啊,主粒子这里面把这个球体啊改成一个纹理多变形啊,改成纹理多变形以后,那么在这里面有个纹理啊,打开依然是重复刚才的操作 啊,去给他指定一下,然后这里边要给他改成一个播放一次啊,这样子的话我们就能够看到下面的这些波纹啊,对不对?好,然后他的这个角度是错乱的,那么这里的话在旋转这个位置上旋转 x 轴,给他一个负九十。好,然后呢我们这里的话去把这个透明显示给他关了。 好,现在对这个波纹这一层啊,给他肯佳丽复制一下啊,复制出来之后呢,把这波纹下面的波纹啊,先给他关了,选择这个粒子层,那么这里的话把这个粒子类型啊改回去是一个球体的,然后羽化呢,把它归零啊,下方的这个透明度呢,把它改回去到一百啊,随机的话给他一连 啊,尺寸的话呢给他降低一点啊,比如说在这个四左右就行了。然后呢我们现在的话回到下方辅助系统这里边,那么辅助系统这里面的话呢,有一个类型啊,也是一样的,把它改成一个球体的啊,下面的这些都不用管他啊,尺寸的话呢给他降低一点,那么这里的话给他一个三左右 啊,大小随机给他一点啊,然后透明度的话把它改到一百啊,透明度随机给他一点,好吧?然后呢我们再往下一点,这个重力的话呢,稍微给一点啊啊,稍微有一点点就行了啊,基本上 就差不多了。然后这里面有一个例子,速度啊稍微给一点,那现在的话我们是看不到什么哈,我们等下预览一下啊就行了啊,那我们来去播放一下, 这时你可以看到我们的这个粒子往下掉的时候呢,他碰到的地面他也会弹射出一些这个小粒子啊,然后这个重力的话需要去配合到我们的这个粒子的这个速度啊,这速度的话是一百可能不太够,对吧?我们这里的话给他提高点,就可以看到他弹射起来的这个距离就会更远一点啊,然后再来去播放下, 看到吗?啊?这个就是我们的这个粒子啊,然后呢我们这里的话去到上方啊,这个主粒子这里面这个颜色啊,去给他稍微改一下 啊,啊,这里面有一个粒子颜色,可以把它改成一个你任意的一个颜色啊,你想你想要的一个颜色都可以啊,比如改成一个蓝色的 啊,然后再往下辅助系统这里面这个粒子的这个颜色呢,我们就让他跟随着我们的这个主粒子啊,他这里的主要颜色呢,把它改到百分之一百啊,这样子的话就是遵从我们主粒子的这个颜色啊,然后再往下一点啊,他这里面呢有一个渲染啊,渲染打开这里面有个运动模糊 啊,打开了以后呢,我们这里的话去把它的运动模糊从这个合成设置改成一个开启,改成开启以后这边有个快门角度,我们可以设置为一百八十啊,快门角度越大, 那么这个拖尾就越长啊,我们来播放一下,对不对啊?由于我们的这个主力值啊往下掉这个速度非常快,所以呢他拖的就比较长,而我们下面的这个弹起来的这 这个例子呢,它由于它速度比较小,所以呢它这里面呢就没有这么明显的这个头尾了啊,我们来看一下,好,然后下方的这个波纹给它打开 啊,由于这波我们已经提前给了颜色啊,所以这里的话就不用给他改颜色了,如果说你需要改颜色的话,你就进去到这里面啊,对这一层啊去进行一个颜色的一个修改就行了,给他一个色调啊就行了,我们这里的话就不去做了,好吧 啊,前面这一半段的话是没有粒子掉下来的啊,所以呢?他这里面的话是不会有内容的啊,我们这里头打摄像机的时候你要注意一下就 ok 了。
2470ruyi 01:15
01:15 00:39查看AI文稿AI文稿
三 t max 自带的粒子系统制作下雨效果你们都有使用过吗?首先我们到标准基本体这找到粒子系统,点击喷射到窗口创建出来,然后移动好位置,使它在窗户的上方就可以了。第二步再去调整参数,四口技术设置为三千,渲染技术也设置为三千, 水滴的大小设置为一点二,速度设置为两百,变化设置为十。再到计时中开始设为负三十, 我们就可以看到这个雨滴的效果了。我们可以移动下方的时间滑块,就可以看到雨滴下落的效果。然后打开材质编辑器,把水的材质给上,开启渲染,就可以看到这样的一个下雨效果了,你学会了吗?赶快自己去试试吧!
454一个喜欢设计的小可爱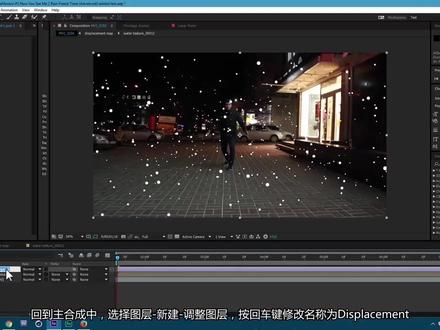 06:22查看AI文稿AI文稿
let's get started for this effect you need to have trap good form so let's import our footage go to file import file and drag your footage on this icon here it will make new composition then go to animation track camera you can also go to advanced and click on this checkbox here then analysis will be more detailed in order this is the work you need to shoot your video without anyone in background only you and none of moving objects okay we have a bunch of points let's select one of points which closest to our character write click on it and go to create null and camera we can delete this snow object but click and delete on the keyboard and now let's create new salad go to layer new solid let's call it form because this plug in we are going to use okay now select both of these layers and go to layer pre compose and let's call it displacement map okay double click on this composition and select your form layer go to effect trap code form now let's make some changes to our form plugin let's go to base form size x set it to twenty one hundred size y about a thirty and size z let's set it to twenty six seventy particles in x let's set it to seven particles in y let's set it to ten and particles in z let's set it to ten also and let's move center in this space now let's go to the particle look sphere feather set it to zero size to about ten size random to one hundred and transfer mode to normal i'll make some changes to disperse and twist i set it to two seventy as you can see it disperse our raindrops now let's make a texture for our raindrops in description to this video will be this link right mouse click on it and go to save image i already saved mine so i'm going to put it so go to file input file now drag our image here to create new composition then go to effect distort turbulent displays let's shut this effect for now and left mouse click on this icon and choose a lips tool now let's draw some circle click and hold also press shift on keyboard to make it perfect then select the selection tool double click on this point and move it to the center great now enable this effect and let's make some changes here also displacement set to turbulent smoother size, two two hundred forty hold out on keyboard and left mouse click on this stopwatch now let's type some expression type in here time multiply fifteen hundred and click anywhere you can close here select our layer and go to effect color correction exposure let's change it to about point five and also hold out on keyboard left mouse click on this stopwatch and let's type another expression i'll type wiggle twenty comma zero point, two close brackets and click anywhere now let's also add some curves effect go to effect color, correction curves and let's drag and make it a little brighter as you can see now we have this raindrop wiggle animation excellent now, let's go back to our displacement map composition and go to project here let's drag and drop our water texture here and we can shut this layer off now, we can go to particle look and change it to sprite and here in texture let's set it to our water texture and click okay, it will make your computer works lower so this option we will change at the end before render let's set it to sphere for now now let's go back to our main comp and go to layer new adjustment layer click return on keyboard and rename it to displacement then go to effect distort displacement map let's set it to luminance and here also luminance set it to ten here ten also here in displacement map layer set it to displacement map excellent now, let's make our rainfall and then stop so let's cut this layer just about here and create new adjustment player go to layer new adjustment layer, let's call it rain then go to effect simulation cc rainfall let's set it to twenty thousand size to about two c on depth to ten thousand speed to twenty seven hundred variation to one hundred and spread to nine oppositely let's set it to fifty five okay, now we have our rainfall and let's cut it here to this moment then let's go back to displacement map and set our xy click on stopwatch then press u on keyboard drag this keyframe a little further and change this position to about zero let's also activate motion blur and click here also to activate it select this keyframe go to graph editor and click here let's change to edit speed graph and drag this here now let's see result as you can see it blends with our original rain and stops and now we can go to displacement map go to form and change it to sprite it will take some time because of motor blur and discomplicated texture so set it to sprite only at the end when you're ready to render let's also change transfer mode to add and press t on keyboard change opacity to fifty five now as you can see we have pretty cool raindrops i can also go to effect color, correction curves and in blue channel i'll make a little warmer to make seem better and that's it this is how i made this effect。
63影视特效|张


