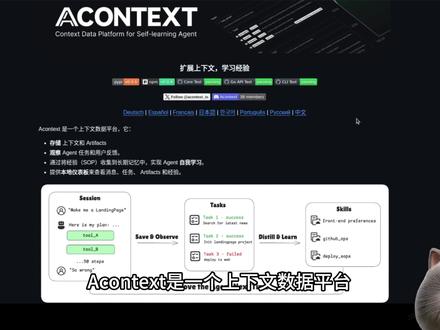
AcontextAPI使用教程
可以注意到在购里面我们大量的用康泰,什么其实这个东西啊,你光说用,那其实是非常简单的,他他核心 a 片一点都不多,你两次我加在一起就能把它数完。比如说第一个所谓的康泰斯 v 四八六,这个是拿来干嘛的? 一般来讲可以认为把它说是安全传递数据,就是你在不同的方法调用之间传递数据的,你可以理解为我传个 map 效果其实是一样的。然后呢,接下来就是 contacts with cancer 和 contacts with deadline 和 contacts with time 这几个 is cancel 大家应该能够理解吧? is cancel 的意思是我会有一个带的 cancer 的功能,那 is deadline 呢? deadline 大家应该知道吧?就是你的截止时间,还有 ista 帽超时时间,其实本质上他这几个都是用于干嘛的?用于控制你的练录的。

粉丝6.9万获赞59.5万
相关视频
 03:10177AGI_Ananas
 01:03查看AI文稿AI文稿
之前跟大家说过了,妞棒是可以用 pk 官方 a p i 来发布带货视频的,而且是免费使用,然后很多人提出希望增加一个定时发布功能,那么今天呢,这个定时发布功能也搞好了,给大家看一下。 进入工作台, tik tok 直连发布在最下面呢,增加了一个定时发布的开关,你希望在什么时间发布,就按这个时间定好就可以了, 系统就会在你定好的这个时间去自动帮你开始执行发布工作,非常的方便。另外在这里呢,还增加了一个可以赚积分的任务, 首次绑定店铺官方号或者渠道号呢,就会有一百积分。然后呢,就是通过这个 a p i 发布视频,而且是选择我创作的视频啊,自己上传的不算 发布视频达到一定的数量啊,分别就有一百、两百、五百的积分,整个任务加起来呢,总共有九百积分啊,奖励很丰厚,难度也不高,积分可以用来做 ai 视频,也可以用 ai 来作图啊, 非常的好用。之前呢,已经完成过绑定的,并且已经达到任务要求的,也都一样会收到奖励,今天呢,应该已经有很多人都收到了吧,大家可以到后台自己去看一下。
447西帅NeoBund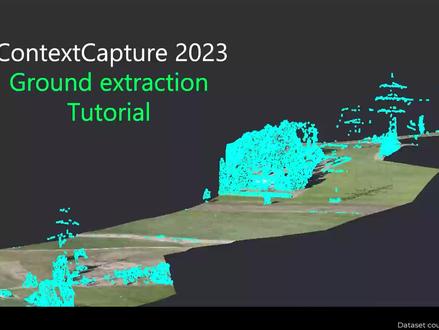 05:30查看AI文稿AI文稿
hello and welcome to this contest capture tutorial in today's video we will learn about the ground extraction feature that is available in catascapture 2023 to demonstrate the feature i will use this project that has already been processed with an first error triangulation and the reconstruction and the production of a reality mesh and a point loud you can see the resulting related image in the street view that's a corridor for which we want to extract only ground points the results of the grand extraction job in cottage capture is a classified point cloud in multiple formats for which we have two classes ground and non ground this can be further used in third party applications to create the terrain you can initiate the ground extraction process from a really dimension of or point cloud just look at the workflow buttons and spot the extract ground button the extra ground button will be enabled for productions of point cloud in opc and pod formats and for reality mesh of three sm and three mx formats so let's go back to our reality mesh production and start the ground extraction process by clicking on the extra ground button you will first be prompted with the choice of the ground detector for now we only have one detector that is applicable to most drawn surveys so you can just use the default one and press create this will create a new item in the analysis section of the project preview named ground extraction one you have multiple tabs the first one is the overview when you can see the status of your production in the setting stab you will be able to adjust the settings the most important one here will be the region of interest in case you want to extract ground only in a sub area of your project you can use the region of interest tool to draw a polygon to extract terrain only in this specific area similar to the tool in the rock construction special framework you will draw the polygon and press accept when completed for this particular project i will just discard this region of interest and we will do the ground extraction on the entire area so i'll just press the clear button here now that i am all set i can just go to the workflow buttons and press submit i am now prompted with the outputs i want to generate ah the outputs are segmented point louds so opc and context in our mandatory for display proposes and we can then produce las led and pud formats can select the special reference system in which i want my data to be produced and press submit the processing is then picked up by an engine so make sure that you have a kind of sculpture engine running and similar to a production you'll be able to review the processing status with different milestones, the running tests and the progress bar the grab extraction process is generally pretty fast in this example i have extracted the ground in about one minute for a project that contains 600 photos so now we can have a look at the results just go to the result tab to display the results here you have multiple layers the ratimish is displayed and on top of it you have the classified point clouds with two colors the purple for ground points and blue for non ground to help with quality assessment you can use the layers tool to adjust what you want to see on screen? you can toggle the really team mesh on and off and for the analysis you can choose which classes you want to display on screen in this deck preview there are no editing capabilities for the point loud classification so you will have to rely on third party applications to adjust it if necessary once you're happy with your results you can just press the folder button here to open the projection folders where you will find the different outputs you've generated thank you very much for following this tutorial and we'll be happy to hear any feedback you have on this new feature so we can further improve it later on thank you。
11瞰融信息 12:32497老纪的技术唠嗑局
 20:0536kate人不错


猜你喜欢
最新视频
- 1.4万漫威超级粉