领格n2手柄连接电脑方法

粉丝270获赞3665
相关视频
 05:32查看AI文稿AI文稿
各位同学大家好,我们今天来讲解一下 ps 二手柄的运用。首先呢我们来看一下 ps 二手柄, 他呢分为两部分,一部分呢是遥控器,另外一部分呢是接收装,遥控器呢只需要用电池供电就可以了,接收装呢需要用 i don't 用的供电。我们来看一下这个接收端,这一端他有什么端口,他分别是坚递 v, c, c, date 和 c m d, 然后 c s, c, l, k 这几个引脚。我们来看一下与 r d n 的接线 data 呢,它是连接的 i don't 的第二, c m d 连接的是 第三间地,连接间地 vcc, 连接五伏 cs, 有的呢上面可能标着它是 sel, 这两个是一样的,它接的是 i don't 的第五,再一个是 clk, 接的是 d。 十二,我们再打开米斯奇, 我们找到传感器,找到下面的最下面复式化 psi 手柄和 psi 手柄刷新数据。 然后还有两块,这块呢是判断上面的一些键值,键值是否被按住或者按下松开改变,这里呢每一个键值呢都有,除了这个之外,还有一个是摇杆值, 摇杆值呢就是左右两边这两个摇杆。我们接下来呢来看一下效果, 这个 psi 手柄刷新数据呢,也是要放在循环中间,或者放在促刷中间,不然的话就不会刷新数据,我们来上传一下,看下效果。 好我们来看一下,哦对了,还有一点要补充的,最开始的时候,如果你的这个 ps 设备它是没有商店的,我们先把它关闭, 这个上的时候呢,上面的灯呢是不亮的,然后我们可以看到这个接受端呢,他的绿灯是一直在闪烁,这时候呢就是没有连接, 我们呢,再打开这个开关, 打开这开关好打开了,接下来呢这两边呢就进行配对了,它自动配对了,此时呢这个绿灯呢就不亮了,这时候配对成功了之后,我们就可以试一下效果,现在呢我们来看一下, 可以看到呢,此时呢这个摇杆值呢,就跟随着我的控制这个摇杆运动,哎,运动, 我们再来测试一下其他的,测试一下按键吧, 如果, 如果三角形按住,那么就 打印一个创口,打印,打印一个。 hello, 这里有按住和按下,我们来看一下,点击上传。 好的,上传完了,我们来试下效果,我们按住这个三角形 可以看到呢,这个时候按住的时候呢它是打印。 hello, 松开呢就不打印,我们再来看一下按下的效果,我们点击上传。 好的,上传了,我们来看一下,现在呢我们将它按住,可以看到呢,只有在按下的这个时候打印词,然后后面他就不再打印了,就是我们按下的时候打印,其他时候不打印。 好,我们再来测试一下这个松开,松开呢他是和按下一样的,就是我们在开始按下,然后这时候松开的时候他是打一次,我们来看下效果。 好的上传了,我们来看一下,我们按住松开的时候呢,他就是打印一次, 然后还有一个是改变,改变的话就是我们 从没有按下到按下,它会打印词,然后从按下到松开,它有打印词,我们来看效果,点击上传。 好的,上传了,我们看一下。首先我们按下打印词,松开打印词,按下松开,按下松开。 好的,本节课的讲解到此结束,感谢大家聆听,我们下节课再见。
5达者为师 09:42查看AI文稿AI文稿
now we're going to take a look at the menu of the control handle we're now going to take a look at the menu of the control handle for the nano to this can be accessed by triple pressing the power button you can use the m key as enter the record key is back and the joystick to navigate so to start the wireless menu you'll find easy mode which will allow you to connect to nucleus motors or dgi gimbals you'll also find two point four g they'll see an option mode which will allow you to adjust the transmission strength of the system between low, medium and high as well as an option to directly change the channel that the handle is set to below that you'll find motor this is going to have some settings relating to both the focus style and the joystick you'll see the option for direction which allow you to change the direction the focus style is set to between clockwise and counterclockwise you'll be able to assign the motor number to the focus style whether that's motor number one or the purple led motor number two or the green led, three or the blue four or the orange you also see an option for setting a and b points all you'll need to do is find your a point press enter find your b point press enter and this will be held until enters pressed a third time you'll see the option auto cow which will automatically calibrate any connected lens manual cow allow you to manually calibrate the lens by finding the first position pressing enter finding the second position you'll see the same options for the joystick below that you'll find function as well allow you to manually calibrate the focus wheel going to turn this all the way to the left press enter and all the way to the right press enter you can also calibrate the joystick by pressing enter and then within 10 seconds moving the joystick up down left and right this is very useful in the case of joystick drift when we enter the menu by triple pressing power we can select the system sub menu for information regarding the firmware as well as the option to adjust the language of the ui and to reset the handle to factory defaults unlessly you'll find the mode option which will allow you to change between nano2 mode and gimbal mode and all that means is what the joystick is currently set to control whether it is a dgi series gimbal or a nucleus series motor now we're going to take a look at how to connect the control handle with the nano2 motors without a hand wheel so to start we're going to want to open up the menu by triple pressing the power button and navigating over to wireless and easy mode and then we're gonna connect one motor at a time double pressing the function button pressing enter and then once more double pressing the function button and pressing enter so now our motors should be paired to the same channel as the controller the next thing we'll need to do is navigate to motor go down to wheel motor and motor number and in this case we want this to control foot focus, which is currently set to the purple led i could either change the motor number if i want, but because this is already set to focus i'm just going to adjust this so it's motor number one and then same thing for the joystick i have this currently set to blue which is motor number three so i just want to adjust that so it's set to motor number three and the last thing i'll need to do is navigate to the mode menu and make sure this is set to nano2 mode so that the joystick will control a motor from there, i can exit the menu and i should have focused control with the dial and zoom control with the joystick now we're going to go over how to pair the control handle with the nano2 motors? alright, so in order to control the nano2 motors via the control handle first, we'll need to make sure both motors are paired the hand wheel and then we'll need to connect the hand wheel to the control handle you also want to make sure that both the control handle and the hand wheel are set to the same channel next, we want to enter the menu by triple pressing the power button going into function and then selecting mode and making sure that is set to nano2 mode in reference to what the joystick is set to control from there all we need to do is single press the function button on the motor to either green for iris or yellow for other and then the dial on the handle is now set to control iris while the joystick is set to control other so we're gonna take a look at how to pair the wireless control handle with a gimbal like the rs3 pro to start we're gonna open the menu of the control handle by triple pressing the power button and then we'll enter the function menu then below wheel cow we'll find our select mode you just want to make sure that that's set to g for gimbal mode after that it's gonna be the same pairing process as many of our other controllers get back into the menu and select wireless easy mode double tap the pairing button on the wireless receiver then press m to confirm once you egg at the menu you should now have full control of your rs2 or rs3 pro now we're going to show how to set up four motors with the nucleus nano2 hand wheel and control handle so as you can see we have these zoom lens with a motor on iris zoom focus and then we also have our fourth motor on a mirage variable nd so to start you want to make sure everything is powered correctly you want to run your power input into port 2 and then send power output from port 1 and then you also want to connect the hand wheel to the control handle in order to make sure these are communicating properly you can adjust the dial make sure your iris information is changing you're going to want to make sure the control handle is set to tf for tilta focus from there there's a few settings where going to need to adjust so we're going to enter the menu by triple pressing the power button first selecting wireless and then going into 2.4g and then channel and you want to make sure that this is set to the same channel as the hand wheel in order for everything to function properly from there we want to back out and select the function menu select mode and make sure that is set to nano2 mode which will allow the joystick to control a motor as opposed to a get mole so once that's all set up we're able to start the connection process swiping up selecting connect 2.4g channel we're going to manually search channel to and then we're going to double press the function button on each motor making sure that we wait for the motor to appear for selecting the next one we can scroll to see if that yep bottom motor is connected and press confirm give it one moment and now we can calibrate the motors you can do soak by holding down the function button however with this many motors we're gonna opt to calibrate each motor one at a time by holding the function button if any issues arise while calibrating you can always run another calibration now all we need to do is assign the motors by single pressing the function button we want to make sure our iris is set to green our focus is set to purple our zoom is set to blue our mirage motor is set to yellow from there we can now control the focus via the main wheel we can control zoom via the zoom rocker we can control iris via the dial on the control handle we can control our v amp d via the joystick。
102TILTA铁头 07:00查看AI文稿AI文稿
哈喽,大家好,今天分享的就是这款格斗大摇哦,那这个是有典故的哦,有个网友呢,拜托女友帮他找,就是 ps 四的大摇杆,因为他要玩全款,是他是一个格斗玩家哈,但是他说就是一直没有一款好的大摇杆来衬托他的格斗实力,因为像这种直接格斗大摇的话,其实大 动车都是要六七千到破万,其实都是不在少数啊。那我今天帮他找到这一款,我觉得也蛮适合跟大家分享,因为他是全霸推出的,他这个型号是 n two 独风哦,那他的优优点跟特色就在他自愿 pa 三 ps, 而且未经拿来试过全款十四真的很好出招哦。 它的价格来说相对又比市售的这种直接格斗大的来说便宜很多,因为它只有台币两千多块的价格。好,那废话不多说,现在看下它的配件有什么吗?好,配件的话非常简单,好,就是一本说明书跟大摇。好,那接下来我们来看 这个摇杆的部分。好,这样拍摇杆的部分的话,他用的是全八自主引爆的摇杆跟他们的按键,他总共是八件设计,然后他摇杆的部分的话,他软度算是比较适中,而且搭配是原版的,尤其是这个声音,我蛮喜欢的,给大家听听看 哇,他的摇杆声音其实还蛮好听的,而且敲起来话其实也算是蛮顺的哦,在我们可以去看一下,就是摇杆的前端这边的话,其实他这边有一个让你放松 手的地方,出入之外还有一个小巧石头,就是它里面的话还可以藏线好,所以说它的 usb 的连接线材是可以直接塞进去,所以在打斗的过程中,其实外面的话其实不会有线材去伴着你哦,其实 我觉得还蛮不错的。好,再我们看一下上面这排功能按键好,在上面的话有 psps 的一个切换键哦,可以以上的游戏机类型去做一个调整,再次需要键哦,在 ps 三模式的话代表是选择键,然后再是 f 三键, cpo 键的话是可以针对不同的按钮的,去做一个淋巴设定好,中间的话就搭手机的 ps 键好,再是 模式键啊,三键还有一个选项键哦,同理,在选项键在 ps 三的部分的话,代表就是搭建哦,最后一个标特别地方就是他有一个锁定键哦,锁定键的话要分啊,上锁跟解锁好,那所谓的上锁就是指说如果你以后要打比赛的情况下,你就把它调整成上锁,因为他会禁止掉这个射箭啊, bs 键,还有科博键,功能键等等, 我就说不让你作为一些比较特殊的一件粗招等等的操作。好,接下来我们就接到 ps 来操作,给大家做一个参考吧,好在 有人用这个 psb 来给大家做一个测试哦。就怎么样连接,其实非常简单,就是你先把他的 usb 先拉出来好,再就是把摇杆的部分调到你的游戏机哦,现在我把它调到 ps, 然后最后边的部分呢,先把它调整成解锁键,让他做一个识别,完了之后我们就只要把 usb 插上去 好之后呢再按一下中间的 ps 键好,这样子呢摇杆就可以连接上去啊,这时候我们就可以去做控制好,那接下来我们就挑一下这个 拳王十四的部分啊测试,给大家参考一下这个摇杆的一个粗招的一个灵敏度好加利友试一下拳王十四给大家参考一下啊!那大家可以先看一下摇杆的灵敏度其实非常好啊,就是小跳跃啊,跟粗招都是没有问题的啊。好,那我们就试一下简单的连招啊 啊 好,就是不管是绝招啊,小招啊好,或者是一般的就是呃组合技,其他操作起来都是非常顺的哦, 好,那再来就是上面一颗淋巴箭头,比如说我们现在亲手的部分,我们要做淋巴,我们就是按住这一颗再选择特保健好,这时候放掉啊,你再按住的话就是可以淋巴好,所以这部分就是属于是呃淋巴的一个操作了。那接下来我们再试几个 这个组合器,给大家参考一下他的这个粗刀的部分。 好,这位大叔一下淋巴的功能不,你可以通过这个上手机的地方把它往上调整,这个时候淋巴功能就会失效啊,就算你按住这个按键再去选择 这波线,也是完全没有反应的。完了,这摇杆其实他非常好上手,就是 usb 插到你的主机对应你的机器的开关,这样子就可以直接做使用了哦,那今天是举这个球网是做一个测试啊,当然你也可以用在不同的游戏,因为它整体来讲手感的操作其实是真的,我觉得非常的不错哦,建议大家如果有玩 ps 也玩格的话,可以试试看这组摇杆,因为 鸡皮子来讲我觉得是算偏高的啊,这部分也是给大家参考一下好价格,那说明一下不只是可以用在 ps 三, ps 也可以加到桌垫或笔垫都是没有问题的啊,那盖线是塞在这个里面,我现在把它拿出来给大家看,就是你可以看一下长进去还是外露都是。 ok, 那我先挑一个是定的这个格斗酒器给大家做一个测试啊。 好,大家可以待会稍微看一下,就是不管是小招连续击或者绝招他都是很快就可以出来哦,不会说有那种延迟停顿的感觉哦, 就这部分话可就稍微给大家做一个参考,就是不管是用 在就是刚才提到就是小刀啊,连续剧然后举刀啊,真的好,个人实测的话我觉得超重的手感是非常不错,我就会给大家做个参考。好,这次也到尾声了哦,基本上就是整体来讲操作的手感我个人觉得还不错啦。好,当然就不会还是要大家自己去试才知。 我难忘跟大家说到就是如果你是老玩家应该知道就是摇杆玩久一定会有这个松脱的问题,然后这边是有做一个开口,我们可以把这地方转开 好把它取下来之后呢啊,这边的话是可以针对腰杆的部分的,如果松脱的话可以从这边去锁紧,那这个部分的话就是一开始跟他提到就是细皮质很高哈,瘦下来就是抬臂两千出头哦,那他的长按咨询我会把它放在里面的下方大号进去可以看 调一下。好,那这部分的话我觉得摇杆的部分虽然我个人觉得好粗大,但是每个人的使用的手感的话还是会有一点点不同,所以建议大家如果有兴趣的话也是自己去实际呢。玩过敲过才知道他的感受, 就告一段落了,我们下一次影片再见。拜拜。
112獅心瘋Leo 00:11
00:11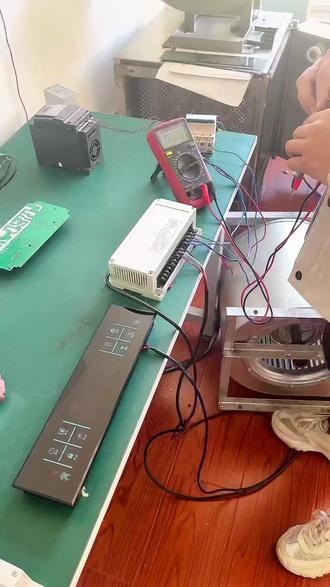 01:53查看AI文稿AI文稿
接下来给大家介绍一下领格触摸屏,我们来通三百八电,这时屏幕已经通电,我们启动电源, 启动开封,这时候已经启动起来了,这时候屏幕爆故障,那我们来量一下外部电压, 火线与火线之间三百九,三项电压没有问题, 火线与零线之间二百二也没有问题。这个时候的话是风机向絮保护了,也就是这时风机是反转,那我们要调整一下线序,这个时候我们断电, 这是我们来调整任意一根火线的线序 们通三百八电, 这个是我们在启动电源,没有包错了,让我们启动台风, 风机运气正常,那在这个时候如果说换一部电,缺一下电, 突然掉了一个,掉了一个电, 这个时候等于缺项了,然后这个时候风机又开始启动保护脱贫开始保护了,现在是缺项保护和相距保护。
