maya怎么导出动画资产

粉丝3.6万获赞24.6万
相关视频
 01:51查看AI文稿AI文稿
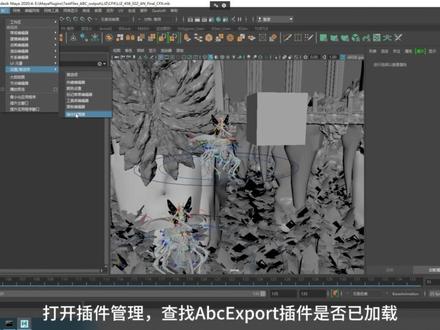
运行 made up, 打开某个分镜场景,先查看菜单缓存是否有 alumbic 缓存子菜单,在缓存菜单只发现几何缓存,没有 alumbic 缓存菜单。 打开插件管理,查找 a、 b、 c、 x 脖的插件是否已加载。输入关键词, a、 b、 c, 搜索 a、 b、 c x port。 如果没有加载,请勾选已加载和自动加载。 再次打开菜单缓存, the landbag 缓存子菜单已经出现, 先选择一个带动作的模型, 先播放场景, 预览下动画效果。 执行菜单缓存 a limbic 缓存,将当前选择导出到 limbic, 根据您的实际需求设置缓存时间范围,其他设置暂时就不修改了。为了演示,我勾选了所有的高级选项。 设置好文件名称, 点击导出当前选择完成操作。 生成完成后,可以在查看刚刚生成的 a、 b、 c 文 键。学会了吗?下个视频向大家介绍下如何使用 python 从 mate 中导出 a、 b、 c 动画文件。
124游戏创作大陆 03:52
03:52 00:10查看AI文稿AI文稿
玛雅的文件导出设置,为什么你导出不了 out 格式的文件?点击窗口首选项插件管理器,勾选 f g x blog 就可以了。
245建模小虾米 06:11查看AI文稿AI文稿
我们来看一下蓝牙的保存还有项目设置。嗯,我们比如说做好的一个模型保存, ctrl s 就可以了,它会 保存的话有 m a 和 m b 啊,按进去是 m b 啊,一般都是存 m b 会比较快,比较小,然后你自己去选位置啊,选位置存哪里?然后名称是什么? 上名称之后呢?点零存就可以了,然后这个文件呢,就会把保存到你自己选的那个位置,嗯,大概是个这样的 m b 点 m b 啊,然后命令的话呢,在这地方有个保存 保存场景,保存场景的亮这边啊, ctrl s 啊,你可以另存一份,如果你存过了的话呢,你像 ctrl s, 它会覆盖掉我们刚刚那一份 文件啊,这是这是上面显示有就会覆盖掉,如果上面没有显示人家你点保存这个,这个就是保存啊, 点保存他会让你选位置啊,因为你没有路径吗?目标点嘛,就存不了,然后打开的话呢?嗯,如果你选这个打开, 然后去找这个打开,那么他问你要不要保存现在这个新场景啊,现在是空的,他就会显示这个路径,看到没有, 你现在去保存的话,他会直接存进去。嗯,然后另外一个打开方式就是这样丢进去,那丢进去的话呢,是没有路径的,看到没有,如果你丢进去的,点保存的话呢,他还是会让你另存。 嗯,所以这有一点小小的区别啊。然后导出的话呢,你选择你要导的文件也会导出当前选择或者导出,选 这里一个导入啊,导入就是导入其他,导入是导入其他的文件,打开是打开 mar 的文件,有什么导出导出导入都一样的,这边可以导出或者导入 m a, n b, 然后还有其他的一些格式,常用的 f b, x 跟 o b go 这样做, 如果你没有这些格式的话, fpx 跟这个 obigo export, 如果你没有这些格式的话呢,可能在你的这个窗口出现一项,有一个参与管理器,打开之后呢,里面搜这个 obigo 就会有一个,比如导出的这个,你给他打勾就行了,然后 f x 是一样的 f x, f x 码呀,这个这是游戏的,这个就是这些啊,不用管它,这你是多勾多勾上, 默认的都是勾上的,你如果看到的话就不用管这些东西了,一般都是不用管的,这俩都是自己打开的,是导入导出,因为他的那个项目的话呢,是这样子的, 你点这个打开文件,这边会有一个当前项目啊,这个项目呢,就是我们的这个 全部设置,只有那一些比较复杂的东西的时候才需要你做一些简单的,是不需要的啊,它里面有这么多文件啊,默认的你刚创建玛雅就会给你一个项目,这个项目在文档里面一个玛雅,玛雅里面有一个 project 这个地方的,然后这里就是达摩人的项目,莫克思贝斯工作空间啊,达摩人就是在这里面,你点这个,如果你要设置项目的话呢,你就必须存在项目里面的这个盛世里面, 你设置的项目就不可以乱存了啊,长期必须存到这个里面。嗯,设置项目的话,你可以自己重新设置,这里有个设置项目, 比如说我们想设置在这个,嗯,我们在这个这个里面点一个,其实不要有中文。 好,我在这里面设这个项目,我就把这个路径呢贴上去,然后就选这个就可以了啊,设置,然后他会跟你说这个里面不包含这个一个电影文件,就是这个 walk space m 一幺这个文件,你点这个创建, 然后,对,就不管他,然后这边 刷新一下,看能不能出来,没有吗?那我们来看一下他到底设置好了没有啊?啊?没有设置到,是吧?这里面公众区。 呃,反正我们把它拿到这个 e 盘下面去啊, 试一下这个文件位置,你觉得他说实话我觉得他也是不喜欢,说不定就好了啊,好了啊,不要有中文啊, 如果有中文的话,他可能就会出现一些问题啊,然后这里面没有东西,你再点这个文件,有个项目窗口就会出现一个这个项目窗口啊,这里就是我们刚 策略项目位置在这里,场景就是这个,我们所有的蚂蚁文件都存在于场景里面,对应的东西放在对应里面,你看现在是空的,对不对?点接受啊,然后就会呗出来很多东西啊。那现在你在打开的时候,这边就可以切换到这个,或者说这个 就有不同的项目了,追逐项目,然后你看一下这个设置里面,如果你要存码就存这里面就行了,这样就不需要自己去找位置了。 当然这个还是先说的,就如如果不是一些比较麻烦的项目,我们简单做个小道具什么的,这种东西是没有任何意义的,没必要设啊。把这个项目关掉的话呢,就是删除掉这个项目的话呢,也很简单,你选择这个纹理夹,这个大纹理夹啊,直接把 删掉就行了,就行了,就没有事了。没关系,他这里你再去选他,你找是找到,但是里面是没东西的,他刚刚的记录还在,切回这个默认就行了。 项目你有需要的去设置,没需要就不需要去设置。好吧?这个就是这个。嗯,保存呢?导入导出,还有项目设置。
46🍄蘑菇🍄 01:23查看AI文稿AI文稿
ok, 今天我们来分享一下麻药软件,做完我们的模型之后呢,如何打包成一个压缩包,发送给我们的合作伙伴,或者是发送的其他的电脑去打开呢?首先呢我们要做完场景之后呢,在这里左上角,在这里文件 往电池后打开之后呢,有一个我们的场景啊,先把场景另从到我们需要打包的用场景文件。 对啊,是这个问题啊,是打包的一个问题,然后呢我们把它定从一下场景定从位,然后是在这里文件夹哦,把这个门打开一下, 打好之后呢,秘密一下我们的场景啊,就是串,然后点顶葱,爆葱之后呢,然后我们在文件底下有一个我们的硅档场景,看到没点击这个之后呢,我们的文件夹里 就会出现这样一个压缩包,这个压缩包就是根据我,我们把这个秘密一定要改一下哦,改成我们的这后面点 m b j, 点 n b, 把它关闭掉,删除掉,然后点会车双击打开我们这个压缩包, 然后呢又会导致回到这里啊,然后呢这里啊包括他所有穿的一个模型都会在这里贴图帮我们一起打包在一起了, 包括我们的一些截图,所有的路径都会打包收集在一起,然后这就是我们的一个妈呀的一个场景文件啊。 ok, 今天就分享到这里,你学会了吗?
253西安云造建模师 02:04查看AI文稿AI文稿
在上一个视频里向大家介绍了如何从卖了中导出 a、 b、 c 动画文件,但是批量导出 a、 b、 c 动画文件就需借助派早来实现。打开脚本编辑器, 可以看到之前那些操作对应的脚本命令。这里介绍一个小技巧,为了实现某些批量操作的功能,先手动操作一遍,在脚本编辑器上找到对应的脚本命令。以导出 abc 动画文件为例, 在脚本编辑器上可以找到他的命令 a, b, c, x pro 和使用的参数。接着我们可以参考这部分命令来编写派葬脚本。新建一个派葬编辑框, 输入代码 important, c m d s c m d s 这段代码表示导入 爱的命令库。根据之前的技巧,导出 a, b, c 动画使用的命令叫 a, b, c export。 设置参数 j 的值 参数 j 的值。我们直接复制了手动操作时候生成的参数值。 修改下输出的文件名称, 全选拍房代码。 点击编辑器上方的运行按钮,运行代码。 新的 a、 b, c 文件就通过 python 从 mate 中导出来了,学会了吗?
 01:02查看AI文稿AI文稿
性动补数据怎么应用在麦尔制作动画?在动作捕捉系统 wedymo cap 录制动作数据导出为 f b x 文件格式一,自动重定向将 f b x 动补数据导入麦亚, 将模型导入脉啊,因为模型骨架与动补骨架标准一致,模型与动补数据自动匹配,模型动补数据驱动效果展示。 二模型与骨架无法自动匹配,可将模型与数据进行角色化,将模型与动步数据导入麦亚,给模型创建角色定义, 将模型各个节点定义到 common ik 骨骼中。 将模型作为角色,动补数据作为原,就可以播放数据查看动补数据驱动效果了。
111广州虚拟动力 02:38查看AI文稿AI文稿
当你在做项目时,如果说你做了一夜没有保存,你的心情是什么样的?你崩溃不崩溃?对,你肯定是崩溃的, 所以说呢,今天我就给大家讲一下,在我们这个麻鸭里面,我们如何去避免出现这种情况, 说别到时候有同行再去做项目的时候,还是说做了一夜啊,忘记保存了,或者之间停电了,或者软件给崩溃了,怎么办呢? 是吧?是不是很崩溃?软件崩溃你的心,你的心态也崩了,对吧?都想把电脑给砸了。我们这 这款软件呢,为我们提供的有一个设置,什么设置呢?我们可以去自动保存,也就是在窗口里面找到设置首选项,在窗口里面找到设置首选项,点击首选项, 然后在弹出的面板里面去找文件项,在文件项目里面 滑动这个滑块,在这呢就会有一个自动保存,当前是没有启用的,我们要把这个勾给他勾上去, 我们勾上去之后呢呢,下面才能够解锁,也是下面这些属性呢,我们才能够去激活,然后才能去修改。 下面有一个保存之前是否要提示你,这个可以不用选择,还有限制自动保存也不用啊,最重要的是下面这个 时间间隔,也就是几分钟保存一次是吧?你可以设置成五分钟,十分钟,或者是三十分钟保存一次,这样一来呢,我们的文件呢? 哎,你再去制作的时候,如果说你设置十分钟保存一次啊,到了十分钟他就会自动给保存一分,然后再过十分钟又会保存一分, 这样就避免我们出现更大的损失,对不对?有通过这个我做项目一天没有保存,忽然之间停电了,或者电脑给崩溃了,软件给崩了,软件崩了还有办法去解决,说如果说停电了, 那就麻烦了啊,这就是我们这个自动保存的一个方法。
230新乡云博教育 00:15查看AI文稿AI文稿
之后我们选择角色最上面这个层级,在 fire 菜单下面选择 expert selection, 在文件类型里面勾选 anime equals, 然后勾选 double 和笔漏,在英文路径下输入一个英文名称即可。
27产奶的的黄药师 00:39查看AI文稿AI文稿
玛雅小技巧,很多同学在拿到客户资产时并非瑞格文件,很多情况以额兰贝克形式纳入资产。在这种情况下,如何获取当前物体的位置信息或约束成了一大难题。如何解决此类问题?我们可以点击 indosseticslogue 搜索马首,勾选马首,选择模型中的两条线,点击 dfo 马首 borace with the surface attach, 创建小球,做复制约束,管理好画动画,一起来试试吧。根据问题,百度搜索随机应用。
9CG阎明 23:21查看AI文稿AI文稿
all right welcome so i've had a few people asked me how i did this animation look in on the verse, because it looked so great and i wanted to show you it's actually really simple so what i've got here is it's got a scene it's animated by jody pros it's really really great animation and using the rig from eye animate so really nice to them to do that and they share the file for me and so first thing you want to do if you want to get going is you want to help you see install omivers in the beta you can get in exchange tab here and there's a whole bunch of stuff to load what we're going to use today is obviously the connector for maya, i'd recommend getting the cash one as well because it just helps if you're going back in your scenes and stuff that makes it quicker and create create was the thing that we actually rendered it out and look at it in so those are really all you need that there's a bunch more you can get of course there's tons coming and the bait is pretty cool, but definitely pick those up once you've installed the connector and you go into maya you'll see a little omniverse menu here and it's really a simple as basically the problem at this point is we need to turn this scene into a usd file and there's a lot more you can do with it connected to different people and all that stuff but in this scenario of just trying to get a playblast to look cool, we want to make our scene a usd file so you can see i've already made a few of these, but just to do the process again if i was to do you know whatever, we want to call this test and you want to make sure you have different settings here in this case because we're bringing out our animation you can do different things here but properly totally fine i'm gonna hit export all i obviously it's very much like my you can do as you would expect export different things use the animation the frame range from one and three eighteen up that's right and materials i'm gonna keep and i'm gonna actually keep my cameras so i don't have any lights in this team but i do have a shot camera and so i'm going to hit go after i yeah i think that's all i need to do so pretty straightforward i hit export and what'll happen is it starts converting that to usdfa right so as that's doing that we can actually jump in to create it doesn't take too long it's just gonna crank through it and honestly this is something that you have to do once and then once you create it's fast if you're working with my and you already got the usd plug in installed you know do i just save as usd so once we've converted that sucker over we're going to end up going into crate and here we go so in the launcher under the library tab create a hit launch and it's as simple as that and it's going to load up and all the way we're going to try to do is take that play blast one and turn it into looking something like this looks pretty darn awesome and when you see how easy says you're gonna always want to do this with your playglass so let's close that up creates launching here and as i said in that launcher tab there's a bunch of stuff you can get you can experiment with different ones view is really nice got some nice view for architectural, stuff and skies and things i was playing with minecraft with my kids you can convert and load minecraft anyway, getting distracted let's go get in here and show you what we're doing so we're in create pretty straightforward canvas here what i'm going to do is get a news stage from template and i'm going to pick one of these and it makes it super simple so i'm going to pick cloudy day and really all that does is it just sets you up with a skydom right and so you've got a nice skydome of a city this case this city is not really gonna work for our dog shot if you remember in maya, the dog was sitting on a green ground there so if we go here and in the dome skydom late you can pick a different file path or you can browse over here if you'd rather but i'm just gonna go here because it's simple file i'm gonna pick my local host don't connect anything here in video brings you a bunch of examples which is really cool and so under assets skies there's a whole bunch a ton of them right you can go into different studios and storms and all the rest of it for us i'm just gonna take something simple and clear and grassy this one kind of looks like an interesting one let's try that yeah that'll work fun so we're just gonna pop chase into this now you can see there's a gray square here which we don't necessarily need so yeah there's a ground cube i'm just gonna kill that i don't need that i don't need to distantly that really just need this guide them and it's all set up for me nice and easy so at this point we're ready to go it's just like maya what we're gonna do is we're gonna add a reference like you would with bring it in and the nice way to doing this is if i add my reference and my dog tutorial here here he is and if i bring him in right or no it's this one if i add the dog in the new one that we just exported what you're gonna get is basically because it's a reference i can tune stuff and i can grab my dude here and frame in so you can actually see them you can tune different things like textures lights, whatever and the reference will just stay there and if you need to for instance update your animation all you need to do is go into maya change your animation save it as your usd file and when you come back in here and you hit reopen will be ready so actually let's hit save and we'll call this call this some things so it makes sense right, so we'll just call this dog tutorial hit save and i already made made one so it's like are you sure you want to do that and yep we do and so now the next time i just have to hit reopen and it will update the usd file and through the reference and we're good to go now the next thing you'll notice is chase is plaque i did this with some different examples from like turboscoating, etc and the doors works fine in this particular case it didn't bring in the path to the texture so if i click this little guy and get the orange one and click again i'll select by object mode so this is kind of like the whole world and this is object mode and on chase if i hit the little shader ball what i'll notice is that this texture path is not pointing to the right one it's as simple as that so if i go into my computer and i think a bookmarked here roughly dog played at there we go and if i pick the color map now he's looking pretty good right and you'll notice that like his collar and stuff aren't and if i scroll down here there's yeah there's a different ones here so simple as that so going to i folder color map and just because i had a bunch of these all on different bits like his collar etc i just have to re point them map i'm sure there's a better way to do that again i'm learning along with you so if you guys have tips and and know more by all means share but that's as simple as that so chase is looking pretty good already and now we want to get into the fun stuff so if i hit play he's obviously moving and doing this thing and you'll notice that the timeline thing will just hide and unhide depending where your mouse is so that's cool the other thing i notice is because they brought in as a reference it doesn't update the timeline to the end because the world itself where he had a timeline so i'm just gonna type in my time length here and i'm good to go with that so there you go there's this whole shot the next thing i'm gonna do is probably start lighting him right because i think we're good to go and the lighting is honestly it's really simple so if i switch this to path traced already the skydome is gonna be doing a bunch of cool stuff and there's my shot camera so let's bring in a couple lights just to make it a bit more interesting right because he's walking around doing his thing, but you know it's kind of flat right and so if i i go and i create a disc light it's going to make this gigantic disc light for us i'm just going to bring it over here and bring it around and sort of give them a bit of an upload effect going on maybe make this a little bit smaller something like that so he's got his uplight and then just so we can see obviously this is a bit nuts, so let's make it blue or something so we can really see it right super blue sure and maybe take this down to something more reasonable like three thousand or something like that so now we get blue and right, but now already you're in this scenario of maybe you want to start lighting from the oxygen camera so you can see what you're doing i'm just gonna call it some blue because we're gonna give him not just one like because it's gonna not look super good if it's just flat, so let's just duplicate this and sort of give him and control d to duplicate by the way and i'm just gonna move this one over oh my yeah w for move and e for rotate and all that fun stuff but what i'm gonna do is gonna give him a bit more of a you know cartoony kind of studio fun lighting so let's give him sort of a down light maybe here, maybe make this one a little bit bigger just so we can see it let's make it like bright pink and then let's switch to the camera here and see what it looks like now right away you're going to notice it's kind of blurry this kind of freaked me out the first time i did too right now in the beta, you have to go in here and dial in your focal distance kinda neat, so actually let's change this back to real time so, so we can see it faster but even in real time you can mess with things like lenses right, so here's a focal length and if you know about your cameras it's a distance to a sphere of focus right, so i'm going to bring that out, but you can mess with like how sharp the background and the drop off of all that stuff is which is pretty crazy right, so that's not bad but you're gonna notice if you think so one obviously the lighting is crazy bright and everything we can tune that but two he's shiny and three like this color's speckled and so there's a few things we want to just tweak a little bit so let's get in on chase himself and let's start with that color because what i talked about so you can rather in smoothing stuff in maya and doing all that so if you look here in maya you can see chase is pretty low rest and i did that for animating and that's totally fine like scrubbing around and stuff, but you probably want to uprise him so rather than doing the smooth groups and everything here and let's just close mine because we don't need it anymore you can do that all here so you can grab this collar and scroll down just a little bit and there's a refinement tab turn that on and let's just make it a subdieve the capital clark and already it's nice and smooth and if you want it to go crazy you could turn that up to a one and similarly the chase is already looking pretty decent because he's got the captain clark going on, but if i just turn that on it just looks a little bit nicer, so let's do that yeah make chase look cool, okay, super simple we're ready to do our lighting obviously he's shiny, so if you click on him click on this ball takes you to your shader and you might want to you know crank up the roughness a little bit, so that it's not so super shine, right, so let's try like a point eight or something like that where it's a bit more soft and a specular of course will influence that as well and then the last thing i'll show you is a couple little tricks here, so on the rtx settings i'm just going to hit reset, so it's the way it is when you get it okay, so it's all reset i'm on real time right real time this is really quick but if i go into my lighting and the first thing i'm going to do is i'm going to say use my dome light and that's using your actual skydom light right, so that's it's been optimized for speed there's something that you want to turn on if you're using your skydom you can see the difference in the lighting already is quite drastic i don't have anything reflective, so there's no point putting in reflections, but you can the other thing here is the max roughness so again it clamps out for speed if i put this up to fully mine, as well, it is so fast it doesn't matter anyway, that's something that i like to make sure you do and the other thing you can do here is costics and translut i don't have any other stuff in this scene, but you can mess with for instance like turning on the gi here, so you can see almost no difference it's really sort of super subtle, but there is some bounce and fill going on so you can turn that on it's i can't hit so fast it doesn't matter so much will keep the quality up and by default there's ambient light and in this case, i'm just gonna turn it down because you know do i want ammune light or not it's up to you and so you can hit these little blue buttons if you want to reset that so something to be aware of sometimes you want that on sometimes you don't in this case, i'm gonna just gonna turn it to zero because i'm just gonna light it myself and make it look good okay, so he's probably looking pretty decent already, so if we go back to the camera and again if you switch back and forth, so this is path traced right fully crazy render and if i hit play it'll drop down a little bit and it's doing some cool, ai denoising and stuff but when you let it go it just settles in really nice and my focus distance obviously a little soft there, but looks pretty cool but the crazy thing for me is the real time is just as fast and shots like this and muscle just keep it there and it renders super quick really fast the last thing i didn't do on my real time one is you'll notice a couple little spots and a little tiny differences from from the patrick's ones so if you take this enabled sampled light and turn it on it'll use that same sort of thing and look at that just cleans it right up and it's super nice and again this is real time like you can scrub and play and they get good to go so i mean other than just changing the light, color now and making it look a little better we're already done, so that's pretty cool i you know my disc blue let's make it an orange or something just to come you know contrast the blue so you can do some pretty crazy stuff here right like if we make it really thanks orange and you get some something cool going on there you can take your blue one and you know crank it up a little bit you do whatever you like right so i'm like i get too carried away there the other thing i wanted to show you though just while you're here and you're looking is some stuff i still stumbled on so under this local host that comes with it under in video remember we showed you the skies but rapis i i saw a vegetation as i hang on what's vegetation and so i'm just gonna pop back to my perspective camera so we can move around a little bit and check this out this is where it gets crazy so if i load up my shrubs and stuff like ah okay there's trees and palm trees i'm not really gonna work for this scene but maybe i don't want just a pure green cartoon background like it was fine for a playblast but you know with the background maybe i can do something cool here so if i pick in the shrubs here something that matches this i don't know maybe let's check this guy and he just drag it in and immediately it's there, it's crazy and you can see it's lying on its side it's massive and so lying on its side got a rotary around x so let's do minus ninety there we go and just shrinking a little bit it's kind of crazy bring them in and so there's obviously you can do this and bring in whatever you want you can use your own stuff you got stuff from somewhere else that's totally fine but they've given you a bunch of examples all right, so muscle make use of them and by the way they look fantastic so like that grass fine whatever, if i grab this back to world space i can select the grass control d right just or duplicate like maya move it over here and make me make a smaller one you know and it's like my you can you can grab both of these guys right, so i have two of them i can grab them both control d and i get now i got four right and like you can do all that stuff right, so that grass is cool that i don't know let's grab this when you want to fall in short one this tufty stuff kind of looks short so let's grab a short one drop it in whoa that's pretty cool and you'll notice that it is massive and again it's just different scales this particular one here and you can see this thing when i want to show you here is that he's pretty big for grass right but if we put him behind chase and we look through the camera here you notice how soft it's looking because obviously if i bring it closer it's in focus and it drops out of focus because of that focal distance that we did right and like this is just moving it i'm not not doing anything it's just crazy how good this looks so you can position this stuff put it where you want and obviously i don't want to kill it silhouette but put it where you want and then dial in your focus to get it the way you'd like right so on the camera there's these two settings your f stop which will help you on the sort of the bumpers here right and the actual focus distance of where i'm focusing so if you can think of this as sort of the fall off and the other one as sort of exactly where you're focused to so you can you can really dial and see those plants are really soft but as chase sort of steps forward he's looking too soft because now he's he's these beyond that range right so you can dial that in what you like so that's cool last thing i'm going to show you quickly and then we'll do the cooking show thing where we jump and show you the final result is now that i've got grass and everything this plane is starting to look not super grid so materials here there's a base obviously you can do this in substance or whatever you want but what i found is there's a bunch of material already here so i was just exploring and i found a bunch of carpets and i'm like okay well, i could make a plane here plane and it's literally on top of the green one so let's just move it up slightly point on two and so my plane here i could make it you know whatever in these carpets but this forest one kind of jumped out of me obviously so if i just drag that and drop it on the plane it's going to pop in the forest and then you can see that my other plane is still showing up so you can go in here and the eyeball just hide it quickly now my forest plane that i just brought in this forest color is obviously just a little bit off so you can you can mess with how much this elbito adds to it and you can mess with either of these colors you can tint it here for instance and like start making it more yellow and whatever you like obviously if i sort of dial it in you can do that and then turn down the ad and really sort of tune it to where you want now this is obviously a little bit too brown whatever, but my point here is definitely explore a little bit there's a lot of cool stuff in here and so what i'm going to do is jump to the one that i had opened before let's just hit save so that we can come back if we want to, but if i look at how i sort of tune it up and watch it quickly slow it's like boom we're in done oh the last thing i didn't show you was creating a sound file so uncreating audio sound it's gonna drop in a sound and we've already done that here, but here's your sound file just browse to the wave right and flip these guys to linear and non spatial spatial sound is like if you've got three three hundred sixty angry sound and all that like you know dolby almost nonsense, i don't it's just a lip sync file and the attenuation it just works nicer and down there obviously in linear because again it's just a lip sync file it's nothing crazy so if i hit play now it works great and the last thing you need to do is export it to get the thing and that's super simple so if i go rendering movie capture you give it a name like dog tutorial right, he had captured and it's gonna be done ridiculously fast so it's i would say it's probably faster than playblast at this point depends on your scene it's super faster it's way faster and rendering it and it looks fantastic and you can mess with the lights and all the rest of it it and at the end there it's already done i didn't finish my sentence and if i go in here there's my dog tutorials and this is what it looks like so pretty darn great right, so i'll post this video on youtube so you can check it out i went through a lot of little things here again, you're gonna find that once, you know this stuff it's way quicker you can obviously show and hide different types and get into a whole bunch of details there's a bunch more i didn't cover so definitely check out the videos and envity has done a great job of teaching you all the different things, but it should be as simple as that export you're used to bring it over bring it in add some lights hit render right, so i hope that helped and enjoy, thanks。
 01:36查看AI文稿AI文稿
玛雅如何创建路径动画? 我们先打开一个飞机模型, 缩小一些, 创建一条曲线作为路径, 按住 shift, 同时选中飞机和曲线, 切换到动画仕途, 在约束中找到连接到运动路径, 我们的飞机就动起来了,但是方向不对, 切回到经典仕途, 选中曲线,在属性栏中找到 motion path, 勾选跟随并更改世界上方向类型, 调节方向扭曲,再看一下效果, 大家可以再测试更改其他属性。
447大平


猜你喜欢
- 1613酷家乐王一